
Notification settings New notifications
ecommerce website design nz|our back-end developer David shared a method today, how to build a payments system with React and Stripe to your own company website.
full stack developer Kevin wrote the post • 0 comments • 586 views • 2020-04-06 00:05
Whether you’re implementing a subscription-based service, an e-commerce store, or a crowdfunding solution, Stripe offers the flexibility to get it done. We’re going to build a small proof-of-concept payments system to enable one-time purchases on a website.
By the end of this tutorial, you should be able to set up a backend and frontend for processing online payments in your React app.
Requirements to follow along
This tutorial requires that you have the following:
Node installed on your computer
A Stripe developer account
Basic knowledge of Express
Basic knowledge of React Hooks
If you do not have Node installed, you can get the latest version from the official website. All the code written in this tutorial can be accessed here.
Stripe setup
If you do not have a Stripe developer account, you can get started for free by signing up for an account here. After signing up, complete the following steps to get set up:
Select Developer integrations on the How do you want to get started? modal
Select Accept payments only on the next modal
Check the One-time payments option on the next modal
Finally, check Build a custom payment flow on the last modal
You should now have a base account set up. You can update the name of the account by clicking the Add a name link at the top left of the page.
You’ll need to copy your Publishable and Secret keys from the dashboard and store them somewhere, because we’ll need them very soon.
Building the payment server
Before we go ahead with building the React app, we’ll need to set up a server to handle payment requests.
We’ll need to set up a RESTful endpoint on an Express server, which will act as a middleman between our React code and the Stripe backend. If you’ve never built an API before, don’t worry, it’ll be pretty basic as we’re not implementing a production-ready backend here.
Let’s get started.
Create a new project folder and name it whatever you want (I’m going with react-stripe-payment)
Open your terminal in the folder and run npm init -y
Install the dependencies by running npm install express dotenv body-parser stripe
Create a folder src under the root folder by running mkdir src
server.js
Let’s create the server to listen for payment requests. Create a new file called server.js under the src folder and paste the following in it:const path = require('path')
const express = require('express')
const bodyParser = require('body-parser')
const postCharge = require('./stripe')
require('dotenv').config()
const app = express()
const router = express.Router()
const port = process.env.PORT || 7000
router.post('/stripe/charge', postCharge)
router.all('*', (_, res) =>
res.json({ message: 'please make a POST request to /stripe/charge' })
)
app.use((_, res, next) => {
res.header('Access-Control-Allow-Origin', '*')
res.header(
'Access-Control-Allow-Headers',
'Origin, X-Requested-With, Content-Type, Accept'
)
next()
})
app.use(bodyParser.json())
app.use('/api', router)
app.use(express.static(path.join(__dirname, '../build')))
app.get('*', (_, res) => {
res.sendFile(path.resolve(__dirname, '../build/index.html'))
})
app.listen(port, () => console.log(`server running on port ${port}`))
Let’s break down this file section by section.
const path = require('path')
const express = require('express')
const bodyParser = require('body-parser')
const postCharge = require('./stripe')
require('dotenv').config()
Here, we’re importing the required packages. You’ll notice that they are all third-party imports except for postCharge, which is being imported from a file called stripe. We’ll create that file later.
dotenv allows us to read sensitive information from the Node process so we don’t have to hardcode secret values in our code.const app = express()
const router = express.Router()
const port = process.env.PORT || 7000
We’re initializing a new Express instance into a variable called app. We then create a new Router instance and store it in a variable called router. This is what we’ll use to define the payment endpoint.
Finally, we initialize a new variable called port and assign it a value from the Node process (process.env.PORT), and if that is undefined, it is assigned 7000.router.post('/stripe/charge', postCharge)
router.all('*', (_, res) =>
res.json({ message: 'please make a POST request to /stripe/charge' })
)
app.use((_, res, next) => {
res.header('Access-Control-Allow-Origin', '*')
res.header(
'Access-Control-Allow-Headers',
'Origin, X-Requested-With, Content-Type, Accept'
)
next()
})
app.use(bodyParser.json())
app.use('/api', router)
app.use(express.static(path.join(__dirname, '../build')))
Remember the router we initialized earlier? On the first line, we set up an endpoint called /stripe/charge and assign postCharge to handle all POST requests to this route.
We then catch all other requests to the server and respond with a JSON object containing a message directing the user to the appropriate endpoint.
Next, we define a middleware on the app instance to enable CORS for all requests. On the next line, we attach another middleware that enables us to parse JSON objects from the request body.
Then we tell our app instance to use the router instance to handle all requests to the /api endpoint. Finally, we tell Express to serve up the /build folder. This folder will hold the transpiled code for the app’s frontend.app.get('*', (_, res) => {
res.sendFile(path.resolve(__dirname, '../build/index.html'))
})
app.listen(port, () => console.log(`server running on port ${port}`))
Here, we’re telling the app instance to handle all GET requests by serving the index.html file located in the /build folder. This is how we’ll serve the frontend in production.
Finally, we spin up the server on the port we defined earlier and log a message to the console on a successful startup.
stripe.js
We’ll then create the postCharge handler we required in server.js above. Under the src folder, create a new file, stripe.js, and paste the following in it:const stripe = require('stripe')(<your_secret_key>)
async function postCharge(req, res) {
try {
const { amount, source, receipt_email } = req.body
const charge = await stripe.charges.create({
amount,
currency: 'usd',
source,
receipt_email
})
if (!charge) throw new Error('charge unsuccessful')
res.status(200).json({
message: 'charge posted successfully',
charge
})
} catch (error) {
res.status(500).json({
message: error.message
})
}
}
module.exports = postCharge
Let’s break it down.const stripe = require('stripe')(<your_secret_key>)
Here, we initialize a new Stripe instance by requiring the stripe package and calling it with the secret key we copied earlier as a string. We save this instance in a variable called stripe.async function postCharge(req, res) {
try {
const { amount, source, receipt_email } = req.body
const charge = await stripe.charges.create({
amount,
currency: 'usd',
source,
receipt_email
})
We then create a new function called postCharge. This function is a request handler, so we have to take in two parameters: req and res.
We then open a try catch block inside this function. We destructure all the variables we’re expecting to be sent along with the request from the request object; in this case, those variables are amount, source, and receipt_email.
We then create a new variable called charge. This variable holds the result of an asynchronous call to the Stripe API to create a new charge (stripe.charges.create).if (!charge) throw new Error('charge unsuccessful')
If the result of the Stripe call is a falsy value — undefined, in this case — it means our payment request failed, and so we throw a new error with the message “charge unsuccessful.”
res.status(200).json({
message: 'charge posted successfully',
charge
})
Otherwise, we respond to the request with a 200 status code and a JSON object containing a message and the charge object.
} catch (error) {
res.status(500).json({
message: error.message
})
}
}
module.exports = postCharge
In the catch block, we intercept all other errors and send them to the client with a 500 status code and a message containing the error message.
At the end of the file, we export the postCharge function using module.exports.
That is all there is to the payment server. Of course, this isn’t production-ready and should not be used in a real application processing real payments, but it is enough for our current use case. Let’s move on to the frontend.
Building the frontend
Since we’re done building the payments server, it’s time to flesh out the frontend. It’s not going to be anything fancy since I’m trying to keep this tutorial bite-sized. Here are the different components of the app:
A router component
A products list component
A checkout form component
Let’s get started.
Run the following command to install the required packages:
npm install axios babel-polyfill history parcel parcel-bundler react react-dom react-router-dom react-stripe-elements
In the project root, run the following command:
mkdir public && touch public/index.html
This will create a folder called public and create an index.html file in this new folder. Open the index.html file and paste the following:<!DOCTYPE html>
<html lang="en">
<head>
<meta charset="utf-8" />
<meta name="viewport" content="width=device-width, initial-scale=1" />
<meta name="description" content="React + Stripe" />
<title>React and Stripe Payment</title>
</head>
<body>
<noscript>You need to enable JavaScript to run this app.</noscript>
<div id="root"></div>
<script src="https://js.stripe.com/v3/"></script>
<script src="../src/index.js"></script>
</body>
</html>
If you’re already familiar with React, this should be nothing new; this is simply the entry point of our app. Also notice that we import the Stripe SDK in the first <script> tag — the Stripe SDK import must come before our own code.
Inside the src folder, run the following command:
touch src/index.js && touch src/products.js
Open index.js and paste the following:import React from 'react'
import ReactDOM from 'react-dom'
import App from './components/App'
import 'babel-polyfill'
const rootNode = document.querySelector('#root')
ReactDOM.render(<App />, rootNode)
Now we need to get the list of products from somewhere. Usually, this would be from a database or some API, but for this simple use case, we can just hardcode two or three products in a JavaScript file. This is why we need products.js. Open it and paste the following:export const products = [
{
name: 'Rubber Duck',
desc: `Rubber ducks can lay as many eggs as the best chicken layers, and they
are fun to watch with their antics in your backyard, your barnyard, or
your pond.`,
price: 9.99,
img:
'https://encrypted-tbn0.gstatic.com/images?q=tbn%3AANd9GcSqkN8wkHiAuT2FQ14AsJFgihZDzKmS6OHQ6eMiC63rW8CRDcbK',
id: 100
},
{
name: 'Chilli Sauce',
desc: `This Chilli Sauce goes well with some nice roast rubber duck. Flavored with
the best spices and the hottest chillis, you can rest assured of a tasty Sunday
rubber roast.`,
price: 12.99,
img:
'https://encrypted-tbn0.gstatic.com/images?q=tbn%3AANd9GcRTREm1dEzdI__xc6O8eAz5-4s88SP-Gg9dWYMkBKltGMi84RW5',
id: 101
}
]
This is an array of products that are available for purchase. You can add as many as you like and then move on to creating the components.
Run the following command from the project root: mkdir src/components. This will create a new folder called components inside the src folder to hold our React components. Let’s go ahead and create the first component.
App.jsx
This is the root component and will be responsible for routing to the various pages we have in our app. Create a new file called App.jsx inside the components folder and paste in the following:import React, { useState } from 'react'
import { Router, Route, Switch } from 'react-router-dom'
import { createBrowserHistory } from 'history'
import Products from './Products'
import Checkout from './Checkout'
import { products } from '../products'
const history = createBrowserHistory()
const App = () => {
const [selectedProduct, setSelectedProduct] = useState(null)
return (
<Router history={history}>
<Switch>
<Route
exact
path="/"
render={() => (
<Products
products={products}
selectProduct={setSelectedProduct}
history={history}
/>
)}
/>
<Route
path="/checkout"
render={() => (
<Checkout
selectedProduct={selectedProduct}
history={history}
/>
)}
/>
</Switch>
</Router>
)
}
export default App
Let’s break it down.import React, { useState } from 'react'
import { Router, Route, Switch } from 'react-router-dom'
import { createBrowserHistory } from 'history'
import Products from './Products'
import Checkout from './Checkout'
import { products } from '../products'
const history = createBrowserHistory()
This first part is just a bunch of dependency imports. The first three imports are required for any single-page React application. The next two imports are custom components that we’ll write later on. The last import is the hardcoded products we created earlier. We’ll pass it down as a prop to the Products component.
Finally, we create a new history instance from the history package and save it in a variable aptly named history.const App = () => {
const [selectedProduct, setSelectedProduct] = useState(null)
return (
<Router history={history}>
<Switch>
<Route
exact
path="/"
render={() => (
<Products
products={products}
selectProduct={setSelectedProduct}
history={history}
/>
)}
/>
<Route
path="/checkout"
render={() => (
<Checkout
selectedProduct={selectedProduct}
history={history}
/>
)}
/>
</Switch>
</Router>
)
}
export default App
We then create a new functional component called App. App has a state variable called selectedProduct, which holds the product currently selected to be purchased.
We return a Router instance that defines all the routes and their respective components.
In the first route, /, we render the Products component and pass in three props: the list of hardcoded products, a function to set a product in the App state, and the history object to enable us to navigate to new pages without breaking the browser history.
In the second route, /checkout, we render the Checkout component and pass in a couple props: the currently selected product and the history object.
At the end of the file, we export the App component as the default export.
Products.jsx
This component is responsible for rendering the list of products to the DOM, and it’s fairly simple. Create a new file called Products.jsx in the components folder and paste in the following:import React from 'react'
import './Products.scss'
const Products = ({ products, selectProduct, history }) => {
const handlePurchase = prod => () => {
selectProduct(prod)
history.push('/checkout')
}
return products.map(prod => (
<div className="product" key={prod.id}>
<section>
<h2>{prod.name}</h2>
<p>{prod.desc}</p>
<h3>{'$' + prod.price}</h3>
<button type="button" onClick={handlePurchase(prod)}>
PURCHASE
</button>
</section>
<img src={prod.img} alt={prod.name} />
</div>
))
}
export default Products
Note: You can get the Products.scss contents from here.
Let’s break it down.const Products = ({ products, selectProduct, history }) => {
const handlePurchase = prod => () => {
selectProduct(prod)
history.push('/checkout')
}
We start off defining a functional component that takes in three props:
products
selectProduct
history
products is the array of products we hardcoded earlier. We’ll be mapping over this array later on to render the individual products to the DOM.
selectProduct is a function that takes in a single product object. It updates the App component’s state to hold this product so that the Checkout component can access it through its props.
history is the history object that will allow us to navigate to other routes safely.
Then we define the handlePurchase function, which will be called when a user wants to purchase a certain product. It takes in a single parameter, prod, and calls selectProduct with this parameter. After calling selectProduct, it then navigates to the /checkout route by calling history.push.return products.map(prod => (
<div className="product" key={prod.id}>
<section>
<h2>{prod.name}</h2>
<p>{prod.desc}</p>
<h3>{'$' + prod.price}</h3>
<button type="button" onClick={handlePurchase(prod)}>
PURCHASE
</button>
</section>
<img src={prod.img} alt={prod.name} />
</div>
))
}
export default Products
It’s time to render the products to the DOM. We map over the products array and, for each product in the array, return a bunch of JSX. The JSX should be pretty straightforward and will result in the following image being painted in the screen:
Checkout.jsx
Next, we want to create the checkout page where the user will be routed to when they click on the PURCHASE button on a product.
Create a Checkout.jsx file under the components folder and paste the following in it:import React, { useEffect } from 'react'
import { StripeProvider, Elements } from 'react-stripe-elements'
import CheckoutForm from './CheckoutForm'
const Checkout = ({ selectedProduct, history }) => {
useEffect(() => {
window.scrollTo(0, 0)
}, [])
return (
<StripeProvider apiKey="pk_test_UrBUzJWPNse3I03Bsaxh6WFX00r6rJ1YCq">
<Elements>
<CheckoutForm selectedProduct={selectedProduct} history={history} />
</Elements>
</StripeProvider>
)
}
export default Checkout
This is when we begin to bring Stripe into the mix. In the second line, we’re importing something called StripeProvider and another thing called Elements from the react-stripe-elements package we installed at the beginning of this section.
StripeProvider is required for our app to have access to the Stripe object, and any component that interacts with the Stripe object must be a child of StripeProvider.
Elements is a React component that wraps around the actual checkout form. It helps group the set of Stripe Elements (more on this in a bit) together and makes it easy to tokenize all the data from each Stripe Element.
The Checkout component itself is fairly simple. It takes in two props, selectedProduct and history, which it passes on to a CheckoutForm component we’ll create next.
There’s also a useEffect call that scrolls the document to the top when the page mounts for the first time. This is necessary because react-router-dom preserves the previous scroll state when you switch routes.
Also notice that we’re passing a prop, apiKey, to StripeProvider. This key is the publishable key you copied earlier when setting up Stripe. Note that this prop is required because it serves as a way to authenticate your application to the Stripe servers.
CheckoutForm.jsx
This is the last component we’ll be creating, and it’s also the most important. The CheckoutForm component will hold the inputs for getting the user’s card details as well as actually making a call to the backend to process the payment charge.
Create a new file called CheckoutForm.jsx inside the components directory. We’re going to go through the content of this file section by section.import React, { useState } from 'react'
import { Link } from 'react-router-dom'
import {
CardNumberElement,
CardExpiryElement,
CardCVCElement,
injectStripe
} from 'react-stripe-elements'
import axios from 'axios'
import './CheckoutForm.scss'
...to be continued below...
First, we import the required packages we’ll be working with into the file. Notice the imports from the react-stripe-elements package. This is a good time to talk more about Stripe Elements.
Stripe Elements are a set of prebuilt UI elements that allow you to collect your user’s card information without managing such sensitive information yourself.
The react-stripe-elements package is a wrapper for Stripe Elements that exposes these elements as React components you can just plug into your app — no need to create them from scratch.
We are importing some of these components into this file along with a HOC component, injectStripe.
injectStripe basically takes the Stripe object initialized in the StripeProvider component and “injects” the object into any component wrapped with it. This is how we’ll get access to the Stripe Object.
We then import a package called axios. Axios is just a promise-based HTTP client for the browser that we’re going to use to communicate with our payments server.
You can get the contents of CheckoutForm.scss from here.
...continued...const CheckoutForm = ({ selectedProduct, stripe, history }) => {
if (selectedProduct === null) history.push('/')
const [receiptUrl, setReceiptUrl] = useState('')
const handleSubmit = async event => {
event.preventDefault()
const { token } = await stripe.createToken()
const order = await axios.post('http://localhost:7000/api/stripe/charge', {
amount: selectedProduct.price.toString().replace('.', ''),
source: token.id,
receipt_email: '[email protected]'
})
setReceiptUrl(order.data.charge.receipt_url)
}
...to be continued...
Next up is the actual CheckoutForm component itself. It takes in three props:
selectedProduct
stripe
history
selectedProduct is the product the user clicked on to purchase. It’s coming from the root App component’s state and is being passed down as props.
stripe is the actual Stripe object that is being “injected” as a prop by the injectStripe HOC we imported. You already know what history does.
The first thing we do in the component is check whether selectedProduct actually exists. If it doesn’t, we route the user to the homepage. In a production-grade app, this would probably be handled by a route guard HOC.
We then define a new piece of state to hold the receipt URL for successful payments. It will initially be empty.
Next, we define a function called handleSubmit, which will be called when the checkout form is submitted (i.e., when the Pay button is clicked). Let’s go through this function.
Firstly, we prevent the default behavior of the form element so that the page doesn’t refresh.
Then we destructure a token value from the result of an async call to stripe.createToken. createToken tokenizes the card information from the form and sends it to the Stripe server. It then returns a token object, where you can get a token.id value as an alias for the actual card info. This ensures that you never actually send the user’s card details to your payment server.
Secondly, we make an HTTP POST request to localhost:7000/api/stripe/charge with a request body containing three things:
amount
source
receipt_email
amount is the price of the item being purchased. We have to convert it to a string and remove all special characters like “.” and “,”. This means that a cost of $9.99 will get sent to the payment server as 999.
source is where the payment will be charged. In our case, it will be the ID of the token we just generated.
receipt_email is where the receipt of the payment will be sent. It is usually the customer’s email address, but in our case, we’re just hardcoding it because, again, we’re not implementing authentication.
After the request is done, we grab the URL of the receipt from the response object and set it to state. This is assuming that there are no errors, so in a production-grade app, you would usually implement error handling.
...continued...if (receiptUrl) {
return (
<div className="success">
<h2>Payment Successful!</h2>
<a href={receiptUrl}>View Receipt</a>
<Link to="/">Home</Link>
</div>
)
}
...to be continued...
Immediately after the handleSubmit function, we have an if check to see if there’s a receiptUrl in the state. If there is, we want to render a div containing a success message and a link to view the receipt as well as a link back to the homepage.
...continued...
return (
<div className="checkout-form">
<p>Amount: ${selectedProduct.price}</p>
<form onSubmit={handleSubmit}>
<label>
Card details
<CardNumberElement />
</label>
<label>
Expiration date
<CardExpiryElement />
</label>
<label>
CVC
<CardCVCElement />
</label>
<button type="submit" className="order-button">
Pay
</button>
</form>
</div>
)
}
export default injectStripe(CheckoutForm)
Otherwise, we’re going to render the actual checkout form. We’re using the prebuilt Elements components instead of recreating them from scratch and having to manage sensitive information.
At the end of this file, we wrap the CheckoutForm component in the injectStripe HOC so that we have access to the Stripe object we use in the component.
Testing our app
Let’s go through what we’ve accomplished so far.
We’ve created a payments server that communicates with Stripe
We’ve created a homepage to list our products
We’ve created a checkout page to capture the user’s payment details
We’ve created a handleSubmit function to send a request to the server to process a payment charge
We just about have everything set up, so it’s time to actually run our app and see if we’re able to purchase a Rubber Duck. We have to add our scripts first, so open the package.json file and replace the “scripts” section with the following:"scripts": {
"build": "parcel build public/index.html --out-dir build --no-source-maps",
"dev": "node src/server.js & parcel public/index.html",
"start": "node src/server.js"
},
Open your terminal and run npm run dev. This should start the payments server and expose the frontend on port 1234. Open your browser, navigate to http://localhost:1234, and follow the steps below:
Click on the PURCHASE button on any product
In the checkout page, fill in 4242 4242 4242 4242 for the Card details field
Fill in any expiration date and choose a random CVC value
Click on Pay
If everything goes well, you should see a Payment Successful message with links to view your receipt and go back to the homepage.
To confirm payment, log in to your Stripe dashboard, click on Payments, and you should see your payment there.
If your company website using WooCommerce codes , you can use WooCommerce Stripe Payment Gateway Plugin
Woocommerce Stripe payment gateway enables you to accept payments from customers directly onsite. Customers can purchase their items, select stripe as their checkout option, and be able to pay quite easily with their credit cards.
Stripe takes care of processing the payment (for a little fee) and securing the customer’s financial details, thus giving customers both ease of use and security.
This guide will show you all the steps you need to integrate Stripe with WooCommerce using the WooCommerce Stripe Payment Gateway plugin. We assume you already have a Stripe account. If not, create one, and then go on to activate it.
Also, if you want to avoid all the work, we can help you setup and test Stripe in your WooCommerce store. Simply request our service and we will get to work on it.
Step 1. Installing the WooCommerce Stripe Payment Gateway plugin
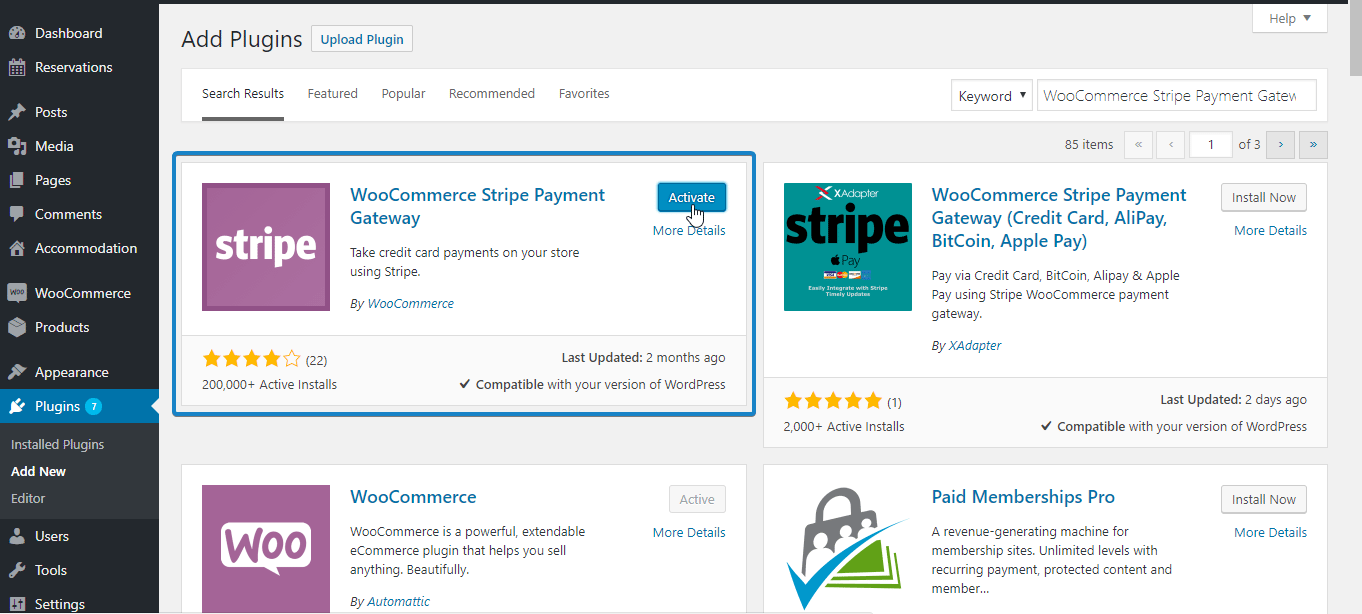
To install the plugin, login to your WordPress Dashboard and go to “Plugins > Add New”
Add New Plugin - WooCommerce Stripe Payment Integration
Type in “WooCommerce Stripe Payment Gateway” in the search bar. When the plugin appears, click Install Now and wait for the installation to complete. Next click Activate.
Note: Ensure you install the WooCommerce Stripe plugin designed by WooCommerce.
Install and activate WooCommerce Stripe Payment Gateway
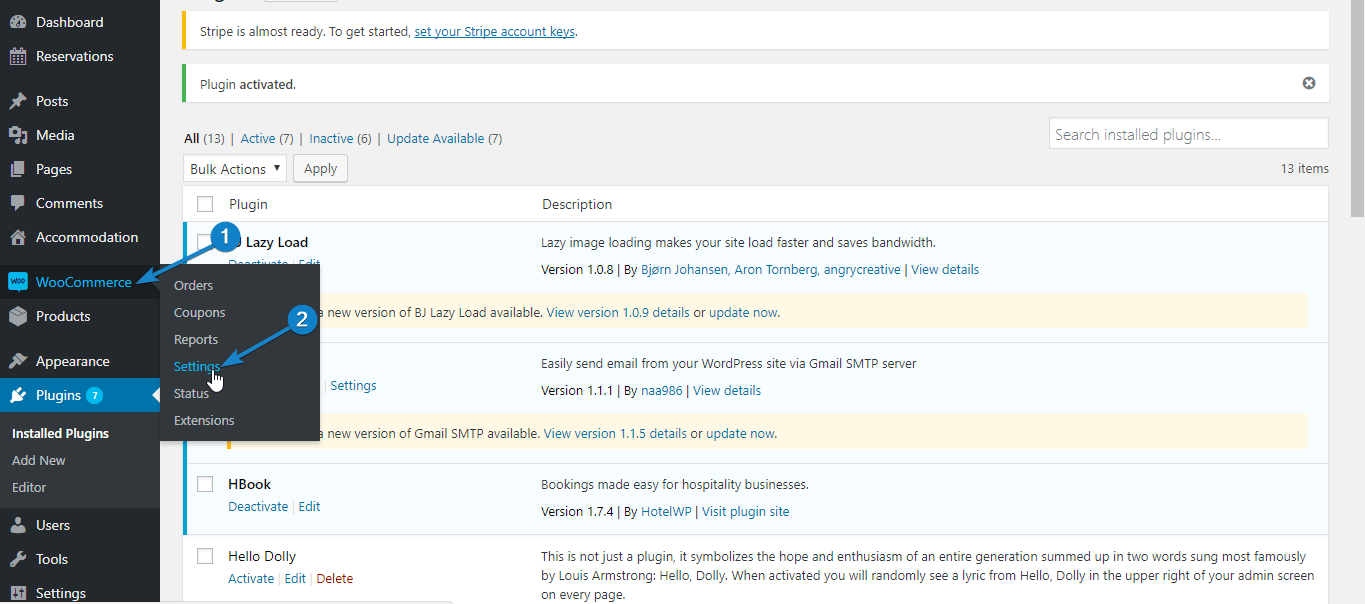
After activating the plugin, go to WooCommerce > Settings.
Go to Settings - WooCommerce Stripe Payment Integration
Next, switch to the “Checkout” tab. If you have correctly activated the WooCommerce Stripe plugin, “Stripe” should now appear among the options. Click on it.
Step 2. Setting Up Stripe Payment Options
In this step, we are going to set up the various options needed to activate and configure stripe for your website.
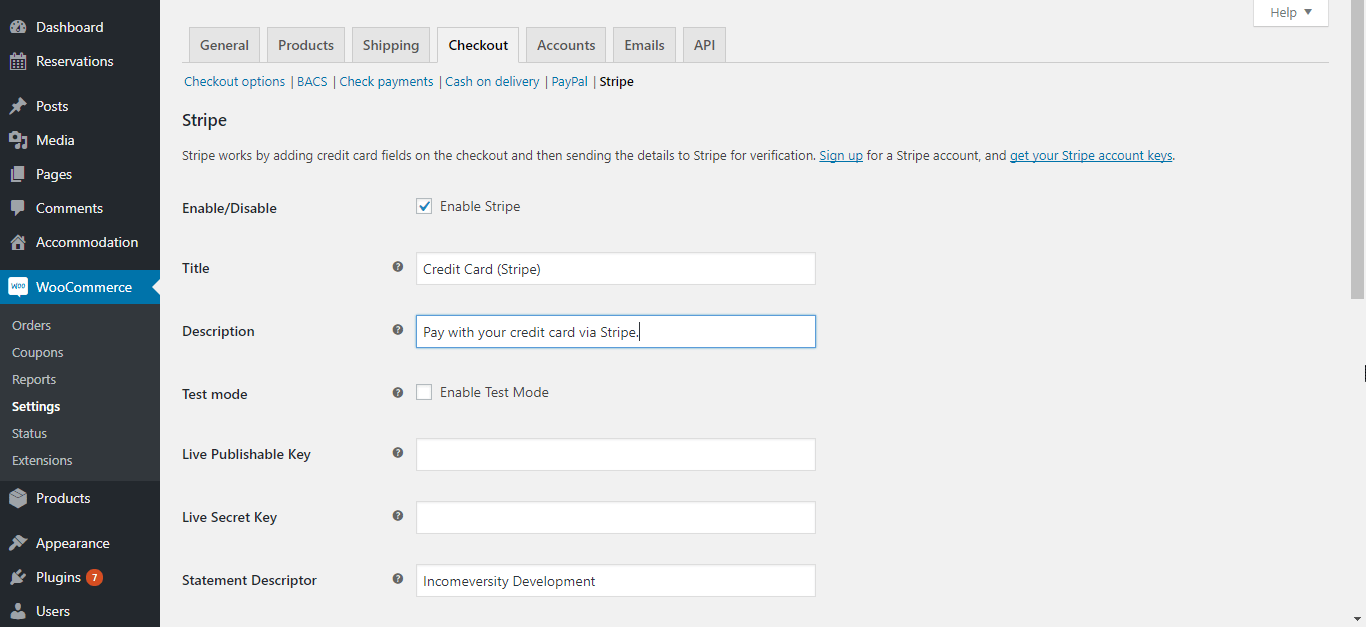
First click “Enable Stripe” to activate this payment option.
Next, setup your Title and Description. These would determine what users see during checkout. The default values may be good enough, or you can adjust as you see fit.
Set the description - WooCommerce Stripe Payment Integration
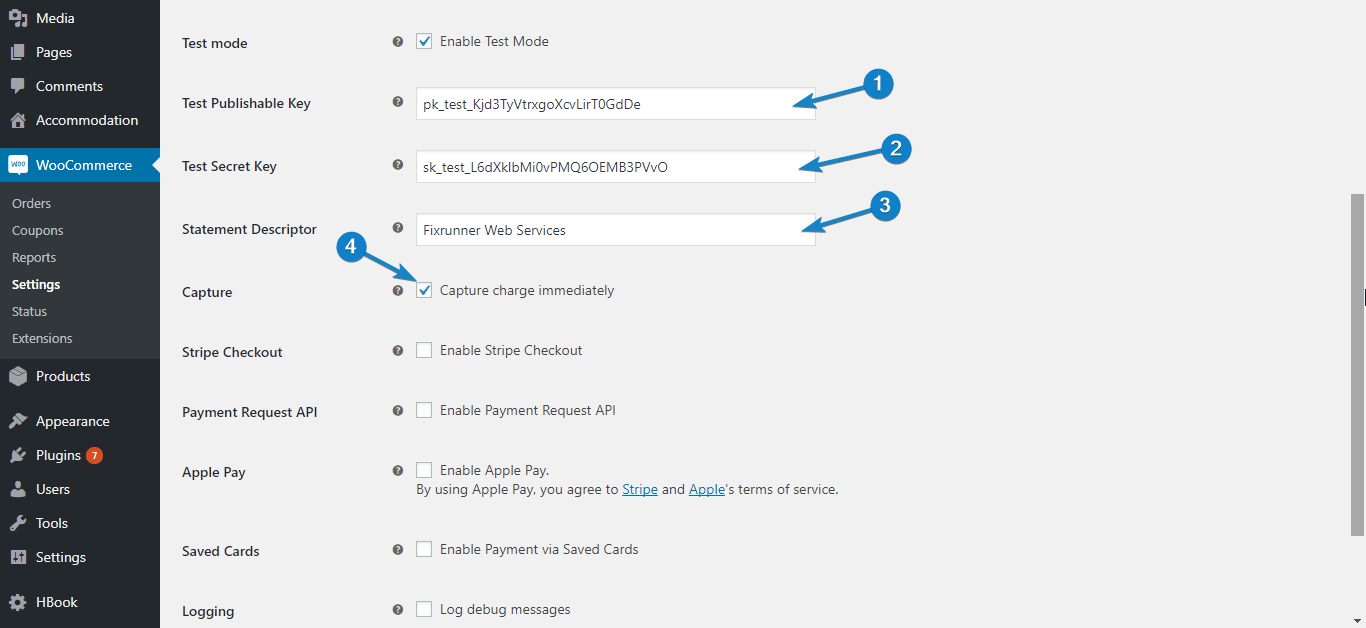
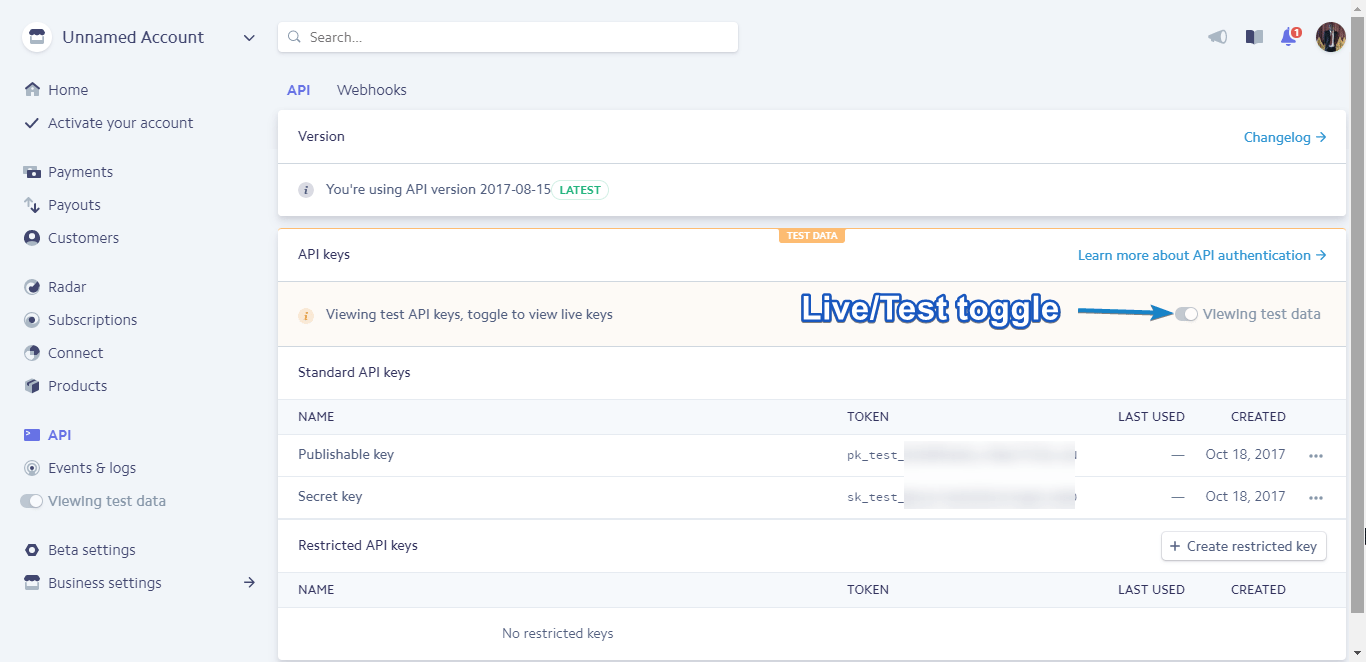
Since we want to try it out in test mode first, tick the “Enable Test Mode” option. Next, login to your stripe account and click API.
Switch to test mode with the toggle button, and copy the test “Publishable” and “Secret” keys into the corresponding fields in your stripe plugin.
Copy test API keys - WooCommerce Stripe Payment Integration
In the Statement Descriptor input, enter a description that will appear in the transaction statement. In the example below, this is “FixRunner Web Services”.
Next, tick the “Capture Charge Immediately” option to ensure charges are processed and billed as soon as the customer checks out.
Enter settings - WooCommerce Stripe Payment Integration
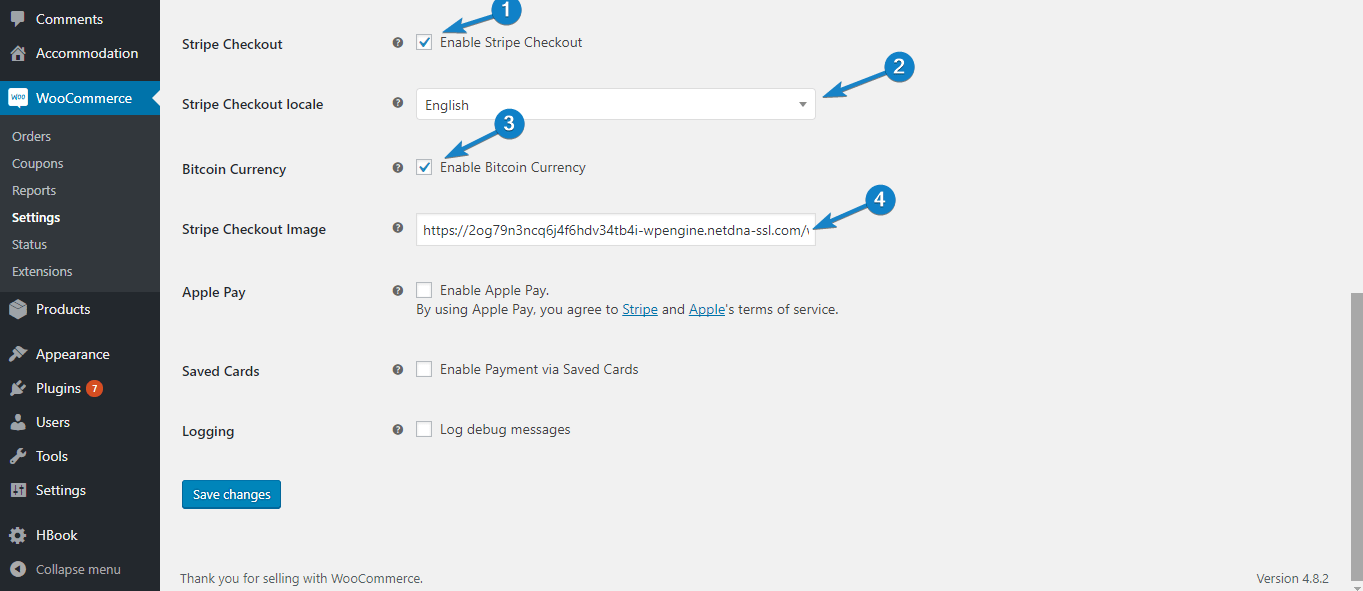
Enabling Stripe Checkout
When the “Enable Stripe Checkout” option is ticked, users get a popup form requesting their financial details when they select stripe as payment method and click Continue To Payment. Enabling this option also gives you the ability to accept payments via Bitcoin.
To use this feature, tick “Enable Stripe Checkout”. Next, select your preferred language, and tick “Enable Bitcoin Currency” if you want to accept payments with Bitcoin.
If you want a custom image of your brand to appear on top of the Stripe checkout popup, enter the url of that image in the “Stripe Checkout Image” input box.
Enable Stripe Checkout - WooCommerce Stripe Payment Integration
When users opt to pay through Stripe, the payment popup will appear like this:
Payment with Stripe Checkout - WooCommerce Stripe Payment Integration
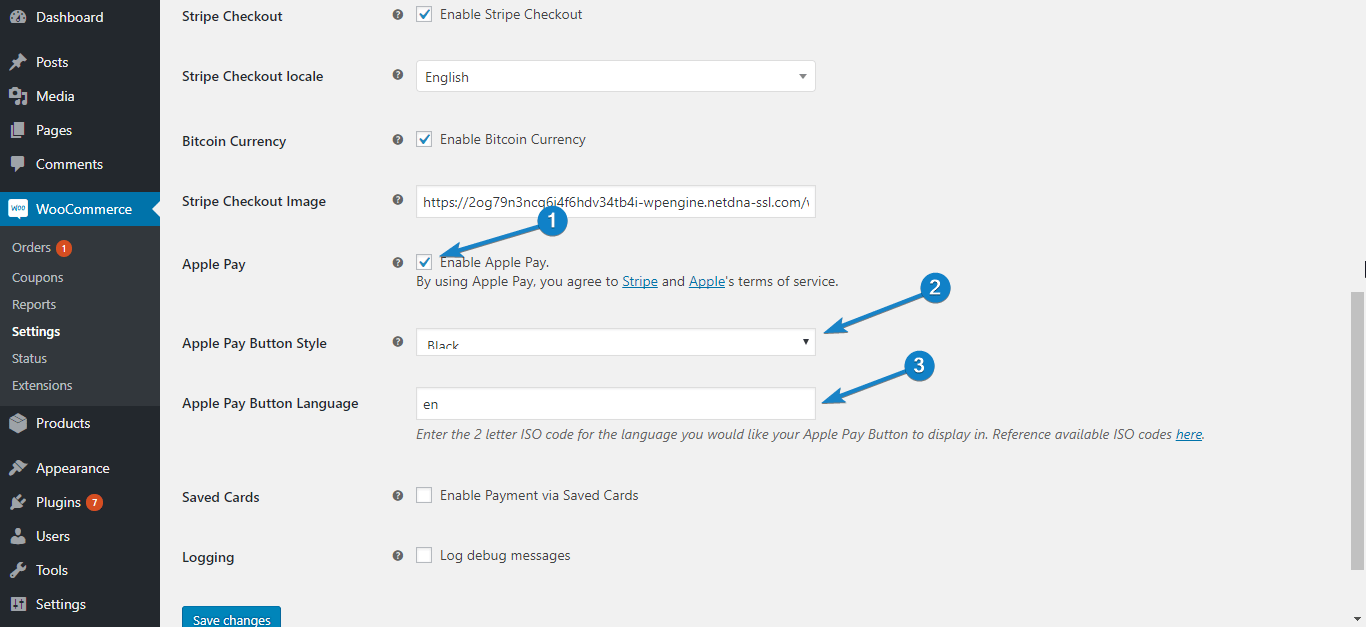
Enabling Apple Pay
Apple pay offers your customers a very simple way to checkout from their iOS devices. If you want to use this option, tick “Enable Apple Pay”
Next, select your button style, and enter the 2 letter code for the language you want Apple pay to be displayed in. You may leave it set to “en” for English, or click the link under that option to see the codes for other languages.
Apple pay settings - WooCommerce Stripe Payment Integration
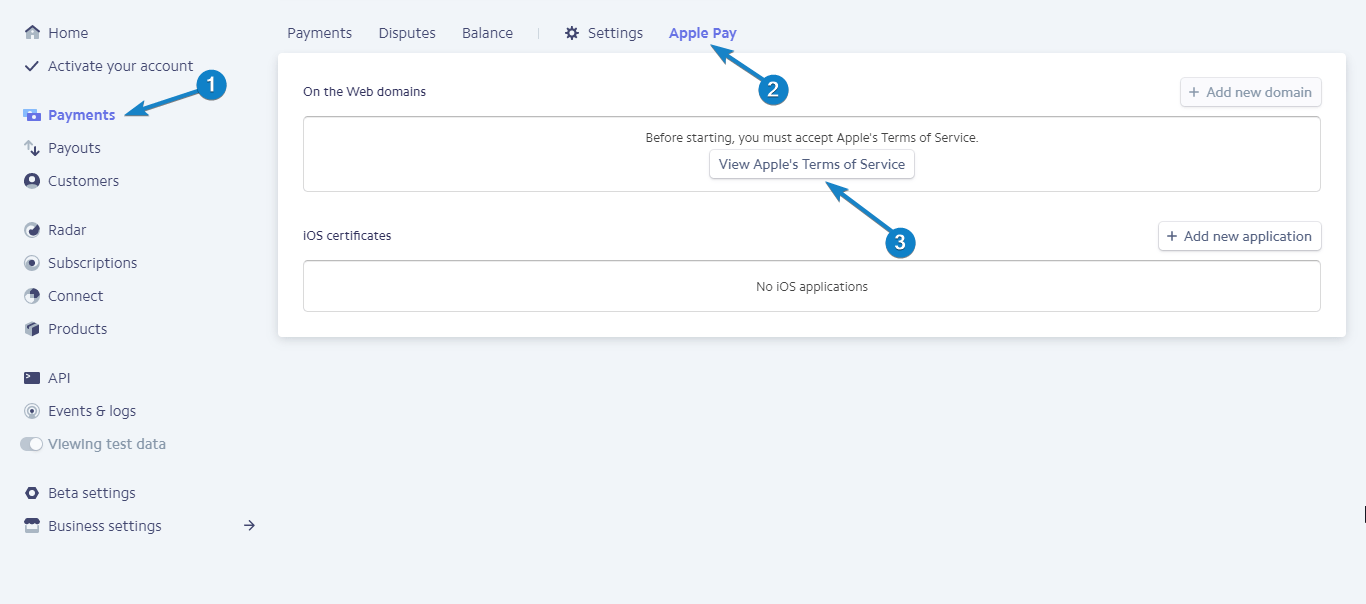
Now go back to your stripe account and click Payments. In the payments page, select Apple Pay, and accept Apples terms of service.
Accept Apple Pay terms - WooCommerce Stripe Payment Integration
Next, click Add New Domain, and type in your domain name. Your WooCommerce Stripe plugin would take care of steps 2 and 3. Go on to click Add.
Add domain for Apple Pay - WooCommerce Stripe Payment Integration
Note: If you get an error that the file could not be found in your domain, go back, download the file in step 2, and upload it to the specified location in step 3. And then click Add.
After completing this step and saving the setting in your Plugin, Apple Pay would be seen in product, checkout, and other pages, when your site is accessed with a compatible iOS device.
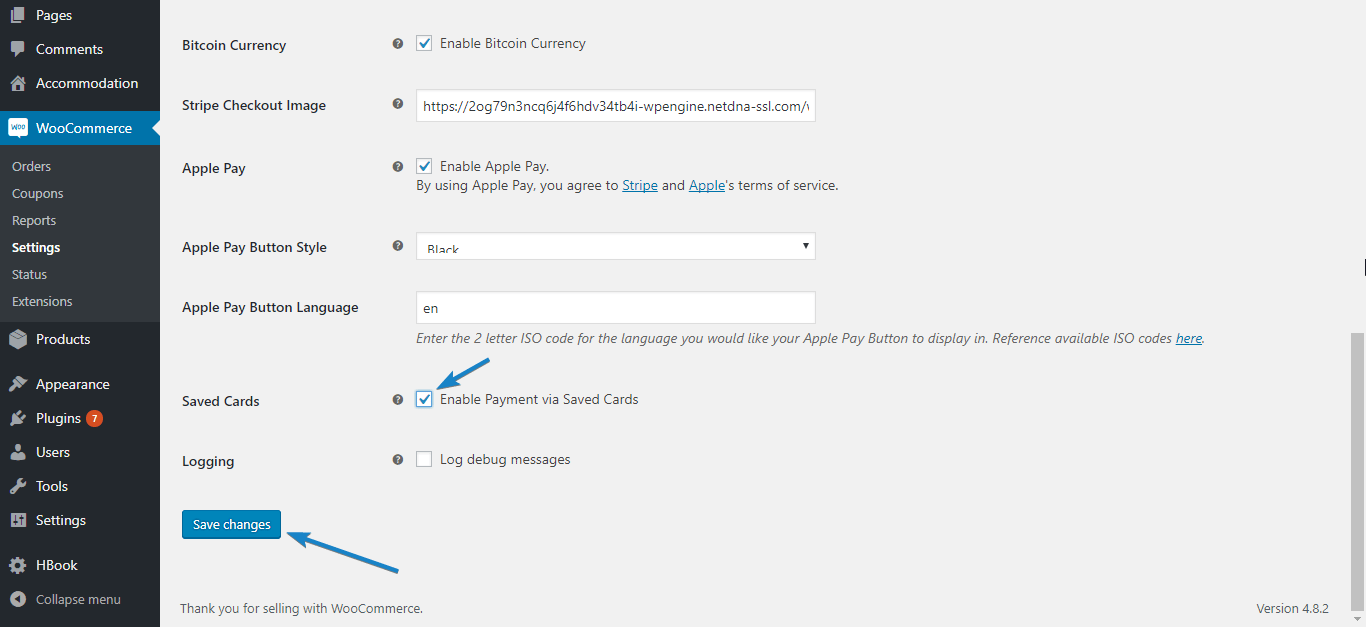
Saving Details for Future Payments
If you would like to store customer financial details so you can use these for billing them in the future, tick the “Enable Payments Via Saved Cards” option.
Saving financial details - WooCommerce Stripe Payment Integration
Note that the financial details are not stored on your servers, but on Stripe’s servers, where all security measures are in place to protect this sensitive data.
For debugging purposes, you may also enable the “Log Debug Messages” option. This can be useful in finding out what went wrong if there are errors.
And that concludes your setup process. Click Save Changes to use the settings you have specified.
Step 3. Trying WooCommerce Stripe in Test Mode
In the setup above, we enabled test mode and used the test API details obtained from Stripe. This is useful to check if Stripe payment works properly before making it available to your customers.
Stripe provides test credit card details you can use for this purpose. In this example, we would be using the following details, and you should be able to use them too. If not, you can obtain other test card details.
Card number: 4242424242424242
Expiry: Any date after today
CVV: 789
Now, go to any of your products page, add the product to cart, and click View Cart. In the cart page, click Proceed to checkout.
Fill out the form with your information. At the bottom of the page, select “Stripe” as your payment method and click Continue to payment.
Next, enter the test financial details and click Pay #Amount.
Test payment - WooCommerce Stripe Payment Integration
You would be taken to an order confirmation page like the one below:
Payment confirmation - WooCommerce Stripe Payment Integration
Congratulations! Your WooCommerce Stripe payment option works!
The final step is to make this payment method available to customers.
Step 4. Activating Live Mode to begin processing real payments
To enable this payment method for your customers, you need to activate live mode.
In your WordPress dashboard, go to WooCommerce > Settings. Next, switch to the “Checkout” tab and click Stripe.
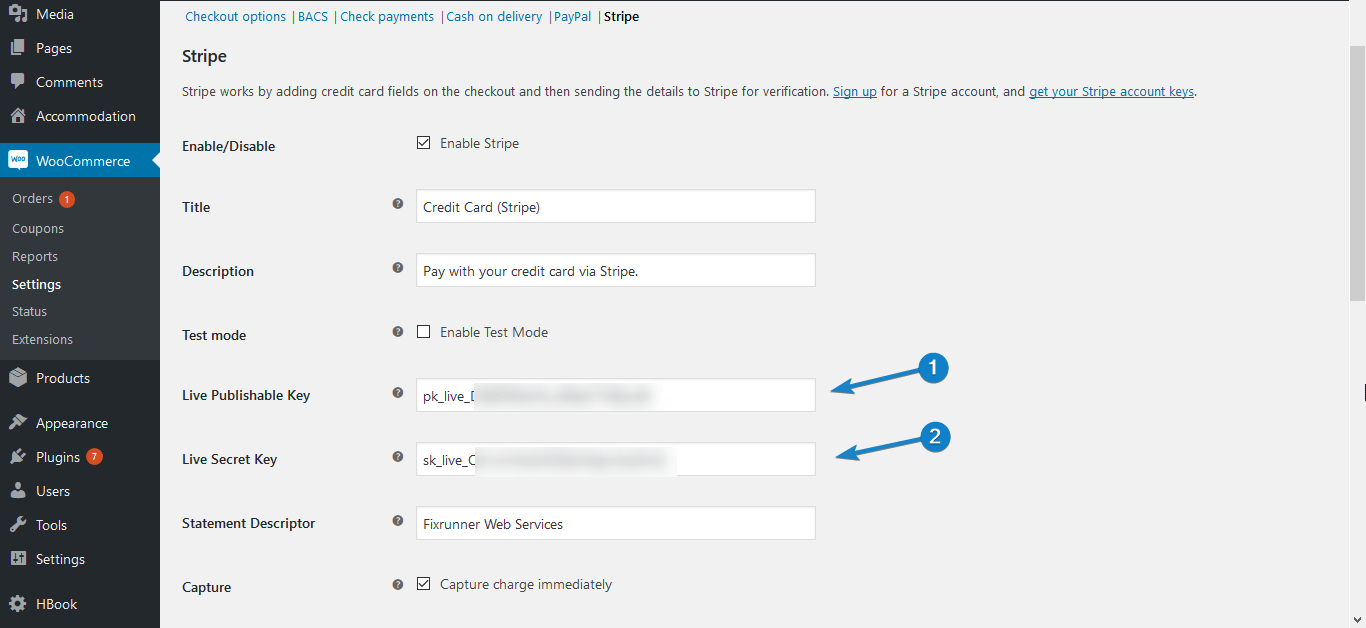
Uncheck the enable test mode option. When you do, the key input boxes will change to accept the live keys.
Switch to live mode - WooCommerce Stripe Payment Integration
Now login go to your stripe dashboard and click API. You should currently be in test mode.
Switch API to live - WooCommerce Stripe Payment Integration
To switch to live mode, click the Live/Test toggle switch. Next, copy your live Publishable and Secret keys into their input boxes in your WooCommerce Stripe Plugin.
Enter live keys - WooCommerce Stripe Payment Integration
Lastly, scroll down and click Save Changes. Customers can now make payments with Stripe on your website.
Note: To be able to activate live mode, you must have ssl in your server (i.e. your domain should start with https), and you must have enabled the “Force secure checkout” option found in WooCommerce > Settings > Checkout.
If you do not have ssl, have your host add it for you, and then go on to enable secure checkout, and then live mode.
view all
Whether you’re implementing a subscription-based service, an e-commerce store, or a crowdfunding solution, Stripe offers the flexibility to get it done. We’re going to build a small proof-of-concept payments system to enable one-time purchases on a website.
By the end of this tutorial, you should be able to set up a backend and frontend for processing online payments in your React app.
Requirements to follow along
This tutorial requires that you have the following:
Node installed on your computer
A Stripe developer account
Basic knowledge of Express
Basic knowledge of React Hooks
If you do not have Node installed, you can get the latest version from the official website. All the code written in this tutorial can be accessed here.
Stripe setup
If you do not have a Stripe developer account, you can get started for free by signing up for an account here. After signing up, complete the following steps to get set up:
Select Developer integrations on the How do you want to get started? modal
Select Accept payments only on the next modal
Check the One-time payments option on the next modal
Finally, check Build a custom payment flow on the last modal
You should now have a base account set up. You can update the name of the account by clicking the Add a name link at the top left of the page.
You’ll need to copy your Publishable and Secret keys from the dashboard and store them somewhere, because we’ll need them very soon.

Building the payment server
Before we go ahead with building the React app, we’ll need to set up a server to handle payment requests.
We’ll need to set up a RESTful endpoint on an Express server, which will act as a middleman between our React code and the Stripe backend. If you’ve never built an API before, don’t worry, it’ll be pretty basic as we’re not implementing a production-ready backend here.
Let’s get started.
Create a new project folder and name it whatever you want (I’m going with react-stripe-payment)
Open your terminal in the folder and run npm init -y
Install the dependencies by running npm install express dotenv body-parser stripe
Create a folder src under the root folder by running mkdir src
server.js
Let’s create the server to listen for payment requests. Create a new file called server.js under the src folder and paste the following in it:
const path = require('path')

const express = require('express')

const bodyParser = require('body-parser')

const postCharge = require('./stripe')

require('dotenv').config()


const app = express()

const router = express.Router()

const port = process.env.PORT || 7000


router.post('/stripe/charge', postCharge)

router.all('*', (_, res) =>

  res.json({ message: 'please make a POST request to /stripe/charge' })

)

app.use((_, res, next) => {

  res.header('Access-Control-Allow-Origin', '*')

  res.header(

    'Access-Control-Allow-Headers',

    'Origin, X-Requested-With, Content-Type, Accept'

  )

  next()

})

app.use(bodyParser.json())

app.use('/api', router)

app.use(express.static(path.join(__dirname, '../build')))


app.get('*', (_, res) => {

  res.sendFile(path.resolve(__dirname, '../build/index.html'))

})


app.listen(port, () => console.log(`server running on port ${port}`))

Let’s break down this file section by section.


const path = require('path')

const express = require('express')

const bodyParser = require('body-parser')

const postCharge = require('./stripe')

require('dotenv').config()
Here, we’re importing the required packages. You’ll notice that they are all third-party imports except for postCharge, which is being imported from a file called stripe. We’ll create that file later.
dotenv allows us to read sensitive information from the Node process so we don’t have to hardcode secret values in our code.
const app = express()

const router = express.Router()

const port = process.env.PORT || 7000
We’re initializing a new Express instance into a variable called app. We then create a new Router instance and store it in a variable called router. This is what we’ll use to define the payment endpoint.
Finally, we initialize a new variable called port and assign it a value from the Node process (process.env.PORT), and if that is undefined, it is assigned 7000.
router.post('/stripe/charge', postCharge)

router.all('*', (_, res) =>

  res.json({ message: 'please make a POST request to /stripe/charge' })

)

app.use((_, res, next) => {

  res.header('Access-Control-Allow-Origin', '*')

  res.header(

    'Access-Control-Allow-Headers',

    'Origin, X-Requested-With, Content-Type, Accept'

  )

  next()

})

app.use(bodyParser.json())

app.use('/api', router)

app.use(express.static(path.join(__dirname, '../build')))
Remember the router we initialized earlier? On the first line, we set up an endpoint called /stripe/charge and assign postCharge to handle all POST requests to this route.
We then catch all other requests to the server and respond with a JSON object containing a message directing the user to the appropriate endpoint.
Next, we define a middleware on the app instance to enable CORS for all requests. On the next line, we attach another middleware that enables us to parse JSON objects from the request body.
Then we tell our app instance to use the router instance to handle all requests to the /api endpoint. Finally, we tell Express to serve up the /build folder. This folder will hold the transpiled code for the app’s frontend.
app.get('*', (_, res) => {

  res.sendFile(path.resolve(__dirname, '../build/index.html'))

})


app.listen(port, () => console.log(`server running on port ${port}`))
Here, we’re telling the app instance to handle all GET requests by serving the index.html file located in the /build folder. This is how we’ll serve the frontend in production.
Finally, we spin up the server on the port we defined earlier and log a message to the console on a successful startup.
stripe.js
We’ll then create the postCharge handler we required in server.js above. Under the src folder, create a new file, stripe.js, and paste the following in it:
const stripe = require('stripe')(<your_secret_key>)


async function postCharge(req, res) {

  try {

    const { amount, source, receipt_email } = req.body


    const charge = await stripe.charges.create({

      amount,

      currency: 'usd',

      source,

      receipt_email

    })


    if (!charge) throw new Error('charge unsuccessful')


    res.status(200).json({

      message: 'charge posted successfully',

      charge

    })

  } catch (error) {

    res.status(500).json({

      message: error.message

    })

  }

}
module.exports = postCharge
Let’s break it down.
const stripe = require('stripe')(<your_secret_key>)Here, we initialize a new Stripe instance by requiring the stripe package and calling it with the secret key we copied earlier as a string. We save this instance in a variable called stripe.
async function postCharge(req, res) {

  try {

    const { amount, source, receipt_email } = req.body


    const charge = await stripe.charges.create({

      amount,

      currency: 'usd',

      source,

      receipt_email

    })
We then create a new function called postCharge. This function is a request handler, so we have to take in two parameters: req and res.
We then open a try catch block inside this function. We destructure all the variables we’re expecting to be sent along with the request from the request object; in this case, those variables are amount, source, and receipt_email.
We then create a new variable called charge. This variable holds the result of an asynchronous call to the Stripe API to create a new charge (stripe.charges.create).
if (!charge) throw new Error('charge unsuccessful')

If the result of the Stripe call is a falsy value — undefined, in this case — it means our payment request failed, and so we throw a new error with the message “charge unsuccessful.”


res.status(200).json({

  message: 'charge posted successfully',

  charge

})

Otherwise, we respond to the request with a 200 status code and a JSON object containing a message and the charge object.


} catch (error) {

    res.status(500).json({

      message: error.message

    })

  }

}


module.exports = postCharge
In the catch block, we intercept all other errors and send them to the client with a 500 status code and a message containing the error message.
At the end of the file, we export the postCharge function using module.exports.
That is all there is to the payment server. Of course, this isn’t production-ready and should not be used in a real application processing real payments, but it is enough for our current use case. Let’s move on to the frontend.
Building the frontend
Since we’re done building the payments server, it’s time to flesh out the frontend. It’s not going to be anything fancy since I’m trying to keep this tutorial bite-sized. Here are the different components of the app:
A router component
A products list component
A checkout form component
Let’s get started.
Run the following command to install the required packages:
npm install axios babel-polyfill history parcel parcel-bundler react react-dom react-router-dom react-stripe-elements
In the project root, run the following command:
mkdir public && touch public/index.html
This will create a folder called public and create an index.html file in this new folder. Open the index.html file and paste the following:
<!DOCTYPE html>

<html lang="en">

  <head>

    <meta charset="utf-8" />

    <meta name="viewport" content="width=device-width, initial-scale=1" />

    <meta name="description" content="React + Stripe" />

    <title>React and Stripe Payment</title>

  </head>

  <body>

    <noscript>You need to enable JavaScript to run this app.</noscript>

    <div id="root"></div>

    <script src="https://js.stripe.com/v3/"></script>

    <script src="../src/index.js"></script>

  </body>

</html>
If you’re already familiar with React, this should be nothing new; this is simply the entry point of our app. Also notice that we import the Stripe SDK in the first <script> tag — the Stripe SDK import must come before our own code.
Inside the src folder, run the following command:
touch src/index.js && touch src/products.js
Open index.js and paste the following:
import React from 'react'

import ReactDOM from 'react-dom'

import App from './components/App'

import 'babel-polyfill'


const rootNode = document.querySelector('#root')

ReactDOM.render(<App />, rootNode)
Now we need to get the list of products from somewhere. Usually, this would be from a database or some API, but for this simple use case, we can just hardcode two or three products in a JavaScript file. This is why we need products.js. Open it and paste the following:
export const products = [

  {

    name: 'Rubber Duck',

    desc: `Rubber ducks can lay as many eggs as the best chicken layers, and they

  are fun to watch with their antics in your backyard, your barnyard, or

  your pond.`,

    price: 9.99,

    img:

      'https://encrypted-tbn0.gstatic.com/images?q=tbn%3AANd9GcSqkN8wkHiAuT2FQ14AsJFgihZDzKmS6OHQ6eMiC63rW8CRDcbK',

    id: 100

  },

  {

    name: 'Chilli Sauce',

    desc: `This Chilli Sauce goes well with some nice roast rubber duck. Flavored with

    the best spices and the hottest chillis, you can rest assured of a tasty Sunday

    rubber roast.`,

    price: 12.99,

    img:

      'https://encrypted-tbn0.gstatic.com/images?q=tbn%3AANd9GcRTREm1dEzdI__xc6O8eAz5-4s88SP-Gg9dWYMkBKltGMi84RW5',

    id: 101

  }

]
This is an array of products that are available for purchase. You can add as many as you like and then move on to creating the components.
Run the following command from the project root: mkdir src/components. This will create a new folder called components inside the src folder to hold our React components. Let’s go ahead and create the first component.
App.jsx
This is the root component and will be responsible for routing to the various pages we have in our app. Create a new file called App.jsx inside the components folder and paste in the following:
import React, { useState } from 'react'

import { Router, Route, Switch } from 'react-router-dom'

import { createBrowserHistory } from 'history'

import Products from './Products'

import Checkout from './Checkout'

import { products } from '../products'


const history = createBrowserHistory()


const App = () => {

  const [selectedProduct, setSelectedProduct] = useState(null)


  return (

    <Router history={history}>

      <Switch>

        <Route

          exact

          path="/"

          render={() => (

            <Products

              products={products}

              selectProduct={setSelectedProduct}

              history={history}

            />

          )}

        />

        <Route

          path="/checkout"

          render={() => (

            <Checkout

              selectedProduct={selectedProduct}

              history={history}

            />

          )}

        />

      </Switch>

    </Router>

  )

}
export default App
Let’s break it down.
import React, { useState } from 'react'

import { Router, Route, Switch } from 'react-router-dom'

import { createBrowserHistory } from 'history'

import Products from './Products'

import Checkout from './Checkout'

import { products } from '../products'


const history = createBrowserHistory()
This first part is just a bunch of dependency imports. The first three imports are required for any single-page React application. The next two imports are custom components that we’ll write later on. The last import is the hardcoded products we created earlier. We’ll pass it down as a prop to the Products component.
Finally, we create a new history instance from the history package and save it in a variable aptly named history.
const App = () => {

  const [selectedProduct, setSelectedProduct] = useState(null)


  return (

    <Router history={history}>

      <Switch>

        <Route

          exact

          path="/"

          render={() => (

            <Products

              products={products}

              selectProduct={setSelectedProduct}

              history={history}

            />

          )}

        />

        <Route

          path="/checkout"

          render={() => (

            <Checkout

              selectedProduct={selectedProduct}

              history={history}

            />

          )}

        />

      </Switch>

    </Router>

  )

}
export default App
We then create a new functional component called App. App has a state variable called selectedProduct, which holds the product currently selected to be purchased.
We return a Router instance that defines all the routes and their respective components.
In the first route, /, we render the Products component and pass in three props: the list of hardcoded products, a function to set a product in the App state, and the history object to enable us to navigate to new pages without breaking the browser history.
In the second route, /checkout, we render the Checkout component and pass in a couple props: the currently selected product and the history object.
At the end of the file, we export the App component as the default export.
Products.jsx
This component is responsible for rendering the list of products to the DOM, and it’s fairly simple. Create a new file called Products.jsx in the components folder and paste in the following:
import React from 'react'

import './Products.scss'


const Products = ({ products, selectProduct, history }) => {

  const handlePurchase = prod => () => {

    selectProduct(prod)

    history.push('/checkout')

  }


  return products.map(prod => (

    <div className="product" key={prod.id}>

      <section>

        <h2>{prod.name}</h2>

        <p>{prod.desc}</p>

        <h3>{'$' + prod.price}</h3>

        <button type="button" onClick={handlePurchase(prod)}>

          PURCHASE

        </button>

      </section>

      <img src={prod.img} alt={prod.name} />

    </div>

  ))

}
export default Products
Note: You can get the Products.scss contents from here.
Let’s break it down.
const Products = ({ products, selectProduct, history }) => {

  const handlePurchase = prod => () => {

    selectProduct(prod)

    history.push('/checkout')

  }
We start off defining a functional component that takes in three props:
products
selectProduct
history
products is the array of products we hardcoded earlier. We’ll be mapping over this array later on to render the individual products to the DOM.
selectProduct is a function that takes in a single product object. It updates the App component’s state to hold this product so that the Checkout component can access it through its props.
history is the history object that will allow us to navigate to other routes safely.
Then we define the handlePurchase function, which will be called when a user wants to purchase a certain product. It takes in a single parameter, prod, and calls selectProduct with this parameter. After calling selectProduct, it then navigates to the /checkout route by calling history.push.
return products.map(prod => (

    <div className="product" key={prod.id}>

      <section>

        <h2>{prod.name}</h2>

        <p>{prod.desc}</p>

        <h3>{'$' + prod.price}</h3>

        <button type="button" onClick={handlePurchase(prod)}>

          PURCHASE

        </button>

      </section>

      <img src={prod.img} alt={prod.name} />

    </div>

  ))

}
export default Products
It’s time to render the products to the DOM. We map over the products array and, for each product in the array, return a bunch of JSX. The JSX should be pretty straightforward and will result in the following image being painted in the screen:

Checkout.jsx
Next, we want to create the checkout page where the user will be routed to when they click on the PURCHASE button on a product.
Create a Checkout.jsx file under the components folder and paste the following in it:
import React, { useEffect } from 'react'

import { StripeProvider, Elements } from 'react-stripe-elements'

import CheckoutForm from './CheckoutForm'


const Checkout = ({ selectedProduct, history }) => {

  useEffect(() => {

    window.scrollTo(0, 0)

  }, [])


  return (

    <StripeProvider apiKey="pk_test_UrBUzJWPNse3I03Bsaxh6WFX00r6rJ1YCq">

      <Elements>

        <CheckoutForm selectedProduct={selectedProduct} history={history} />

      </Elements>

    </StripeProvider>

  )

}
export default Checkout
This is when we begin to bring Stripe into the mix. In the second line, we’re importing something called StripeProvider and another thing called Elements from the react-stripe-elements package we installed at the beginning of this section.
StripeProvider is required for our app to have access to the Stripe object, and any component that interacts with the Stripe object must be a child of StripeProvider.
Elements is a React component that wraps around the actual checkout form. It helps group the set of Stripe Elements (more on this in a bit) together and makes it easy to tokenize all the data from each Stripe Element.
The Checkout component itself is fairly simple. It takes in two props, selectedProduct and history, which it passes on to a CheckoutForm component we’ll create next.
There’s also a useEffect call that scrolls the document to the top when the page mounts for the first time. This is necessary because react-router-dom preserves the previous scroll state when you switch routes.
Also notice that we’re passing a prop, apiKey, to StripeProvider. This key is the publishable key you copied earlier when setting up Stripe. Note that this prop is required because it serves as a way to authenticate your application to the Stripe servers.
CheckoutForm.jsx
This is the last component we’ll be creating, and it’s also the most important. The CheckoutForm component will hold the inputs for getting the user’s card details as well as actually making a call to the backend to process the payment charge.
Create a new file called CheckoutForm.jsx inside the components directory. We’re going to go through the content of this file section by section.
import React, { useState } from 'react'

import { Link } from 'react-router-dom'

import {

  CardNumberElement,

  CardExpiryElement,

  CardCVCElement,

  injectStripe

} from 'react-stripe-elements'

import axios from 'axios'

import './CheckoutForm.scss'
...to be continued below...
First, we import the required packages we’ll be working with into the file. Notice the imports from the react-stripe-elements package. This is a good time to talk more about Stripe Elements.
Stripe Elements are a set of prebuilt UI elements that allow you to collect your user’s card information without managing such sensitive information yourself.
The react-stripe-elements package is a wrapper for Stripe Elements that exposes these elements as React components you can just plug into your app — no need to create them from scratch.
We are importing some of these components into this file along with a HOC component, injectStripe.
injectStripe basically takes the Stripe object initialized in the StripeProvider component and “injects” the object into any component wrapped with it. This is how we’ll get access to the Stripe Object.
We then import a package called axios. Axios is just a promise-based HTTP client for the browser that we’re going to use to communicate with our payments server.
You can get the contents of CheckoutForm.scss from here.
...continued...
const CheckoutForm = ({ selectedProduct, stripe, history }) => {

  if (selectedProduct === null) history.push('/')


  const [receiptUrl, setReceiptUrl] = useState('')


  const handleSubmit = async event => {

    event.preventDefault()


    const { token } = await stripe.createToken()


    const order = await axios.post('http://localhost:7000/api/stripe/charge', {

      amount: selectedProduct.price.toString().replace('.', ''),

      source: token.id,

      receipt_email: '[email protected]'

    })


    setReceiptUrl(order.data.charge.receipt_url)

  }
...to be continued...
Next up is the actual CheckoutForm component itself. It takes in three props:
selectedProduct
stripe
history
selectedProduct is the product the user clicked on to purchase. It’s coming from the root App component’s state and is being passed down as props.
stripe is the actual Stripe object that is being “injected” as a prop by the injectStripe HOC we imported. You already know what history does.
The first thing we do in the component is check whether selectedProduct actually exists. If it doesn’t, we route the user to the homepage. In a production-grade app, this would probably be handled by a route guard HOC.
We then define a new piece of state to hold the receipt URL for successful payments. It will initially be empty.
Next, we define a function called handleSubmit, which will be called when the checkout form is submitted (i.e., when the Pay button is clicked). Let’s go through this function.
Firstly, we prevent the default behavior of the form element so that the page doesn’t refresh.
Then we destructure a token value from the result of an async call to stripe.createToken. createToken tokenizes the card information from the form and sends it to the Stripe server. It then returns a token object, where you can get a token.id value as an alias for the actual card info. This ensures that you never actually send the user’s card details to your payment server.
Secondly, we make an HTTP POST request to localhost:7000/api/stripe/charge with a request body containing three things:
amount
source
receipt_email
amount is the price of the item being purchased. We have to convert it to a string and remove all special characters like “.” and “,”. This means that a cost of $9.99 will get sent to the payment server as 999.
source is where the payment will be charged. In our case, it will be the ID of the token we just generated.
receipt_email is where the receipt of the payment will be sent. It is usually the customer’s email address, but in our case, we’re just hardcoding it because, again, we’re not implementing authentication.
After the request is done, we grab the URL of the receipt from the response object and set it to state. This is assuming that there are no errors, so in a production-grade app, you would usually implement error handling.
...continued...
if (receiptUrl) {

    return (

      <div className="success">

        <h2>Payment Successful!</h2>

        <a href={receiptUrl}>View Receipt</a>

        <Link to="/">Home</Link>

      </div>

    )

  }
...to be continued...
Immediately after the handleSubmit function, we have an if check to see if there’s a receiptUrl in the state. If there is, we want to render a div containing a success message and a link to view the receipt as well as a link back to the homepage.
...continued...
return (

    <div className="checkout-form">

      <p>Amount: ${selectedProduct.price}</p>

      <form onSubmit={handleSubmit}>

        <label>

          Card details

          <CardNumberElement />

        </label>

        <label>

          Expiration date

          <CardExpiryElement />

        </label>

        <label>

          CVC

          <CardCVCElement />

        </label>

        <button type="submit" className="order-button">

          Pay

        </button>

      </form>

    </div>

  )

}
export default injectStripe(CheckoutForm)
Otherwise, we’re going to render the actual checkout form. We’re using the prebuilt Elements components instead of recreating them from scratch and having to manage sensitive information.
At the end of this file, we wrap the CheckoutForm component in the injectStripe HOC so that we have access to the Stripe object we use in the component.
Testing our app
Let’s go through what we’ve accomplished so far.
We’ve created a payments server that communicates with Stripe
We’ve created a homepage to list our products
We’ve created a checkout page to capture the user’s payment details
We’ve created a handleSubmit function to send a request to the server to process a payment charge
We just about have everything set up, so it’s time to actually run our app and see if we’re able to purchase a Rubber Duck. We have to add our scripts first, so open the package.json file and replace the “scripts” section with the following:
"scripts": {

    "build": "parcel build public/index.html --out-dir build --no-source-maps",

    "dev": "node src/server.js & parcel public/index.html",

    "start": "node src/server.js"

  },
Open your terminal and run npm run dev. This should start the payments server and expose the frontend on port 1234. Open your browser, navigate to http://localhost:1234, and follow the steps below:
Click on the PURCHASE button on any product
In the checkout page, fill in 4242 4242 4242 4242 for the Card details field
Fill in any expiration date and choose a random CVC value
Click on Pay
If everything goes well, you should see a Payment Successful message with links to view your receipt and go back to the homepage.
To confirm payment, log in to your Stripe dashboard, click on Payments, and you should see your payment there.

If your company website using WooCommerce codes , you can use WooCommerce Stripe Payment Gateway Plugin
Woocommerce Stripe payment gateway enables you to accept payments from customers directly onsite. Customers can purchase their items, select stripe as their checkout option, and be able to pay quite easily with their credit cards.
Stripe takes care of processing the payment (for a little fee) and securing the customer’s financial details, thus giving customers both ease of use and security.
This guide will show you all the steps you need to integrate Stripe with WooCommerce using the WooCommerce Stripe Payment Gateway plugin. We assume you already have a Stripe account. If not, create one, and then go on to activate it.
Also, if you want to avoid all the work, we can help you setup and test Stripe in your WooCommerce store. Simply request our service and we will get to work on it.

Step 1. Installing the WooCommerce Stripe Payment Gateway plugin
To install the plugin, login to your WordPress Dashboard and go to “Plugins > Add New”

Add New Plugin - WooCommerce Stripe Payment Integration
Type in “WooCommerce Stripe Payment Gateway” in the search bar. When the plugin appears, click Install Now and wait for the installation to complete. Next click Activate.
Note: Ensure you install the WooCommerce Stripe plugin designed by WooCommerce.
Install and activate WooCommerce Stripe Payment Gateway
After activating the plugin, go to WooCommerce > Settings.
Go to Settings - WooCommerce Stripe Payment Integration
Next, switch to the “Checkout” tab. If you have correctly activated the WooCommerce Stripe plugin, “Stripe” should now appear among the options. Click on it.
Step 2. Setting Up Stripe Payment Options
In this step, we are going to set up the various options needed to activate and configure stripe for your website.
First click “Enable Stripe” to activate this payment option.
Next, setup your Title and Description. These would determine what users see during checkout. The default values may be good enough, or you can adjust as you see fit.
Set the description - WooCommerce Stripe Payment Integration
Since we want to try it out in test mode first, tick the “Enable Test Mode” option. Next, login to your stripe account and click API.
Switch to test mode with the toggle button, and copy the test “Publishable” and “Secret” keys into the corresponding fields in your stripe plugin.

Copy test API keys - WooCommerce Stripe Payment Integration
In the Statement Descriptor input, enter a description that will appear in the transaction statement. In the example below, this is “FixRunner Web Services”.
Next, tick the “Capture Charge Immediately” option to ensure charges are processed and billed as soon as the customer checks out.
Enter settings - WooCommerce Stripe Payment Integration
Enabling Stripe Checkout
When the “Enable Stripe Checkout” option is ticked, users get a popup form requesting their financial details when they select stripe as payment method and click Continue To Payment. Enabling this option also gives you the ability to accept payments via Bitcoin.
To use this feature, tick “Enable Stripe Checkout”. Next, select your preferred language, and tick “Enable Bitcoin Currency” if you want to accept payments with Bitcoin.
If you want a custom image of your brand to appear on top of the Stripe checkout popup, enter the url of that image in the “Stripe Checkout Image” input box.
Enable Stripe Checkout - WooCommerce Stripe Payment Integration
When users opt to pay through Stripe, the payment popup will appear like this:
Payment with Stripe Checkout - WooCommerce Stripe Payment Integration
Enabling Apple Pay
Apple pay offers your customers a very simple way to checkout from their iOS devices. If you want to use this option, tick “Enable Apple Pay”
Next, select your button style, and enter the 2 letter code for the language you want Apple pay to be displayed in. You may leave it set to “en” for English, or click the link under that option to see the codes for other languages.
Apple pay settings - WooCommerce Stripe Payment Integration
Now go back to your stripe account and click Payments. In the payments page, select Apple Pay, and accept Apples terms of service.
Accept Apple Pay terms - WooCommerce Stripe Payment Integration
Next, click Add New Domain, and type in your domain name. Your WooCommerce Stripe plugin would take care of steps 2 and 3. Go on to click Add.
Add domain for Apple Pay - WooCommerce Stripe Payment Integration
Note: If you get an error that the file could not be found in your domain, go back, download the file in step 2, and upload it to the specified location in step 3. And then click Add.
After completing this step and saving the setting in your Plugin, Apple Pay would be seen in product, checkout, and other pages, when your site is accessed with a compatible iOS device.
Saving Details for Future Payments
If you would like to store customer financial details so you can use these for billing them in the future, tick the “Enable Payments Via Saved Cards” option.
Saving financial details - WooCommerce Stripe Payment Integration
Note that the financial details are not stored on your servers, but on Stripe’s servers, where all security measures are in place to protect this sensitive data.
For debugging purposes, you may also enable the “Log Debug Messages” option. This can be useful in finding out what went wrong if there are errors.
And that concludes your setup process. Click Save Changes to use the settings you have specified.
Step 3. Trying WooCommerce Stripe in Test Mode
In the setup above, we enabled test mode and used the test API details obtained from Stripe. This is useful to check if Stripe payment works properly before making it available to your customers.
Stripe provides test credit card details you can use for this purpose. In this example, we would be using the following details, and you should be able to use them too. If not, you can obtain other test card details.
Card number: 4242424242424242
Expiry: Any date after today
CVV: 789
Now, go to any of your products page, add the product to cart, and click View Cart. In the cart page, click Proceed to checkout.
Fill out the form with your information. At the bottom of the page, select “Stripe” as your payment method and click Continue to payment.
Next, enter the test financial details and click Pay #Amount.
Test payment - WooCommerce Stripe Payment Integration
You would be taken to an order confirmation page like the one below:
Payment confirmation - WooCommerce Stripe Payment Integration
Congratulations! Your WooCommerce Stripe payment option works!
The final step is to make this payment method available to customers.
Step 4. Activating Live Mode to begin processing real payments
To enable this payment method for your customers, you need to activate live mode.
In your WordPress dashboard, go to WooCommerce > Settings. Next, switch to the “Checkout” tab and click Stripe.
Uncheck the enable test mode option. When you do, the key input boxes will change to accept the live keys.
Switch to live mode - WooCommerce Stripe Payment Integration
Now login go to your stripe dashboard and click API. You should currently be in test mode.
Switch API to live - WooCommerce Stripe Payment Integration
To switch to live mode, click the Live/Test toggle switch. Next, copy your live Publishable and Secret keys into their input boxes in your WooCommerce Stripe Plugin.
Enter live keys - WooCommerce Stripe Payment Integration
Lastly, scroll down and click Save Changes. Customers can now make payments with Stripe on your website.
Note: To be able to activate live mode, you must have ssl in your server (i.e. your domain should start with https), and you must have enabled the “Force secure checkout” option found in WooCommerce > Settings > Checkout.
If you do not have ssl, have your host add it for you, and then go on to enable secure checkout, and then live mode.
新西兰华人网页设计公司|我们的后端工程师David总结的静态站点加速访问经验,通过 Google CDN 加速,如何让你的网站在一秒钟内打开
full stack developer Kevin wrote the post • 0 comments • 487 views • 2020-04-05 13:33
如果更近一步,除了新西兰本地外,想要让大陆地区访问速度更加快一些的话,我们可以考虑将站点内容放在 Google Cloud Platform 的 Storage 中,并且使用 Google CDN 进行全网加速(主要是因为国内大部分线路可以不绕路使用到香港边缘节点).
本文假设:
你有 Google Cloud Platform 账户,并懂得一些基本操作
在自己的机器上安装了 Google Cloud SDK,如果没有的话,参考 《挂载 Google Storage 到 VPS 文件系统》
账户中已经验证好了自己的域名,如果没有的话,参考 Domain ownership verification
获取 SSL 证书
除非希望托管一个 HTTP 的网站,否则一个证书是必不可少的,Google 不会帮你自动完成这一步。
有多种方式可以获取一个 SSL 证书,如果目前手头没有的话,我们通过 Let’s Encrypt 申请一个好了,首先获取 certbot:$ git clone https://github.com/certbot/certbot.git
$ cd certbot
由于我自己的一些原因(在迁移前域名解析到 GitHub Pages 上的,不能通过改变解析的方式验证,否则会造成博客访问中断),这里我使用了 DNS 的方式进行获取:$ ./certbot-auto certonly --manual --preferred-challenges=dns --email [email protected] --server https://acme-v02.api.letsencrypt.org/directory --agree-tos -d nova.moe
之后会看到一个修改域名 TXT 记录的要求,类似如下:
Please deploy a DNS TXT record under the name _acme-challenge.nova.moe with the following value: J50GNXkhGmKCfn-0LQJcknVGtPEAQ_U_WajcLXgqWqo
此时我们只需要做一个 _acme-challenge 的 TXT 解析,内容为上述的 J50G...qo 即可。
如果没有遇到的问题的话我们就可以看到生成好的证书信息,类似如下:
IMPORTANT NOTES:
- Congratulations! Your certificate and chain have been saved at:
/etc/letsencrypt/live/nova.moe/fullchain.pem
Your key file has been saved at:
/etc/letsencrypt/live/nova.moe/privkey.pem
此时通过任何你喜欢的方式把 fullchain.pem 和 privkey.pem 下载到自己本地。
创建 Storage 桶,配置权限,导入文件
创建 Storage 桶
新建一个 Storage 容器,名称就是你希望的域名
配置权限
由于是对外提供内容的网站,我们需要把 Public Access 设置为 Public 并且为网站配置优化,具体方法如下:
点击最右边的选项,选择 Edit bucket permissions,添加一个 allUsers 账户,权限为 Storage Object Viewer
还是那个选项,选择 Edit website configuration,按照如下填入 index.html 和你的站点 404 页面(比如我的就是 404.html)
导入文件
注意,这里不要参考 《挂载 Google Storage 到 VPS 文件系统》,挂载到本地目录后上传,因为这样会导致文件的 meta 信息错误,导致本来该渲染为图片的地方变成了 octec-stream,本来该是网页的地方变成了 octec-stream ,本来… 然后访问任何页面都是弹出一个下载框了。
正确方法是使用 gsutil 来上传,语法如下:$ gsutil cp -r dir gs://my-bucket其中 dir 就是源目录,假设我的博客放在 /var/www/nova.moe/ 目录下 ,my-bucket 是目标 Storage 桶地址,比如我的就是 gs://nova.moe,整理一下就是:$ gsutil /var/www/nova.moe/* -r dir gs://www.yourdomain.com
可能有同学想到这里如果用 gsutil rsync 的话会不会更好一些,毕竟有增量同步之类的。
不是这样的,这样做的话即不能保留 meta 信息,也不会增量同步,相关描述如下:
Note that by default, the gsutil rsync command does not copy the ACLs of objects being synchronized and instead will use the default bucket ACL (see gsutil help defacl).
The gsutil rsync command copies changed files in their entirety and does not employ the rsync delta-transfer algorithm to transfer portions of a changed file. This is because cloud objects are immutable and no facility exists to read partial cloud object checksums or perform partial overwrites.
设置 Load Balancer
创建一个 HTTP/HTTPS 的 Load Balancer,Backend 创建一个 Backend Bucket,选择刚刚创建的 Storage 桶并勾选 Enable Cloud CDN:
Frontend 那一块选择 HTTPS:
然后导入 SSL 证书,其中 Public Key 和 Chain 全部上传 fullchain.pem, Private Key 就上传 privkey.pem :
创建好了之后有一个 Overview,类似如下:
延迟对比
GitHub Pages
Google Cloud Platform + Google CDN
已知问题 / 缺陷
这样子做的话,每次更新站点的同步也是一个问题,尤其是对于像我这样的 Hexo 用户而言,本地不想安装 SDK,传完文件后手动上服务器 gsutil cp 会很麻烦。
Google Cloud Platform 的 Load Balancer 并不能做 Force SSL,也就是说如果在 HTTPS 只选择了 443 端口的话,用户未添加 https:// 前缀的情况下访问的返回会是 404,如果同时也添加了 80 端口的话,直接访问也不会自动跳转到 https 上面。
一个比较大众化的解决方案是开一个 Compute instance 监听 80 端口专门用来做 SSL 重定向,但这样便失去了便捷性同时也会导致价格无意义地升高(无脑猜测 Google 团队到现在还不提供这个功能是有一定动机的,关于这个的 issue tracker:Redirect all HTTP traffic to HTTPS when using the HTTP(S) Load Balancer 从 15 年到现在还没有一个正式的答复),另一个思路是将域名加入 Preload List,但是现在的网站结构似乎并不能上 List,目前我正在寻找一个更加可靠的解决方案并不定期更新本文,相关更新会优先在 Twitter 上通知,欢迎关注。
2018-08-16 更新:最终我还是选择了新建一个 Compute instance 的方式解决(可以参考:利用 GCE 建立一个 Anycast 网络,超快的香港节点,Google Cloud CDN),Nginx 配置中稍微需要注意一下,Google CDN 会给后端传一个 X-Forwarded-Proto ,鉴于 Google CDN 的 SSL 只到边缘服务器就截止了(其实还是一个 Half-baked SSL),所以后端 Nginx 还是监听在 80 端口的,如果需要 SSL 重定向的话,需要加入以下内容:
if ($http_x_forwarded_proto = "http") {
return 301 https://$host$request_uri;
}
Google Load Balancer
我们知道,业界 Load Balancer 一般有以下实现方案:
一个 Anycast IP(比如 Google LB)
一个普通 IP(比如 Ucloud LB)
一个 CNAME 分区解析(比如 AWS ELB)
且不讨论 CNAME 那个看上去像是一个没钱 Anycast 的解决方案,而且如果用给 APEX 解析的话,在没有特殊加成(APEX FLATTEN)的情况会把 MX 记录炸穿(然后你就无法收邮件了),前者看上去是一个比较用户友好的方式,因为你只需要 A 记录到一个 IP 就可以了,绿色无害。
GFE
在了解 Google LB 之前,我们需要了解一个名词——GFE,感谢 Snowden 的 PPT,我们可以有一个直观的图示:
所有到 Google 的流量会在 GFE 上 SSL Offload(应该叫 SSL 卸载?),并且后端全部是在 Google 内网内以 HTTP 的方式进行传输。
在 Google Infrastructure Security Design Overview 中,我们也可以看到:
When a service wants to make itself available on the Internet, it can register itself with an infrastructure service called the Google Front End (GFE). The GFE ensures that all TLS connections are terminated using correct certificates and following best practices such as supporting perfect forward secrecy.
Google LB 也是一样,使用 GFE 作为面相用户的前端,将 SSL 流量在 GFE 上终结,然后以 HTTP 的方式回到后端的 Service 上。
使用一个统一的入口好处有很多,比如 GCP 就提供了一个统一的位置修改 SSL Policy:
可以自己选择心水的 Cipher Suite 和最低 TLS 版本等,和 Cloudflare 差不多(但是要让 Ucloud LB 做到这一点似乎就太困难了,他们基于 HAProxy 搞的 ULB 到本文发布时还不支持 TLS 1.3,而且要改 Cipher Suite 需要提工单)。
Premium IP
GCP 上的 IP 分为两种,一种是 Premium ,一种是 Standard,默认是前者,Google LB 也只能用 Premium。
Premium 使用的是冷土豆路由,所发送的数据包会保持在 Google 的内网内,并且在尽可能靠近用户的 PoP 离开。
view all
如果更近一步,除了新西兰本地外,想要让大陆地区访问速度更加快一些的话,我们可以考虑将站点内容放在 Google Cloud Platform 的 Storage 中,并且使用 Google CDN 进行全网加速(主要是因为国内大部分线路可以不绕路使用到香港边缘节点).
本文假设:
你有 Google Cloud Platform 账户,并懂得一些基本操作
在自己的机器上安装了 Google Cloud SDK,如果没有的话,参考 《挂载 Google Storage 到 VPS 文件系统》
账户中已经验证好了自己的域名,如果没有的话,参考 Domain ownership verification
获取 SSL 证书
除非希望托管一个 HTTP 的网站,否则一个证书是必不可少的,Google 不会帮你自动完成这一步。
有多种方式可以获取一个 SSL 证书,如果目前手头没有的话,我们通过 Let’s Encrypt 申请一个好了,首先获取 certbot:
$ git clone https://github.com/certbot/certbot.git

$ cd certbot
由于我自己的一些原因(在迁移前域名解析到 GitHub Pages 上的,不能通过改变解析的方式验证,否则会造成博客访问中断),这里我使用了 DNS 的方式进行获取:
$ ./certbot-auto certonly --manual --preferred-challenges=dns --email [email protected] --server https://acme-v02.api.letsencrypt.org/directory --agree-tos -d nova.moe
之后会看到一个修改域名 TXT 记录的要求,类似如下:
Please deploy a DNS TXT record under the name _acme-challenge.nova.moe with the following value: J50GNXkhGmKCfn-0LQJcknVGtPEAQ_U_WajcLXgqWqo
此时我们只需要做一个 _acme-challenge 的 TXT 解析,内容为上述的 J50G...qo 即可。
如果没有遇到的问题的话我们就可以看到生成好的证书信息,类似如下:
IMPORTANT NOTES:

 - Congratulations! Your certificate and chain have been saved at:

   /etc/letsencrypt/live/nova.moe/fullchain.pem

   Your key file has been saved at:

   /etc/letsencrypt/live/nova.moe/privkey.pem
此时通过任何你喜欢的方式把 fullchain.pem 和 privkey.pem 下载到自己本地。
创建 Storage 桶,配置权限,导入文件
创建 Storage 桶
新建一个 Storage 容器,名称就是你希望的域名

配置权限
由于是对外提供内容的网站,我们需要把 Public Access 设置为 Public 并且为网站配置优化,具体方法如下:

点击最右边的选项,选择 Edit bucket permissions,添加一个 allUsers 账户,权限为 Storage Object Viewer
还是那个选项,选择 Edit website configuration,按照如下填入 index.html 和你的站点 404 页面(比如我的就是 404.html)

导入文件
注意,这里不要参考 《挂载 Google Storage 到 VPS 文件系统》,挂载到本地目录后上传,因为这样会导致文件的 meta 信息错误,导致本来该渲染为图片的地方变成了 octec-stream,本来该是网页的地方变成了 octec-stream ,本来… 然后访问任何页面都是弹出一个下载框了。
正确方法是使用 gsutil 来上传,语法如下:
$ gsutil cp -r dir gs://my-bucket其中 dir 就是源目录,假设我的博客放在 /var/www/nova.moe/ 目录下 ,my-bucket 是目标 Storage 桶地址,比如我的就是 gs://nova.moe,整理一下就是:
$ gsutil /var/www/nova.moe/* -r dir gs://www.yourdomain.com
可能有同学想到这里如果用 gsutil rsync 的话会不会更好一些,毕竟有增量同步之类的。
不是这样的,这样做的话即不能保留 meta 信息,也不会增量同步,相关描述如下:
Note that by default, the gsutil rsync command does not copy the ACLs of objects being synchronized and instead will use the default bucket ACL (see gsutil help defacl).
The gsutil rsync command copies changed files in their entirety and does not employ the rsync delta-transfer algorithm to transfer portions of a changed file. This is because cloud objects are immutable and no facility exists to read partial cloud object checksums or perform partial overwrites.
设置 Load Balancer
创建一个 HTTP/HTTPS 的 Load Balancer,Backend 创建一个 Backend Bucket,选择刚刚创建的 Storage 桶并勾选 Enable Cloud CDN:

Frontend 那一块选择 HTTPS:

然后导入 SSL 证书,其中 Public Key 和 Chain 全部上传 fullchain.pem, Private Key 就上传 privkey.pem :

创建好了之后有一个 Overview,类似如下:

延迟对比
GitHub Pages

Google Cloud Platform + Google CDN

已知问题 / 缺陷
这样子做的话,每次更新站点的同步也是一个问题,尤其是对于像我这样的 Hexo 用户而言,本地不想安装 SDK,传完文件后手动上服务器 gsutil cp 会很麻烦。
Google Cloud Platform 的 Load Balancer 并不能做 Force SSL,也就是说如果在 HTTPS 只选择了 443 端口的话,用户未添加 https:// 前缀的情况下访问的返回会是 404,如果同时也添加了 80 端口的话,直接访问也不会自动跳转到 https 上面。
一个比较大众化的解决方案是开一个 Compute instance 监听 80 端口专门用来做 SSL 重定向,但这样便失去了便捷性同时也会导致价格无意义地升高(无脑猜测 Google 团队到现在还不提供这个功能是有一定动机的,关于这个的 issue tracker:Redirect all HTTP traffic to HTTPS when using the HTTP(S) Load Balancer 从 15 年到现在还没有一个正式的答复),另一个思路是将域名加入 Preload List,但是现在的网站结构似乎并不能上 List,目前我正在寻找一个更加可靠的解决方案并不定期更新本文,相关更新会优先在 Twitter 上通知,欢迎关注。
2018-08-16 更新:最终我还是选择了新建一个 Compute instance 的方式解决(可以参考:利用 GCE 建立一个 Anycast 网络,超快的香港节点,Google Cloud CDN),Nginx 配置中稍微需要注意一下,Google CDN 会给后端传一个 X-Forwarded-Proto ,鉴于 Google CDN 的 SSL 只到边缘服务器就截止了(其实还是一个 Half-baked SSL),所以后端 Nginx 还是监听在 80 端口的,如果需要 SSL 重定向的话,需要加入以下内容:
if ($http_x_forwarded_proto = "http") {

    return 301 https://$host$request_uri;

}
Google Load Balancer
我们知道,业界 Load Balancer 一般有以下实现方案:
一个 Anycast IP(比如 Google LB)
一个普通 IP(比如 Ucloud LB)
一个 CNAME 分区解析(比如 AWS ELB)
且不讨论 CNAME 那个看上去像是一个没钱 Anycast 的解决方案,而且如果用给 APEX 解析的话,在没有特殊加成(APEX FLATTEN)的情况会把 MX 记录炸穿(然后你就无法收邮件了),前者看上去是一个比较用户友好的方式,因为你只需要 A 记录到一个 IP 就可以了,绿色无害。
GFE
在了解 Google LB 之前,我们需要了解一个名词——GFE,感谢 Snowden 的 PPT,我们可以有一个直观的图示:

所有到 Google 的流量会在 GFE 上 SSL Offload(应该叫 SSL 卸载?),并且后端全部是在 Google 内网内以 HTTP 的方式进行传输。
在 Google Infrastructure Security Design Overview 中,我们也可以看到:
When a service wants to make itself available on the Internet, it can register itself with an infrastructure service called the Google Front End (GFE). The GFE ensures that all TLS connections are terminated using correct certificates and following best practices such as supporting perfect forward secrecy.
Google LB 也是一样,使用 GFE 作为面相用户的前端,将 SSL 流量在 GFE 上终结,然后以 HTTP 的方式回到后端的 Service 上。
使用一个统一的入口好处有很多,比如 GCP 就提供了一个统一的位置修改 SSL Policy:

可以自己选择心水的 Cipher Suite 和最低 TLS 版本等,和 Cloudflare 差不多(但是要让 Ucloud LB 做到这一点似乎就太困难了,他们基于 HAProxy 搞的 ULB 到本文发布时还不支持 TLS 1.3,而且要改 Cipher Suite 需要提工单)。
Premium IP
GCP 上的 IP 分为两种,一种是 Premium ,一种是 Standard,默认是前者,Google LB 也只能用 Premium。
Premium 使用的是冷土豆路由,所发送的数据包会保持在 Google 的内网内,并且在尽可能靠近用户的 PoP 离开。

新西兰电商网站开发公司|我们的后端工程师David总结的独立电商购物网站整合支付接口的经验,如何让大陆的买家在你的网站上通过微信支付和支付宝付款
full stack developer Kevin wrote the post • 0 comments • 587 views • 2020-04-05 12:56
Stripe 目前收款方式有两种,简单来说,我们分为 Easy 难度和 Hard 难度,前者只支持信用卡,储蓄卡和 Apple Pay,而后者则支持多种支付方式,最终的效果图如下:
Easy 模式——使用 「Checkout」
Easy 模式即使用他们写好的页面,被称为「Checkout」,对于商户来说需要在后台定义好产品(Products),生成 sku 后写一个按钮出发脚本自动跳转过去,页面上需要写的内容如下:<!-- Load Stripe.js on your website. -->
<script src="https://js.stripe.com/v3"></script>
<!-- Create a button that your customers click to complete their purchase. Customize the styling to suit your branding. -->
<button
style="background-color:#6772E5;color:#FFF;padding:8px 12px;border:0;border-radius:4px;font-size:1em"
id="checkout-button-sku_xxxxxxxxxxx"
role="link"
>
Checkout
</button>
<div id="error-message"></div>
<script>
(function() {
var stripe = Stripe('pk_test_xxxxxxxxxxxx');
var checkoutButton = document.getElementById('checkout-button-sku_G40GQYkIX4a8c4');
checkoutButton.addEventListener('click', function () {
// When the customer clicks on the button, redirect
// them to Checkout.
stripe.redirectToCheckout({
items: [{sku: 'sku_xxxxxxxxxxx', quantity: 1}],
// Do not rely on the redirect to the successUrl for fulfilling
// purchases, customers may not always reach the success_url after
// a successful payment.
// Instead use one of the strategies described in
// https://stripe.com/docs/paymen ... lment
successUrl: 'https://xxx.xxx.xx/success',
cancelUrl: 'https://xxx.xxx.xx/canceled',
})
.then(function (result) {
if (result.error) {
// If `redirectToCheckout` fails due to a browser or network
// error, display the localized error message to your customer.
var displayError = document.getElementById('error-message');
displayError.textContent = result.error.message;
}
});
});
})();
</script>
这样在用户点了按钮之后就会出现一个 Stripe 的支付页面:
这样就可以用了,用户在付款完成之后就会跳转回到 successUrl,同时 Stripe 可以给你预先定义好的接口(WebHook)发一个 POST 请求告知,大致逻辑如下(其实官方有示范):\Stripe\Stripe::setApiKey('sk_test_xxxxxxxxxxxxxx');
// You can find your endpoint's secret in your webhook settings
$endpoint_secret = 'whsec_xxxxxxxxxxxxxxx';
$payload = @file_get_contents('php://input');
$sig_header = $_SERVER['HTTP_STRIPE_SIGNATURE'];
$event = null;
try {
$event = \Stripe\Webhook::constructEvent(
$payload, $sig_header, $endpoint_secret
);
} catch(\UnexpectedValueException $e) {
// Invalid payload
http_response_code(400);
exit();
} catch(\Stripe\Exception\SignatureVerificationException $e) {
// Invalid signature
http_response_code(400);
exit();
}
// Handle the checkout.session.completed event
if ($event->type == 'checkout.session.completed') {
$session = $event->data->object;
// 授权用户
$target_customer = \Stripe\Customer::retrieve($session['customer']);
$target_email = $target_customer['email'];
// 然后这里自己根据 email 找到对应用户完成接下来的步骤,比如把文件通过邮件发给用户,给用户头像加个 Buff 啥的~
}
这样就可以获取到用户的信息并且给用户提供/升级服务了,很方便是不是?
不过呢,「Checkout」只支持卡和 Apple Pay,对于喜欢见到付钱就想扫一扫的用户来说并不友好,所以我们需要使用一些别的方法。
Hard 模式——使用「STRIPE ELEMENTS」
为了照顾没有信用卡,遇见码就开始掏手机准备打开或绿或蓝应用准备开始扫一扫的用户来说,我们需要加入支付宝的支持功能。
首先确认你的账户中 Alipay 是连接上并且处于激活状态的,没有这一点等于没戏(也就不用继续往下看了)。
如果你的 Stripe 已经连接上了支付宝,接下来我们就可以开始整合了。
首先我们明白一下对于商户来说,逻辑是怎么样的:
首先由于 Stripe 并不是原生支持支付宝,所以所有这种非信用卡交易都被挂了称为「Source」的东西下,可以理解为一个插件或者一个临时的钱包,以下一段是具体的逻辑,请仔细阅读:
当用户需要付款的时候,用户会先通过 JS 创建一个 「Source」对象,并指定类型为「Alipay」,这个时候 Stripe.js 会带领用户去支付宝的付款页面进行支付,如果付款成功了,那么这个「Source」的状态会从 charge.pending 变成 source.chargeable ,可以理解为用户给临时钱包付了钱,在有了这个状态之后我们可以调用 Stripe 对这个 Source 扣款(Charge),把临时钱包的钱扣到自己 Stripe 账户上,然后就完成了付款的过程。
用户逻辑
我们先来看用户的逻辑部分:
用户的逻辑是,在对应的购买页面上应该有一个 Button,上面写上「立即购买」,这样用户只要一摸那个按钮,就可以看到支付宝的付款页面了,为了满足这个需要,我们需要这么做,在对应的页面上放个 Button:<button id="checkout-button">
立即购买
</button>
然后引用 stripe.js 并写一点 JS 来完成接下来的事情:<script src="https://js.stripe.com/v3/"></script>
<script type="text/javascript">
(function() {
var stripe = Stripe('pk_xxxxxxxxxxxxxx');
var checkout-button = document.getElementById('checkout-button');
checkout-button.addEventListener('click', function () {
stripe.createSource({
type: 'alipay',
amount: 1988,
currency: 'hkd',
// 这里你需要渲染出一些用户的信息,不然后期没法知道是谁在付钱
owner: {
email: '{$user_email}',
},
redirect: {
return_url: 'https://xxx.xxx.xx/buy',
},
}).then(function(result) {
window.location.replace(result.source.redirect.url);
});
});
})();
</script>
其中,owner 和 owner 下的 email 建议填写,不然付款后可能不好找到究竟是哪个用户付了钱,如果正巧你们不用 email 来标识用户,那也可以写点别的,对于 owner 来说有以下字段可供选择:
"owner": {
"address": null,
"email": "[email protected]",
"name": null,
"phone": null,
"verified_address": null,
"verified_email": null,
"verified_name": null,
"verified_phone": null
},
此外,如果你还希望在 Source 中包含一些其他的内容的话,可以自由地使用 metadata ,并在内部包含一系列键值对。由于 createSource 执行完成后会返回一个包含 Source 对象,类似如下:{
"id": "src_16xhynE8WzK49JbAs9M21jaR",
"object": "source",
"amount": 1099,
"client_secret": "src_client_secret_UfwvW2WHpZ0s3QEn9g5x7waU",
"created": 1445277809,
"currency": "usd",
"flow": "redirect",
"livemode": true,
"owner": {
"address": null,
"email": null,
"name": "null",
"phone": null,
"verified_address": null,
"verified_email": null,
"verified_name": "null",
"verified_phone": null
},
"redirect": {
"return_url": "https://shop.example.com/crtA6B28E1",
"status": "pending",
"url": "https://hooks.stripe.com/redir ... ot%3B
},
"statement_descriptor": null,
"status": "pending",
"type": "alipay",
"usage": "single_use",
"alipay": {
"statement_descriptor": null,
"native_url": null
}
}
其中的 redirect 只要访问了就会自动被 Stripe 跳转到支付宝家的支付页面上,所以我们最后会有一行:
window.location.replace(result.source.redirect.url);
将用户跳转过去,然后用户扫码付钱:
用户这边的事情就结束了。
服务器逻辑
用户的事情结束了,服务器端就需要开始处理用户的请求了,一个简单的方法如下,在用户付款完成后 Stripe 会跳转回我们 JS 中定义的 return_url 并附带一些参数,类似如下:https://xxx.xxx.xx/buy?client_secret=src_client_secret_xxxxxxxxx&source=src_xxxxxxxxx
这个时候我们可以通过服务端来解析 src_xxxxxxxxx 得知是谁在付钱,并完成后续的操作:\Stripe\Stripe::setApiKey('sk_xxxxxxxxxxxxxx');
// 获取 URL 中 source 字段
$source_id = filter_input(INPUT_GET, 'source', FILTER_SANITIZE_URL);
$source_object = \Stripe\Source::retrieve($source_id);
// 先确认一下用户付了钱,别有 Object 就直接开始整...
$status = $source_object->redirect->status;
if($status == "failed")
{
// 如果用户没有付钱,我们该怎么做?
}
else {
// 从临时钱包从把钱扣了~
\Stripe\Charge::create([
'amount' => 1988,
'currency' => 'hkd',
'source' => $source_id,
]);
// 有了 Object 之后我们可以提取出对应的用户邮件地址或者别的信息,比如邮件地址可以这样提取
$user_email = $source_object->owner->email;
// 然后这里自己根据 email 找到对应用户完成接下来的步骤,比如把文件通过邮件发给用户,给用户头像加个 Buff 啥的~
}
顺便可以登录 Stripe 后台看看~
微信实现
其实也非常的简单,只需要将上一步的type改为wechat,同时返回source中的source.wechat.qr_code_url转为二维码就好了
var wechatCallback = function (source) {
generateQRCode(source.wechat.qr_code_url);
}
function generateQRCode(value) {
var qrEle = document.getElementById("qrcode");
var qrcode = new QRCode(qrEle, {
width: 100,
height: 100
});
qrcode.makeCode(value);
qrEle.style.display = 'inline-block';
}二维码出来后, 扫码就会得到如下结果
不过这种方法只是说可以用而已,最好的方法可以参考 Best Practices for Using Sources 来接受 Webhook 多次验证,但这个就不在本文的范围内了。
由于是第一次接触支付领域,上述步骤中可能还是会有不少坑或者啥的(所以别直接在生产环境照抄,写完之后一定要多 Review 几遍逻辑漏洞),不过这个至少是一个可用最小模型了,还有不少可以改进的地方,比如浏览器端的函数其实可以异步拉起,这样可以在网页上弄一个 Modal 弹窗,看上去更加用户友好一些。
补充说明(04/06/2020):
关于注册 Stripe 账号
和注册支付宝账号一个道理,首先注册账号,然后绑定自己银行卡,BUT, 就像前面提到的,不支持中国,所以就算注册成功,也没法激活,也就没法收款。
对于中国商家怎么办呢,我能想到的就只有这3个办法:
自己去支持国家去办理张银行卡
使用国外的朋友银行卡
使用Atlas
对于James来说,因为他是新西兰kiwi,所以他可以创建他的主账号,然后添加我的stripe账号到他team memeber账号列表中,这样我就可以访问他账户下所有开发者需要的权限。邀请成功后,Dashboard页面
Stripe.js & Elements
当然对于如果你觉得Checkout的方式集成度太高,不够灵活,那Stripe.js是你最好的选择。
Stripe.js其实就是客户端的一个JS核心类库,Elements是它的UI类库,其实上面的Checkout代码就是Stripe使用两者给我们封装好了的,避免我们直接接触敏感信息,但是其实质都是一样的,都是用来创建source。这里就直接贴出客户端的代码了(这里没有用到Elements做UI,因为就是一个按钮支付,太简单,所以没用到):var stripe = Stripe('pk_live_xxxx');
function alipay(amount) {
showLoading();
stripe.createSource({
type: 'alipay',
amount: parseInt(amount),
currency: 'gbp', // usd, eur,
redirect: {
return_url: 'https://xxx.eu/pay/result.html'
},
}).then(function (response) {
hideLoading();
if (response.error) {
alert(response.error.message);
}
else {
processStripeResponse(response.source);
}
});
}
function processStripeResponse(source) {
window.location.href = source.redirect.url;
}
view all
Stripe 目前收款方式有两种,简单来说,我们分为 Easy 难度和 Hard 难度,前者只支持信用卡,储蓄卡和 Apple Pay,而后者则支持多种支付方式,最终的效果图如下:
Easy 模式——使用 「Checkout」
Easy 模式即使用他们写好的页面,被称为「Checkout」,对于商户来说需要在后台定义好产品(Products),生成 sku 后写一个按钮出发脚本自动跳转过去,页面上需要写的内容如下:
<!-- Load Stripe.js on your website. -->

<script src="https://js.stripe.com/v3"></script>

<!-- Create a button that your customers click to complete their purchase. Customize the styling to suit your branding. -->

<button

  style="background-color:#6772E5;color:#FFF;padding:8px 12px;border:0;border-radius:4px;font-size:1em"

  id="checkout-button-sku_xxxxxxxxxxx"

  role="link"

>

  Checkout

</button>

<div id="error-message"></div>

<script>

(function() {

  var stripe = Stripe('pk_test_xxxxxxxxxxxx');

  var checkoutButton = document.getElementById('checkout-button-sku_G40GQYkIX4a8c4');

  checkoutButton.addEventListener('click', function () {

    // When the customer clicks on the button, redirect

    // them to Checkout.

    stripe.redirectToCheckout({

      items: [{sku: 'sku_xxxxxxxxxxx', quantity: 1}],

      // Do not rely on the redirect to the successUrl for fulfilling

      // purchases, customers may not always reach the success_url after

      // a successful payment.

      // Instead use one of the strategies described in

      // https://stripe.com/docs/paymen ... lment

      successUrl: 'https://xxx.xxx.xx/success',

      cancelUrl: 'https://xxx.xxx.xx/canceled',

    })

    .then(function (result) {

      if (result.error) {

        // If `redirectToCheckout` fails due to a browser or network

        // error, display the localized error message to your customer.

        var displayError = document.getElementById('error-message');

        displayError.textContent = result.error.message;

      }

    });

  });

})();

</script>
这样在用户点了按钮之后就会出现一个 Stripe 的支付页面:

这样就可以用了,用户在付款完成之后就会跳转回到 successUrl,同时 Stripe 可以给你预先定义好的接口(WebHook)发一个 POST 请求告知,大致逻辑如下(其实官方有示范):
\Stripe\Stripe::setApiKey('sk_test_xxxxxxxxxxxxxx');


// You can find your endpoint's secret in your webhook settings

$endpoint_secret = 'whsec_xxxxxxxxxxxxxxx';


$payload = @file_get_contents('php://input');

$sig_header = $_SERVER['HTTP_STRIPE_SIGNATURE'];

$event = null;


try {

    $event = \Stripe\Webhook::constructEvent(

        $payload, $sig_header, $endpoint_secret

    );

} catch(\UnexpectedValueException $e) {

    // Invalid payload

    http_response_code(400);

    exit();

} catch(\Stripe\Exception\SignatureVerificationException $e) {

    // Invalid signature

    http_response_code(400);

    exit();

}


// Handle the checkout.session.completed event

if ($event->type == 'checkout.session.completed') {

    $session = $event->data->object;

    // 授权用户

    $target_customer = \Stripe\Customer::retrieve($session['customer']);

    $target_email = $target_customer['email'];

    // 然后这里自己根据 email 找到对应用户完成接下来的步骤,比如把文件通过邮件发给用户,给用户头像加个 Buff 啥的~

}
这样就可以获取到用户的信息并且给用户提供/升级服务了,很方便是不是?
不过呢,「Checkout」只支持卡和 Apple Pay,对于喜欢见到付钱就想扫一扫的用户来说并不友好,所以我们需要使用一些别的方法。
Hard 模式——使用「STRIPE ELEMENTS」
为了照顾没有信用卡,遇见码就开始掏手机准备打开或绿或蓝应用准备开始扫一扫的用户来说,我们需要加入支付宝的支持功能。
首先确认你的账户中 Alipay 是连接上并且处于激活状态的,没有这一点等于没戏(也就不用继续往下看了)。

如果你的 Stripe 已经连接上了支付宝,接下来我们就可以开始整合了。
首先我们明白一下对于商户来说,逻辑是怎么样的:

首先由于 Stripe 并不是原生支持支付宝,所以所有这种非信用卡交易都被挂了称为「Source」的东西下,可以理解为一个插件或者一个临时的钱包,以下一段是具体的逻辑,请仔细阅读:
当用户需要付款的时候,用户会先通过 JS 创建一个 「Source」对象,并指定类型为「Alipay」,这个时候 Stripe.js 会带领用户去支付宝的付款页面进行支付,如果付款成功了,那么这个「Source」的状态会从 charge.pending 变成 source.chargeable ,可以理解为用户给临时钱包付了钱,在有了这个状态之后我们可以调用 Stripe 对这个 Source 扣款(Charge),把临时钱包的钱扣到自己 Stripe 账户上,然后就完成了付款的过程。
用户逻辑
我们先来看用户的逻辑部分:
用户的逻辑是,在对应的购买页面上应该有一个 Button,上面写上「立即购买」,这样用户只要一摸那个按钮,就可以看到支付宝的付款页面了,为了满足这个需要,我们需要这么做,在对应的页面上放个 Button:
<button id="checkout-button">

    立即购买

</button>
然后引用 stripe.js 并写一点 JS 来完成接下来的事情:
<script src="https://js.stripe.com/v3/"></script>

<script type="text/javascript">

    (function() {

      var stripe = Stripe('pk_xxxxxxxxxxxxxx');

      var checkout-button = document.getElementById('checkout-button');

      checkout-button.addEventListener('click', function () {

        stripe.createSource({

          type: 'alipay',

          amount: 1988,

          currency: 'hkd',

          // 这里你需要渲染出一些用户的信息,不然后期没法知道是谁在付钱

          owner: {

            email: '{$user_email}',

          },

          redirect: {

            return_url: 'https://xxx.xxx.xx/buy',

          },

        }).then(function(result) {

          window.location.replace(result.source.redirect.url);

        });

      });

    })();

</script>
其中,owner 和 owner 下的 email 建议填写,不然付款后可能不好找到究竟是哪个用户付了钱,如果正巧你们不用 email 来标识用户,那也可以写点别的,对于 owner 来说有以下字段可供选择:
"owner": {

    "address": null,

    "email": "[email protected]",

    "name": null,

    "phone": null,

    "verified_address": null,

    "verified_email": null,

    "verified_name": null,

    "verified_phone": null

  },
此外,如果你还希望在 Source 中包含一些其他的内容的话,可以自由地使用 metadata ,并在内部包含一系列键值对。由于 createSource 执行完成后会返回一个包含 Source 对象,类似如下:
{

  "id": "src_16xhynE8WzK49JbAs9M21jaR",

  "object": "source",

  "amount": 1099,

  "client_secret": "src_client_secret_UfwvW2WHpZ0s3QEn9g5x7waU",

  "created": 1445277809,

  "currency": "usd",

  "flow": "redirect",

  "livemode": true,

  "owner": {

    "address": null,

    "email": null,

    "name": "null",

    "phone": null,

    "verified_address": null,

    "verified_email": null,

    "verified_name": "null",

    "verified_phone": null

  },

  "redirect": {

    "return_url": "https://shop.example.com/crtA6B28E1",

    "status": "pending",

    "url": "https://hooks.stripe.com/redir ... ot%3B

  },

  "statement_descriptor": null,

  "status": "pending",

  "type": "alipay",

  "usage": "single_use",

  "alipay": {

    "statement_descriptor": null,

    "native_url": null

  }

}
其中的 redirect 只要访问了就会自动被 Stripe 跳转到支付宝家的支付页面上,所以我们最后会有一行:
window.location.replace(result.source.redirect.url);
将用户跳转过去,然后用户扫码付钱:

用户这边的事情就结束了。
服务器逻辑
用户的事情结束了,服务器端就需要开始处理用户的请求了,一个简单的方法如下,在用户付款完成后 Stripe 会跳转回我们 JS 中定义的 return_url 并附带一些参数,类似如下:
https://xxx.xxx.xx/buy?client_secret=src_client_secret_xxxxxxxxx&source=src_xxxxxxxxx
这个时候我们可以通过服务端来解析 src_xxxxxxxxx 得知是谁在付钱,并完成后续的操作:
\Stripe\Stripe::setApiKey('sk_xxxxxxxxxxxxxx');


// 获取 URL 中 source 字段

$source_id = filter_input(INPUT_GET, 'source', FILTER_SANITIZE_URL);

$source_object = \Stripe\Source::retrieve($source_id);


// 先确认一下用户付了钱,别有 Object 就直接开始整...

$status = $source_object->redirect->status;

if($status == "failed")

{

   	// 如果用户没有付钱,我们该怎么做?

}

else {

    // 从临时钱包从把钱扣了~

    \Stripe\Charge::create([

        'amount' => 1988,

        'currency' => 'hkd',

        'source' => $source_id,

    ]);

    // 有了 Object 之后我们可以提取出对应的用户邮件地址或者别的信息,比如邮件地址可以这样提取

    $user_email = $source_object->owner->email;

    // 然后这里自己根据 email 找到对应用户完成接下来的步骤,比如把文件通过邮件发给用户,给用户头像加个 Buff 啥的~

}
顺便可以登录 Stripe 后台看看~

微信实现
其实也非常的简单,只需要将上一步的type改为wechat,同时返回source中的source.wechat.qr_code_url转为二维码就好了
二维码出来后, 扫码就会得到如下结果
var wechatCallback = function (source) {

    generateQRCode(source.wechat.qr_code_url);

}

function generateQRCode(value) {

    var qrEle = document.getElementById("qrcode");

    var qrcode = new QRCode(qrEle, {

        width: 100,

        height: 100

    });

    qrcode.makeCode(value);

    qrEle.style.display = 'inline-block';

}

不过这种方法只是说可以用而已,最好的方法可以参考 Best Practices for Using Sources 来接受 Webhook 多次验证,但这个就不在本文的范围内了。
由于是第一次接触支付领域,上述步骤中可能还是会有不少坑或者啥的(所以别直接在生产环境照抄,写完之后一定要多 Review 几遍逻辑漏洞),不过这个至少是一个可用最小模型了,还有不少可以改进的地方,比如浏览器端的函数其实可以异步拉起,这样可以在网页上弄一个 Modal 弹窗,看上去更加用户友好一些。
补充说明(04/06/2020):
关于注册 Stripe 账号
和注册支付宝账号一个道理,首先注册账号,然后绑定自己银行卡,BUT, 就像前面提到的,不支持中国,所以就算注册成功,也没法激活,也就没法收款。
对于中国商家怎么办呢,我能想到的就只有这3个办法:
自己去支持国家去办理张银行卡
使用国外的朋友银行卡
使用Atlas
对于James来说,因为他是新西兰kiwi,所以他可以创建他的主账号,然后添加我的stripe账号到他team memeber账号列表中,这样我就可以访问他账户下所有开发者需要的权限。邀请成功后,Dashboard页面
Stripe.js & Elements
当然对于如果你觉得Checkout的方式集成度太高,不够灵活,那Stripe.js是你最好的选择。
Stripe.js其实就是客户端的一个JS核心类库,Elements是它的UI类库,其实上面的Checkout代码就是Stripe使用两者给我们封装好了的,避免我们直接接触敏感信息,但是其实质都是一样的,都是用来创建source。这里就直接贴出客户端的代码了(这里没有用到Elements做UI,因为就是一个按钮支付,太简单,所以没用到):
var stripe = Stripe('pk_live_xxxx');


function alipay(amount) {

    showLoading();

    stripe.createSource({

        type: 'alipay',

        amount: parseInt(amount),

        currency: 'gbp', // usd, eur,

        redirect: {

            return_url: 'https://xxx.eu/pay/result.html'

        },

    }).then(function (response) {

        hideLoading();

        if (response.error) {

            alert(response.error.message);

        }

        else {

            processStripeResponse(response.source);

        }

    });

}


function processStripeResponse(source) {

    window.location.href = source.redirect.url;

}
新西兰网站开发公司|我们的设计师Novah分享她的独门秘笈,如何创建美丽、独特的免版权背景图案
full stack developer Kevin wrote the post • 0 comments • 649 views • 2020-04-05 12:09
今天重点介绍一下背景图案生成器,以前文章推荐过好的背景可以让你的设计更出彩,这里推荐了几个背景素材,感兴趣的也可以去码力全开资源站查看背景素材分类,这里收录了16个背景素材网站。
Beautiful Dingbats
网址:https://beautifuldingbats.com
打开网站,可以看到一个背景图案生成器,用它可以创建独特、漂亮的免版权背景图案,可以导出SVG、JPEG、PNG格式。
接着下面是Unicode工具,这里面包含了花式字体生成器、日历生成器、小故障文本生成器、删除线生成器等等。
这里还提供了Emojis表情相关的符号,有很多不同的类型符号,比如雪花、星星等等,可以直接复制这些符号。
接下来重点看一下背景图案生成器,点进去背景图案生成器,可以看到提供了一些随机的图案例子,点击右侧会生成不同的图案。
选择好一个图案,点击开始使用按钮即可进入编辑图案的界面,这里提供了图案相关的一些条纹可以选择。
这里提供了很多参数可以调整图案,比如改变图案上的形状大小,从0到20自定义调整。
图案上的拼贴比例从5到100也可以调整,以及图案的旋转方向从0到360,还有图案的颜色可以自定义色值。
另外,还可以自定义图案的辅助颜色以及图案的背景颜色,同时颜色还可以左右切换不同的类型,比如Material Design类型的色值。
最后调整好一个满意的背景图案,可以复制链接进行分享,也可以将图案导出SVG、JPEG或PNG格式,同时导出的图案还可以自定义尺寸。
最后
今天的内容就是这些 view all

今天重点介绍一下背景图案生成器,以前文章推荐过好的背景可以让你的设计更出彩,这里推荐了几个背景素材,感兴趣的也可以去码力全开资源站查看背景素材分类,这里收录了16个背景素材网站。
Beautiful Dingbats
网址:https://beautifuldingbats.com

打开网站,可以看到一个背景图案生成器,用它可以创建独特、漂亮的免版权背景图案,可以导出SVG、JPEG、PNG格式。

接着下面是Unicode工具,这里面包含了花式字体生成器、日历生成器、小故障文本生成器、删除线生成器等等。
这里还提供了Emojis表情相关的符号,有很多不同的类型符号,比如雪花、星星等等,可以直接复制这些符号。
接下来重点看一下背景图案生成器,点进去背景图案生成器,可以看到提供了一些随机的图案例子,点击右侧会生成不同的图案。

选择好一个图案,点击开始使用按钮即可进入编辑图案的界面,这里提供了图案相关的一些条纹可以选择。

这里提供了很多参数可以调整图案,比如改变图案上的形状大小,从0到20自定义调整。

图案上的拼贴比例从5到100也可以调整,以及图案的旋转方向从0到360,还有图案的颜色可以自定义色值。

另外,还可以自定义图案的辅助颜色以及图案的背景颜色,同时颜色还可以左右切换不同的类型,比如Material Design类型的色值。

最后调整好一个满意的背景图案,可以复制链接进行分享,也可以将图案导出SVG、JPEG或PNG格式,同时导出的图案还可以自定义尺寸。

最后
今天的内容就是这些
新西兰网站开发公司|我们的插画师Isabella给大家分享一个免费开源的表情符号大全
full stack developer Kevin wrote the post • 0 comments • 739 views • 2020-04-05 12:00
OpenMoji
网址:https://openmoji.org
打开网站,可以看到众多面向设计师、开发人员、其他所有人的开源表情符号,这里还提供了搜索框方便你直接搜索想要的表情。
OpenMoji是一个开源项目,由57名学生和3名教授以及10位外部贡献者组成,目前为止已经设计了超过3000种不同类别的表情符号,可免费使用。
点击导航栏的Library即可进入到所有表情符号的分类,这里提供了10个分类,而且表情符号的质量很高。
另外,可以点击分类右侧的开关按钮即可去掉彩色变身为黑色表情符号,同时也可以按字母和日期进行筛选排序。
每个分类除了提供很多类型的表情符号外,这里还提供了两个扩展的OpenMoji,任意点击一个就可以看到不同类型的彩色图标,很精致。
选择一个满意的表情符号,直接点击就会弹框显示现在的入口,这里提供了SVG、PNG格式,同时还可以切换彩色和黑色表情符号。
这里还可以加入他们一起设计新的表情符号,提供了轮廓、颜色、版式、表情符号设计的一些指南等等。
最后可以点击导航栏的样品入口,这里提供了一些已经完成的作品。
最后
今天的内容就是这些,如果你喜欢我们的作品,又准备找奥克兰当地的网站开发公司,请给我们在线的开发者Kevin留言,他会给大家解决问题的。 view all
大家好,我是新西兰网站开发公司local Fern的插画师Isabella~今天给大家推荐一个免费开源的表情符号大全OpenMoji,OpenMoji是面向设计师、开发人员和其他所有人的开源表情符号,到目前为止,已经设计了超过3000种不同类别的表情符号,提供了彩色和单色的SVG、PNG格式。

OpenMoji
网址:https://openmoji.org
打开网站,可以看到众多面向设计师、开发人员、其他所有人的开源表情符号,这里还提供了搜索框方便你直接搜索想要的表情。
OpenMoji是一个开源项目,由57名学生和3名教授以及10位外部贡献者组成,目前为止已经设计了超过3000种不同类别的表情符号,可免费使用。
点击导航栏的Library即可进入到所有表情符号的分类,这里提供了10个分类,而且表情符号的质量很高。

另外,可以点击分类右侧的开关按钮即可去掉彩色变身为黑色表情符号,同时也可以按字母和日期进行筛选排序。

每个分类除了提供很多类型的表情符号外,这里还提供了两个扩展的OpenMoji,任意点击一个就可以看到不同类型的彩色图标,很精致。
选择一个满意的表情符号,直接点击就会弹框显示现在的入口,这里提供了SVG、PNG格式,同时还可以切换彩色和黑色表情符号。

这里还可以加入他们一起设计新的表情符号,提供了轮廓、颜色、版式、表情符号设计的一些指南等等。
最后可以点击导航栏的样品入口,这里提供了一些已经完成的作品。
最后
今天的内容就是这些,如果你喜欢我们的作品,又准备找奥克兰当地的网站开发公司,请给我们在线的开发者Kevin留言,他会给大家解决问题的。
I will offer a new zealand voice that cuts through the noise, $10 . 3 Days Delivery. HQ Audio File (WAV format))
Emma wrote the post • 0 comments • 426 views • 2020-04-04 10:47
About This Service
I'm a kiwi (New Zealand) male, who can deliver on a wide range of vocal styles - direct from my professionally equipped home studio to you.
I can convey YOUR message - with the desired tone, warmth, vibrancy, depth, quirkiness, clarity, sincerity and energy.
Styles include:
- Hard Sell
- Soft Sell
- Retail Reads
- Corporate Voicing (Station indents etc)
- Instructional Reads
- On-Hold Messaging
- Narration
- Public Service Announcements
+ More
I also offer a limited range of character themes - from Santa to Sinister - faux-American movie trailer style to old-timey British narration + more
**RATES**
1 - 50 words = $5 (1 gig)
51-100 words = $10 (2 gigs)
101-150 words = $15 (3 gigs)
151-200 words = $20 (4 gigs)
201-250 words = $25 (5 gigs)
251-300 words = $30 (6 gigs)
**Please message if your script is over 300 words.**
REMEMBER: ORDER THE LICENCE IF YOUR WORK IS COMMERCIAL IN NATURE.
Rates include full post production mastering and your choice of MP3 or WAV, at no extra charge.
Please do not use the "1 day rush delivery" Gig Extra towards your total script cost. The rush fee is extra on top of your script cost and cannot be used to cover script cost.
About us:
We run a voice overs studio in Auckland , NZ .We produce voice overs for Videos, Documentaries and DVD's, Radio and TV commercials, and can organise nationwide distribution to Radio and TV networks. From a simple voice over, to a commercial of EPIC proportions, emma can create it! view all
About This Service
I'm a kiwi (New Zealand) male, who can deliver on a wide range of vocal styles - direct from my professionally equipped home studio to you.
I can convey YOUR message - with the desired tone, warmth, vibrancy, depth, quirkiness, clarity, sincerity and energy.
Styles include:
- Hard Sell
- Soft Sell
- Retail Reads
- Corporate Voicing (Station indents etc)
- Instructional Reads
- On-Hold Messaging
- Narration
- Public Service Announcements
+ More
I also offer a limited range of character themes - from Santa to Sinister - faux-American movie trailer style to old-timey British narration + more
**RATES**
1 - 50 words = $5 (1 gig)
51-100 words = $10 (2 gigs)
101-150 words = $15 (3 gigs)
151-200 words = $20 (4 gigs)
201-250 words = $25 (5 gigs)
251-300 words = $30 (6 gigs)
**Please message if your script is over 300 words.**
REMEMBER: ORDER THE LICENCE IF YOUR WORK IS COMMERCIAL IN NATURE.
Rates include full post production mastering and your choice of MP3 or WAV, at no extra charge.
Please do not use the "1 day rush delivery" Gig Extra towards your total script cost. The rush fee is extra on top of your script cost and cannot be used to cover script cost.
About us:
We run a voice overs studio in Auckland , NZ .We produce voice overs for Videos, Documentaries and DVD's, Radio and TV commercials, and can organise nationwide distribution to Radio and TV networks. From a simple voice over, to a commercial of EPIC proportions, emma can create it!
New Zealand Voice Talent Agency|I will record a warm professional neutral new zealand voice, $10 . 3 Days Delivery. 201-250 words = $25 (5 item)
Emma wrote the post • 0 comments • 422 views • 2020-04-04 10:47
About This Service
I'm a kiwi (New Zealand) male, who can deliver on a wide range of vocal styles - direct from my professionally equipped home studio to you.
I can convey YOUR message - with the desired tone, warmth, vibrancy, depth, quirkiness, clarity, sincerity and energy.
Styles include:
- Hard Sell
- Soft Sell
- Retail Reads
- Corporate Voicing (Station indents etc)
- Instructional Reads
- On-Hold Messaging
- Narration
- Public Service Announcements
+ More
I also offer a limited range of character themes - from Santa to Sinister - faux-American movie trailer style to old-timey British narration + more
**RATES**
1 - 50 words = $5 (1 item)
51-100 words = $10 (2 item)
101-150 words = $15 (3 item)
151-200 words = $20 (4 item)
201-250 words = $25 (5 item)
251-300 words = $30 (6 item)
**Please message if your script is over 300 words.**
REMEMBER: ORDER THE LICENCE IF YOUR WORK IS COMMERCIAL IN NATURE.
Rates include full post production mastering and your choice of MP3 or WAV, at no extra charge.
Please do not use the "1 day rush delivery" Gig Extra towards your total script cost. The rush fee is extra on top of your script cost and cannot be used to cover script cost.
About us:
We run a voice overs studio in Auckland , NZ .We produce voice overs for Videos, Documentaries and DVD's, Radio and TV commercials, and can organise nationwide distribution to Radio and TV networks. From a simple voice over, to a commercial of EPIC proportions, emma can create it! view all
About This Service
I'm a kiwi (New Zealand) male, who can deliver on a wide range of vocal styles - direct from my professionally equipped home studio to you.
I can convey YOUR message - with the desired tone, warmth, vibrancy, depth, quirkiness, clarity, sincerity and energy.
Styles include:
- Hard Sell
- Soft Sell
- Retail Reads
- Corporate Voicing (Station indents etc)
- Instructional Reads
- On-Hold Messaging
- Narration
- Public Service Announcements
+ More
I also offer a limited range of character themes - from Santa to Sinister - faux-American movie trailer style to old-timey British narration + more
**RATES**
1 - 50 words = $5 (1 item)
51-100 words = $10 (2 item)
101-150 words = $15 (3 item)
151-200 words = $20 (4 item)
201-250 words = $25 (5 item)
251-300 words = $30 (6 item)
**Please message if your script is over 300 words.**
REMEMBER: ORDER THE LICENCE IF YOUR WORK IS COMMERCIAL IN NATURE.
Rates include full post production mastering and your choice of MP3 or WAV, at no extra charge.
Please do not use the "1 day rush delivery" Gig Extra towards your total script cost. The rush fee is extra on top of your script cost and cannot be used to cover script cost.
About us:
We run a voice overs studio in Auckland , NZ .We produce voice overs for Videos, Documentaries and DVD's, Radio and TV commercials, and can organise nationwide distribution to Radio and TV networks. From a simple voice over, to a commercial of EPIC proportions, emma can create it!
Voice Talent Agency Auckland|I will record a warm professional neutral new zealand voice, $10 . 3 Days Delivery. 251-300 words = $30 (6 item)
Emma wrote the post • 0 comments • 434 views • 2020-04-04 10:47
About This Service
I'm a kiwi (New Zealand) male, who can deliver on a wide range of vocal styles - direct from my professionally equipped home studio to you.
I can convey YOUR message - with the desired tone, warmth, vibrancy, depth, quirkiness, clarity, sincerity and energy.
Styles include:
- Hard Sell
- Soft Sell
- Retail Reads
- Corporate Voicing (Station indents etc)
- Instructional Reads
- On-Hold Messaging
- Narration
- Public Service Announcements
+ More
I also offer a limited range of character themes - from Santa to Sinister - faux-American movie trailer style to old-timey British narration + more
**RATES**
1 - 50 words = $5 (1 item)
51-100 words = $10 (2 item)
101-150 words = $15 (3 item)
151-200 words = $20 (4 item)
201-250 words = $25 (5 item)
251-300 words = $30 (6 item)
**Please message if your script is over 300 words.**
REMEMBER: ORDER THE LICENCE IF YOUR WORK IS COMMERCIAL IN NATURE.
Rates include full post production mastering and your choice of MP3 or WAV, at no extra charge.
Please do not use the "1 day rush delivery" Gig Extra towards your total script cost. The rush fee is extra on top of your script cost and cannot be used to cover script cost.
About us:
We run a voice overs studio in Auckland , NZ .We produce voice overs for Videos, Documentaries and DVD's, Radio and TV commercials, and can organise nationwide distribution to Radio and TV networks. From a simple voice over, to a commercial of EPIC proportions, emma can create it! view all
About This Service
I'm a kiwi (New Zealand) male, who can deliver on a wide range of vocal styles - direct from my professionally equipped home studio to you.
I can convey YOUR message - with the desired tone, warmth, vibrancy, depth, quirkiness, clarity, sincerity and energy.
Styles include:
- Hard Sell
- Soft Sell
- Retail Reads
- Corporate Voicing (Station indents etc)
- Instructional Reads
- On-Hold Messaging
- Narration
- Public Service Announcements
+ More
I also offer a limited range of character themes - from Santa to Sinister - faux-American movie trailer style to old-timey British narration + more
**RATES**
1 - 50 words = $5 (1 item)
51-100 words = $10 (2 item)
101-150 words = $15 (3 item)
151-200 words = $20 (4 item)
201-250 words = $25 (5 item)
251-300 words = $30 (6 item)
**Please message if your script is over 300 words.**
REMEMBER: ORDER THE LICENCE IF YOUR WORK IS COMMERCIAL IN NATURE.
Rates include full post production mastering and your choice of MP3 or WAV, at no extra charge.
Please do not use the "1 day rush delivery" Gig Extra towards your total script cost. The rush fee is extra on top of your script cost and cannot be used to cover script cost.
About us:
We run a voice overs studio in Auckland , NZ .We produce voice overs for Videos, Documentaries and DVD's, Radio and TV commercials, and can organise nationwide distribution to Radio and TV networks. From a simple voice over, to a commercial of EPIC proportions, emma can create it!
Voice Agency Christchurch, Auckland & Wellington NZ | Record your British male voice over / voiceover (150 words), $10 . 3 Days Delivery. HQ Audio File (WAV format))
Emma wrote the post • 0 comments • 425 views • 2020-04-04 10:47
About This Service
I can convey YOUR message - with the desired tone, warmth, vibrancy, depth, quirkiness, clarity, sincerity and energy.
Styles include:
- Hard Sell
- Soft Sell
- Retail Reads
- Corporate Voicing (Station indents etc)
- Instructional Reads
- On-Hold Messaging
- Narration
- Public Service Announcements
+ More
I also offer a limited range of character themes - from Santa to Sinister - faux-American movie trailer style to old-timey British narration + more
**RATES**
1 - 50 words = $5 (1 item)
51-100 words = $10 (2item)
101-150 words = $15 (3 item)
151-200 words = $20 (4 item)
201-250 words = $25 (5 item)
251-300 words = $30 (6 item)
**Please message if your script is over 300 words.**
REMEMBER: ORDER THE LICENCE IF YOUR WORK IS COMMERCIAL IN NATURE.
Rates include full post production mastering and your choice of MP3 or WAV, at no extra charge.
Please do not use the "1 day rush delivery" Gig Extra towards your total script cost. The rush fee is extra on top of your script cost and cannot be used to cover script cost.
About us:
We run a voice overs studio in Auckland , NZ .We produce voice overs for Videos, Documentaries and DVD's, Radio and TV commercials, and can organise nationwide distribution to Radio and TV networks. From a simple voice over, to a commercial of EPIC proportions, emma can create it! view all
About This Service
I can convey YOUR message - with the desired tone, warmth, vibrancy, depth, quirkiness, clarity, sincerity and energy.
Styles include:
- Hard Sell
- Soft Sell
- Retail Reads
- Corporate Voicing (Station indents etc)
- Instructional Reads
- On-Hold Messaging
- Narration
- Public Service Announcements
+ More
I also offer a limited range of character themes - from Santa to Sinister - faux-American movie trailer style to old-timey British narration + more
**RATES**
1 - 50 words = $5 (1 item)
51-100 words = $10 (2item)
101-150 words = $15 (3 item)
151-200 words = $20 (4 item)
201-250 words = $25 (5 item)
251-300 words = $30 (6 item)
**Please message if your script is over 300 words.**
REMEMBER: ORDER THE LICENCE IF YOUR WORK IS COMMERCIAL IN NATURE.
Rates include full post production mastering and your choice of MP3 or WAV, at no extra charge.
Please do not use the "1 day rush delivery" Gig Extra towards your total script cost. The rush fee is extra on top of your script cost and cannot be used to cover script cost.
About us:
We run a voice overs studio in Auckland , NZ .We produce voice overs for Videos, Documentaries and DVD's, Radio and TV commercials, and can organise nationwide distribution to Radio and TV networks. From a simple voice over, to a commercial of EPIC proportions, emma can create it!
I will offer a new zealand voice that cuts through the noise, $10 . 3 Days Delivery. HQ Audio File (WAV format))
Emma wrote the post • 0 comments • 418 views • 2020-04-04 10:47
About This Service
I can convey YOUR message - with the desired tone, warmth, vibrancy, depth, quirkiness, clarity, sincerity and energy.
Styles include:
- Hard Sell
- Soft Sell
- Retail Reads
- Corporate Voicing (Station indents etc)
- Instructional Reads
- On-Hold Messaging
- Narration
- Public Service Announcements
+ More
I also offer a limited range of character themes - from Santa to Sinister - faux-American movie trailer style to old-timey British narration + more
**RATES**
1 - 50 words = $5 (1 item)
51-100 words = $10 (2item)
101-150 words = $15 (3 item)
151-200 words = $20 (4 item)
201-250 words = $25 (5 item)
251-300 words = $30 (6 item)
**Please message if your script is over 300 words.**
REMEMBER: ORDER THE LICENCE IF YOUR WORK IS COMMERCIAL IN NATURE.
Rates include full post production mastering and your choice of MP3 or WAV, at no extra charge.
Please do not use the "1 day rush delivery" Gig Extra towards your total script cost. The rush fee is extra on top of your script cost and cannot be used to cover script cost.
About us:
We run a voice overs studio in Auckland , NZ .We produce voice overs for Videos, Documentaries and DVD's, Radio and TV commercials, and can organise nationwide distribution to Radio and TV networks. From a simple voice over, to a commercial of EPIC proportions, emma can create it! view all
About This Service
I can convey YOUR message - with the desired tone, warmth, vibrancy, depth, quirkiness, clarity, sincerity and energy.
Styles include:
- Hard Sell
- Soft Sell
- Retail Reads
- Corporate Voicing (Station indents etc)
- Instructional Reads
- On-Hold Messaging
- Narration
- Public Service Announcements
+ More
I also offer a limited range of character themes - from Santa to Sinister - faux-American movie trailer style to old-timey British narration + more
**RATES**
1 - 50 words = $5 (1 item)
51-100 words = $10 (2item)
101-150 words = $15 (3 item)
151-200 words = $20 (4 item)
201-250 words = $25 (5 item)
251-300 words = $30 (6 item)
**Please message if your script is over 300 words.**
REMEMBER: ORDER THE LICENCE IF YOUR WORK IS COMMERCIAL IN NATURE.
Rates include full post production mastering and your choice of MP3 or WAV, at no extra charge.
Please do not use the "1 day rush delivery" Gig Extra towards your total script cost. The rush fee is extra on top of your script cost and cannot be used to cover script cost.
About us:
We run a voice overs studio in Auckland , NZ .We produce voice overs for Videos, Documentaries and DVD's, Radio and TV commercials, and can organise nationwide distribution to Radio and TV networks. From a simple voice over, to a commercial of EPIC proportions, emma can create it!
voice over Agency in Auckland, New Zealand at affordable price|We will Record a professional 10-20 second telephone prompt, a new zealand male voice,$10 . 3 Days Delivery.
Emma wrote the post • 0 comments • 438 views • 2020-04-04 10:47
About This Service
I can convey YOUR message - with the desired tone, warmth, vibrancy, depth, quirkiness, clarity, sincerity and energy.
Styles include:
- Hard Sell
- Soft Sell
- Retail Reads
- Corporate Voicing (Station indents etc)
- Instructional Reads
- On-Hold Messaging
- Narration
- Public Service Announcements
+ More
I also offer a limited range of character themes - from Santa to Sinister - faux-American movie trailer style to old-timey British narration + more
**RATES**
1 - 50 words = $5 (1 item)
51-100 words = $10 (2item)
101-150 words = $15 (3 item)
151-200 words = $20 (4 item)
201-250 words = $25 (5 item)
251-300 words = $30 (6 item)
**Please message if your script is over 300 words.**
REMEMBER: ORDER THE LICENCE IF YOUR WORK IS COMMERCIAL IN NATURE.
Rates include full post production mastering and your choice of MP3 or WAV, at no extra charge.
Please do not use the "1 day rush delivery" Gig Extra towards your total script cost. The rush fee is extra on top of your script cost and cannot be used to cover script cost.
About us:
We run a voice overs studio in Auckland , NZ .We produce voice overs for Videos, Documentaries and DVD's, Radio and TV commercials, and can organise nationwide distribution to Radio and TV networks. From a simple voice over, to a commercial of EPIC proportions, emma can create it! view all
About This Service
I can convey YOUR message - with the desired tone, warmth, vibrancy, depth, quirkiness, clarity, sincerity and energy.
Styles include:
- Hard Sell
- Soft Sell
- Retail Reads
- Corporate Voicing (Station indents etc)
- Instructional Reads
- On-Hold Messaging
- Narration
- Public Service Announcements
+ More
I also offer a limited range of character themes - from Santa to Sinister - faux-American movie trailer style to old-timey British narration + more
**RATES**
1 - 50 words = $5 (1 item)
51-100 words = $10 (2item)
101-150 words = $15 (3 item)
151-200 words = $20 (4 item)
201-250 words = $25 (5 item)
251-300 words = $30 (6 item)
**Please message if your script is over 300 words.**
REMEMBER: ORDER THE LICENCE IF YOUR WORK IS COMMERCIAL IN NATURE.
Rates include full post production mastering and your choice of MP3 or WAV, at no extra charge.
Please do not use the "1 day rush delivery" Gig Extra towards your total script cost. The rush fee is extra on top of your script cost and cannot be used to cover script cost.
About us:
We run a voice overs studio in Auckland , NZ .We produce voice overs for Videos, Documentaries and DVD's, Radio and TV commercials, and can organise nationwide distribution to Radio and TV networks. From a simple voice over, to a commercial of EPIC proportions, emma can create it!
I will record new zealand kiwi professional voiceover,$80. 3 Days Delivery
Emma wrote the post • 0 comments • 436 views • 2020-04-04 10:41
About This Service:
I will provide a professionally voice over, professionally recorded in my own recording studio for any media. I am a born and bred New Zealander and bring a warm, energetic professional voiceover to commercials, documentaries, tv and film.
Some recent voice over clients include: Uber, Ola, Coke, McDonalds, American Express, Greenpeace, Reliance Insurance and many others!
Depending on time zone I can usually turn jobs around on the same day.
Would love to work with you!
About us:
We run a voice overs studio in Auckland , NZ .We produce voice overs for Videos, Documentaries and DVD's, Radio and TV commercials, and can organise nationwide distribution to Radio and TV networks. From a simple voice over, to a commercial of EPIC proportions, emma can create it! view all
About This Service:
I will provide a professionally voice over, professionally recorded in my own recording studio for any media. I am a born and bred New Zealander and bring a warm, energetic professional voiceover to commercials, documentaries, tv and film.
Some recent voice over clients include: Uber, Ola, Coke, McDonalds, American Express, Greenpeace, Reliance Insurance and many others!
Depending on time zone I can usually turn jobs around on the same day.
Would love to work with you!
About us:
We run a voice overs studio in Auckland , NZ .We produce voice overs for Videos, Documentaries and DVD's, Radio and TV commercials, and can organise nationwide distribution to Radio and TV networks. From a simple voice over, to a commercial of EPIC proportions, emma can create it!
new zealand accent voice over|I will record a new zealand male voice over in 3 days, $80. 3 Days Delivery ,1 - 50 words = $5 (1 item)
Emma wrote the post • 0 comments • 505 views • 2020-04-04 10:41
About This Service:
I will provide a professionally voice over, professionally recorded in my own recording studio for any media. I am a born and bred New Zealander and bring a warm, energetic professional voiceover to commercials, documentaries, tv and film.
Some recent voice over clients include: Uber, Ola, Coke, McDonalds, American Express, Greenpeace, Reliance Insurance and many others!
Depending on time zone I can usually turn jobs around on the same day.
Would love to work with you!
About us:
We run a voice overs studio in Auckland , NZ .We produce voice overs for Videos, Documentaries and DVD's, Radio and TV commercials, and can organise nationwide distribution to Radio and TV networks. From a simple voice over, to a commercial of EPIC proportions, emma can create it!
**RATES**
1 - 50 words = $5 (1 item)
51-100 words = $10 (2item)
101-150 words = $15 (3 item)
151-200 words = $20 (4 item)
201-250 words = $25 (5 item)
251-300 words = $30 (6 item)
**Please message if your script is over 300 words.**
REMEMBER: ORDER THE LICENCE IF YOUR WORK IS COMMERCIAL IN NATURE.
Rates include full post production mastering and your choice of MP3 or WAV, at no extra charge. view all
About This Service:
I will provide a professionally voice over, professionally recorded in my own recording studio for any media. I am a born and bred New Zealander and bring a warm, energetic professional voiceover to commercials, documentaries, tv and film.
Some recent voice over clients include: Uber, Ola, Coke, McDonalds, American Express, Greenpeace, Reliance Insurance and many others!
Depending on time zone I can usually turn jobs around on the same day.
Would love to work with you!
About us:
We run a voice overs studio in Auckland , NZ .We produce voice overs for Videos, Documentaries and DVD's, Radio and TV commercials, and can organise nationwide distribution to Radio and TV networks. From a simple voice over, to a commercial of EPIC proportions, emma can create it!
**RATES**
1 - 50 words = $5 (1 item)
51-100 words = $10 (2item)
101-150 words = $15 (3 item)
151-200 words = $20 (4 item)
201-250 words = $25 (5 item)
251-300 words = $30 (6 item)
**Please message if your script is over 300 words.**
REMEMBER: ORDER THE LICENCE IF YOUR WORK IS COMMERCIAL IN NATURE.
Rates include full post production mastering and your choice of MP3 or WAV, at no extra charge.
Voice Agency Christchurch, Auckland & Wellington NZ | Professionally record your 250 script with my British voice,$80. 3 Days Delivery
Emma wrote the post • 0 comments • 445 views • 2020-04-04 10:41
About This Service:
I will provide a professionally voice over, professionally recorded in my own recording studio for any media. I am a born and bred New Zealander and bring a warm, energetic professional voiceover to commercials, documentaries, tv and film.
Some recent voice over clients include: Uber, Ola, Coke, McDonalds, American Express, Greenpeace, Reliance Insurance and many others!
Depending on time zone I can usually turn jobs around on the same day.
Would love to work with you!
About us:
We run a voice overs studio in Auckland , NZ .We produce voice overs for Videos, Documentaries and DVD's, Radio and TV commercials, and can organise nationwide distribution to Radio and TV networks. From a simple voice over, to a commercial of EPIC proportions, emma can create it!
**RATES**
1 - 50 words = $5 (1 item)
51-100 words = $10 (2item)
101-150 words = $15 (3 item)
151-200 words = $20 (4 item)
201-250 words = $25 (5 item)
251-300 words = $30 (6 item)
**Please message if your script is over 300 words.**
REMEMBER: ORDER THE LICENCE IF YOUR WORK IS COMMERCIAL IN NATURE.
Rates include full post production mastering and your choice of MP3 or WAV, at no extra char view all
About This Service:
I will provide a professionally voice over, professionally recorded in my own recording studio for any media. I am a born and bred New Zealander and bring a warm, energetic professional voiceover to commercials, documentaries, tv and film.
Some recent voice over clients include: Uber, Ola, Coke, McDonalds, American Express, Greenpeace, Reliance Insurance and many others!
Depending on time zone I can usually turn jobs around on the same day.
Would love to work with you!
About us:
We run a voice overs studio in Auckland , NZ .We produce voice overs for Videos, Documentaries and DVD's, Radio and TV commercials, and can organise nationwide distribution to Radio and TV networks. From a simple voice over, to a commercial of EPIC proportions, emma can create it!
**RATES**
1 - 50 words = $5 (1 item)
51-100 words = $10 (2item)
101-150 words = $15 (3 item)
151-200 words = $20 (4 item)
201-250 words = $25 (5 item)
251-300 words = $30 (6 item)
**Please message if your script is over 300 words.**
REMEMBER: ORDER THE LICENCE IF YOUR WORK IS COMMERCIAL IN NATURE.
Rates include full post production mastering and your choice of MP3 or WAV, at no extra char
voice over Agency in Auckland, New Zealand at affordable price |I will record and edit a new zealand voice over for professional use,$80. 3 Days Delivery,
Emma wrote the post • 0 comments • 427 views • 2020-04-04 10:41
About This Service:
I will provide a professionally voice over, professionally recorded in my own recording studio for any media. I am a born and bred New Zealander and bring a warm, energetic professional voiceover to commercials, documentaries, tv and film.
Some recent voice over clients include: Uber, Ola, Coke, McDonalds, American Express, Greenpeace, Reliance Insurance and many others!
Depending on time zone I can usually turn jobs around on the same day.
Would love to work with you!
About us:
We run a voice overs studio in Auckland , NZ .We produce voice overs for Videos, Documentaries and DVD's, Radio and TV commercials, and can organise nationwide distribution to Radio and TV networks. From a simple voice over, to a commercial of EPIC proportions, emma can create it!
**RATES**
1 - 50 words = $5 (1 item)
51-100 words = $10 (2item)
101-150 words = $15 (3 item)
151-200 words = $20 (4 item)
201-250 words = $25 (5 item)
251-300 words = $30 (6 item)
**Please message if your script is over 300 words.**
REMEMBER: ORDER THE LICENCE IF YOUR WORK IS COMMERCIAL IN NATURE.
Rates include full post production mastering and your choice of MP3 or WAV, at no extra char view all
About This Service:
I will provide a professionally voice over, professionally recorded in my own recording studio for any media. I am a born and bred New Zealander and bring a warm, energetic professional voiceover to commercials, documentaries, tv and film.
Some recent voice over clients include: Uber, Ola, Coke, McDonalds, American Express, Greenpeace, Reliance Insurance and many others!
Depending on time zone I can usually turn jobs around on the same day.
Would love to work with you!
About us:
We run a voice overs studio in Auckland , NZ .We produce voice overs for Videos, Documentaries and DVD's, Radio and TV commercials, and can organise nationwide distribution to Radio and TV networks. From a simple voice over, to a commercial of EPIC proportions, emma can create it!
**RATES**
1 - 50 words = $5 (1 item)
51-100 words = $10 (2item)
101-150 words = $15 (3 item)
151-200 words = $20 (4 item)
201-250 words = $25 (5 item)
251-300 words = $30 (6 item)
**Please message if your script is over 300 words.**
REMEMBER: ORDER THE LICENCE IF YOUR WORK IS COMMERCIAL IN NATURE.
Rates include full post production mastering and your choice of MP3 or WAV, at no extra char
I will record new zealand kiwi professional voiceover, $80. 3 Days Delivery,51-100 words = $10 (2item)
Emma wrote the post • 0 comments • 490 views • 2020-04-04 10:41
About This Service:
I will provide a professionally voice over, professionally recorded in my own recording studio for any media. I am a born and bred New Zealander and bring a warm, energetic professional voiceover to commercials, documentaries, tv and film.
Some recent voice over clients include: Uber, Ola, Coke, McDonalds, American Express, Greenpeace, Reliance Insurance and many others!
Depending on time zone I can usually turn jobs around on the same day.
Would love to work with you!
About us:
We run a voice overs studio in Auckland , NZ .We produce voice overs for Videos, Documentaries and DVD's, Radio and TV commercials, and can organise nationwide distribution to Radio and TV networks. From a simple voice over, to a commercial of EPIC proportions, emma can create it!
**RATES**
1 - 50 words = $5 (1 item)
51-100 words = $10 (2item)
101-150 words = $15 (3 item)
151-200 words = $20 (4 item)
201-250 words = $25 (5 item)
251-300 words = $30 (6 item)
**Please message if your script is over 300 words.**
REMEMBER: ORDER THE LICENCE IF YOUR WORK IS COMMERCIAL IN NATURE.
Rates include full post production mastering and your choice of MP3 or WAV, at no extra charge. view all
About This Service:
I will provide a professionally voice over, professionally recorded in my own recording studio for any media. I am a born and bred New Zealander and bring a warm, energetic professional voiceover to commercials, documentaries, tv and film.
Some recent voice over clients include: Uber, Ola, Coke, McDonalds, American Express, Greenpeace, Reliance Insurance and many others!
Depending on time zone I can usually turn jobs around on the same day.
Would love to work with you!
About us:
We run a voice overs studio in Auckland , NZ .We produce voice overs for Videos, Documentaries and DVD's, Radio and TV commercials, and can organise nationwide distribution to Radio and TV networks. From a simple voice over, to a commercial of EPIC proportions, emma can create it!
**RATES**
1 - 50 words = $5 (1 item)
51-100 words = $10 (2item)
101-150 words = $15 (3 item)
151-200 words = $20 (4 item)
201-250 words = $25 (5 item)
251-300 words = $30 (6 item)
**Please message if your script is over 300 words.**
REMEMBER: ORDER THE LICENCE IF YOUR WORK IS COMMERCIAL IN NATURE.
Rates include full post production mastering and your choice of MP3 or WAV, at no extra charge.
I will record new zealand kiwi professional voiceover,$80. 3 Days Delivery
Emma wrote the post • 0 comments • 437 views • 2020-04-04 10:41
About This Service:
I will provide a professionally voice over, professionally recorded in my own recording studio for any media. I am a born and bred New Zealander and bring a warm, energetic professional voiceover to commercials, documentaries, tv and film.
Some recent voice over clients include: Uber, Ola, Coke, McDonalds, American Express, Greenpeace, Reliance Insurance and many others!
Depending on time zone I can usually turn jobs around on the same day.
Would love to work with you!
About us:
We run a voice overs studio in Auckland , NZ .We produce voice overs for Videos, Documentaries and DVD's, Radio and TV commercials, and can organise nationwide distribution to Radio and TV networks. From a simple voice over, to a commercial of EPIC proportions, emma can create it!
Rate
1 - 50 words = $5 (1 item)
51-100 words = $10 (2item)
101-150 words = $15 (3 item)
151-200 words = $20 (4 item)
201-250 words = $25 (5 item)
251-300 words = $30 (6 item) view all
About This Service:
I will provide a professionally voice over, professionally recorded in my own recording studio for any media. I am a born and bred New Zealander and bring a warm, energetic professional voiceover to commercials, documentaries, tv and film.
Some recent voice over clients include: Uber, Ola, Coke, McDonalds, American Express, Greenpeace, Reliance Insurance and many others!
Depending on time zone I can usually turn jobs around on the same day.
Would love to work with you!
About us:
We run a voice overs studio in Auckland , NZ .We produce voice overs for Videos, Documentaries and DVD's, Radio and TV commercials, and can organise nationwide distribution to Radio and TV networks. From a simple voice over, to a commercial of EPIC proportions, emma can create it!
Rate
1 - 50 words = $5 (1 item)
51-100 words = $10 (2item)
101-150 words = $15 (3 item)
151-200 words = $20 (4 item)
201-250 words = $25 (5 item)
251-300 words = $30 (6 item)
I will voice over or narrate videos for you in a new zealand accent, $20 ,2 Days Delivery
Emma wrote the post • 0 comments • 434 views • 2020-04-04 10:35
About This Item
I will offer a fully voiced script, single HQ WAV file, edited and and mixed (removal of pops, room noise etc).
I can sync to video footage if required, have a fast and professional turn-around.
I'm great with long form informational narration and instruction.
About us:
We produce voice overs for Videos, Documentaries and DVD's, Radio and TV commercials, and can organise nationwide distribution to Radio and TV networks. From a simple voice over, to a commercial of EPIC proportions, emma can create it! view all
About This Item
I will offer a fully voiced script, single HQ WAV file, edited and and mixed (removal of pops, room noise etc).
I can sync to video footage if required, have a fast and professional turn-around.
I'm great with long form informational narration and instruction.
About us:
We produce voice overs for Videos, Documentaries and DVD's, Radio and TV commercials, and can organise nationwide distribution to Radio and TV networks. From a simple voice over, to a commercial of EPIC proportions, emma can create it!
I will voice over or narrate videos for you in a new zealand accent, $20 ,2 Days Delivery
Emma wrote the post • 0 comments • 427 views • 2020-04-04 10:35
About This Item
I will offer a fully voiced script, single HQ WAV file, edited and and mixed (removal of pops, room noise etc).
I can sync to video footage if required, have a fast and professional turn-around.
I'm great with long form informational narration and instruction.
About us:
We produce voice overs for Videos, Documentaries and DVD's, Radio and TV commercials, and can organise nationwide distribution to Radio and TV networks. From a simple voice over, to a commercial of EPIC proportions, emma can create it! view all
About This Item
I will offer a fully voiced script, single HQ WAV file, edited and and mixed (removal of pops, room noise etc).
I can sync to video footage if required, have a fast and professional turn-around.
I'm great with long form informational narration and instruction.
About us:
We produce voice overs for Videos, Documentaries and DVD's, Radio and TV commercials, and can organise nationwide distribution to Radio and TV networks. From a simple voice over, to a commercial of EPIC proportions, emma can create it!
We will voiceover in a new zealand or australian accent, 51-100 words = $10 (2 items)
Emma wrote the post • 0 comments • 440 views • 2020-04-04 09:56
About This Service
Voice: Warm-believable
Voice Over Actress with a background in Audio Production delivering professionally recorded & produced voice overs worldwide.
Music & Audio /Voice-Overs 3 Days On AverageAbout This Gig~
Visit my soundcloud to listen to my demos:
www.soundcloud.com/fifigroh
**RATES**
1 - 50 words = $5 (1 gig)
51-100 words = $10 (2 gigs)
101-150 words = $15 (3 gigs)
151-200 words = $20 (4 gigs)
201-250 words = $25 (5 gigs)
251-300 words = $30 (6 gigs)
**Please message if your script is over 300 words.**
REMEMBER: ORDER THE LICENCE IF YOUR WORK IS COMMERCIAL IN NATURE.
Rates include full post production mastering and your choice of MP3 or WAV, at no extra charge.
Please do not use the "1 day rush delivery" Gig Extra towards your total script cost. The rush fee is extra on top of your script cost and cannot be used to cover script cost.
REVISION POLICY:
I will revise if I have misread or mispronounced any of your script.
Any other changes, including intonation changes, script changes or details not included in your initial order instructions, will require you to repurchase. view all
About This Service
Voice: Warm-believable
Voice Over Actress with a background in Audio Production delivering professionally recorded & produced voice overs worldwide.
Music & Audio /Voice-Overs 3 Days On AverageAbout This Gig~
Visit my soundcloud to listen to my demos:
www.soundcloud.com/fifigroh
**RATES**
1 - 50 words = $5 (1 gig)
51-100 words = $10 (2 gigs)
101-150 words = $15 (3 gigs)
151-200 words = $20 (4 gigs)
201-250 words = $25 (5 gigs)
251-300 words = $30 (6 gigs)
**Please message if your script is over 300 words.**
REMEMBER: ORDER THE LICENCE IF YOUR WORK IS COMMERCIAL IN NATURE.
Rates include full post production mastering and your choice of MP3 or WAV, at no extra charge.
Please do not use the "1 day rush delivery" Gig Extra towards your total script cost. The rush fee is extra on top of your script cost and cannot be used to cover script cost.
REVISION POLICY:
I will revise if I have misread or mispronounced any of your script.
Any other changes, including intonation changes, script changes or details not included in your initial order instructions, will require you to repurchase.
Voice Talent & Voice Over Agents Auckland|I will record a female voiceover in a new zealand accent, 3 Days Delivery, $15
Emma wrote the post • 0 comments • 449 views • 2020-04-04 09:41
I am a highly intuitive Tarot reader from New Zealand with over seven years experience in 1:1 and online readings!
I'm super excited to offer you an accurate and helpful reading delivered in either a written report with photos or a video reading via Youtube link (please specify which you prefer when you order).
All readings are finished off with a complimentary unicorn card reading!
Please select from the package available or message me to enquire further.
I am excited to meet you and offer you guidance and insight!
About me:
Hi, I'm a trained and experienced writer, voice artist and tarot reader from New Zealand. On kiwikiwifly I offer voiceovers in a New Zealand accent as well spookily accurate and insightful tarot readings. Check out my gigs for more information or send me a message!
view all

I am a highly intuitive Tarot reader from New Zealand with over seven years experience in 1:1 and online readings!
I'm super excited to offer you an accurate and helpful reading delivered in either a written report with photos or a video reading via Youtube link (please specify which you prefer when you order).
All readings are finished off with a complimentary unicorn card reading!
Please select from the package available or message me to enquire further.
I am excited to meet you and offer you guidance and insight!
About me:
Hi, I'm a trained and experienced writer, voice artist and tarot reader from New Zealand. On kiwikiwifly I offer voiceovers in a New Zealand accent as well spookily accurate and insightful tarot readings. Check out my gigs for more information or send me a message!
I will help with your new zealand business, $10, This assistance can be from sending mails to working on business plan or gathering local information.
Natalia M wrote the post • 0 comments • 404 views • 2020-04-04 05:23
About This item
I am a New Zealand resident. Very professional and trust worthy. If you are looking at expanding your business in NZ then I can assist you.
This assistance can be from sending mails to working on business plan or gathering local information. No job is smaller.
I can be your local help . Please discuss your needs before placing an offer.
view all

About This item
I am a New Zealand resident. Very professional and trust worthy. If you are looking at expanding your business in NZ then I can assist you.
This assistance can be from sending mails to working on business plan or gathering local information. No job is smaller.
I can be your local help . Please discuss your needs before placing an offer.
I will provide guest post dofollow on tf32 new zealand site, $70, 2 Days Delivery +1 Article / Submission
Natalia M wrote the post • 0 comments • 431 views • 2020-04-04 05:18
About This item:
Get a dofollow link from a TF32+ CF26+ New Zealand how to blog.
This will help to boost your NZ rankings.
Either provide your own guest post with 1 dofollow link (Must be 700 words plus and pass copyscape. No spin bot)
Or we can write a 700-800 word guest post for you, with anchor and suitable image.
Or we can offer a niche edit on existing content that's relevant to your site/niche.
This is a genuine blog with high traffic from New Zealand visitors only.
If you want to climb up the ranks in New Zealand then you need this service.
We do not allow gambling, pharma, casino, adult, dating, lotto or anything illegal under NZ law.
If you're unsure, send us a message before ordering.
view all
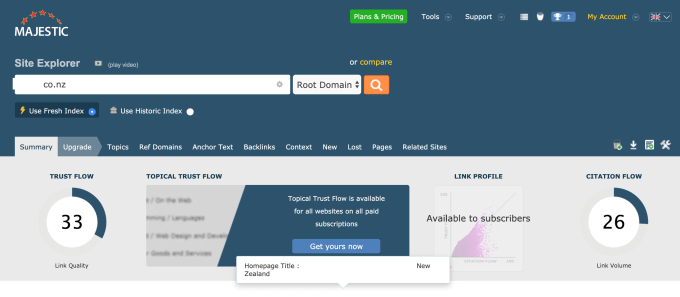
About This item:
Get a dofollow link from a TF32+ CF26+ New Zealand how to blog.
This will help to boost your NZ rankings.
Either provide your own guest post with 1 dofollow link (Must be 700 words plus and pass copyscape. No spin bot)
Or we can write a 700-800 word guest post for you, with anchor and suitable image.
Or we can offer a niche edit on existing content that's relevant to your site/niche.
This is a genuine blog with high traffic from New Zealand visitors only.
If you want to climb up the ranks in New Zealand then you need this service.
We do not allow gambling, pharma, casino, adult, dating, lotto or anything illegal under NZ law.
If you're unsure, send us a message before ordering.
I will be your assistant in New Zealand
Natalia M wrote the post • 0 comments • 402 views • 2020-04-04 05:16
About This offer:
If you need anything done in New Zealand, I'm your guy! Whether it's to send a letter to someone, search for a specific item in shops, i'm up to the task!
Due to the randomness of this gig, the price i set is a dummy price, please contact me if you're interested with what you need done and then we can discuss this further!
view all

About This offer:
If you need anything done in New Zealand, I'm your guy! Whether it's to send a letter to someone, search for a specific item in shops, i'm up to the task!
Due to the randomness of this gig, the price i set is a dummy price, please contact me if you're interested with what you need done and then we can discuss this further!
I will manually post your business in 11 high PR New Zealand classifieds, 100% Manual Posting. $5 , 2 Days Delivery
Natalia M wrote the post • 0 comments • 406 views • 2020-04-04 05:14
About This service:
i will manually post your business or product in 11 high PR New Zealand classifieds. ads include title, content, keywords, phone no, etc..I will upload 1 logo and 1 image where allow in free ads option.
Benefits : 100% Manual Posting.
PR Classifieds
All free Classifieds.
Strict Quality Control.
Detailed report. view all

About This service:
i will manually post your business or product in 11 high PR New Zealand classifieds. ads include title, content, keywords, phone no, etc..I will upload 1 logo and 1 image where allow in free ads option.
Benefits : 100% Manual Posting.
PR Classifieds
All free Classifieds.
Strict Quality Control.
Detailed report.
Auckland based graphic design studio| only $60 . You get: -2 Logo -Business Card -Letterhead -Color Palette,
Natalia M wrote the post • 0 comments • 752 views • 2020-04-04 05:04
You are starting a business?
Corporate Branding/Identity is what you need and what we deliver. We design branding packages that will make your brand memorable, professional, and lead to improved sales.
Remember, Products and Services sell more if the business looks reputable. Let us make your Business/Company/Brand look Professional and Reliable.
Choose from our packages:
1. BASIC (STARTUP PACKAGE):
2 Logos to choose from.
Business Card
Letterhead
Color Palette
2. STANDARD (PRO PACKAGE):
3 Logos to choose from
Business Card
Letterhead
Envelope
Folder Design
Email Signature
Color Palette
3. PREMIUM (ADVANCED PACKAGE):
5 Logos to choose from
Everything from the STANDARD (PRO PACKAGE)
Brand Identity Guidelines (Includes Color Palette)
3d Mockup
Social Media Kit
Invoice Design
Wallpaper
#: We provide quality service and communication to ensure that all our customers know that they are our priority as well as their projects.
Please feel free to inquire and make an order.
Our portfolios:
view all

You are starting a business?
Corporate Branding/Identity is what you need and what we deliver. We design branding packages that will make your brand memorable, professional, and lead to improved sales.
Remember, Products and Services sell more if the business looks reputable. Let us make your Business/Company/Brand look Professional and Reliable.
Choose from our packages:
1. BASIC (STARTUP PACKAGE):
2 Logos to choose from.
Business Card
Letterhead
Color Palette
2. STANDARD (PRO PACKAGE):
3 Logos to choose from
Business Card
Letterhead
Envelope
Folder Design
Email Signature
Color Palette
3. PREMIUM (ADVANCED PACKAGE):
5 Logos to choose from
Everything from the STANDARD (PRO PACKAGE)
Brand Identity Guidelines (Includes Color Palette)
3d Mockup
Social Media Kit
Invoice Design
Wallpaper
#: We provide quality service and communication to ensure that all our customers know that they are our priority as well as their projects.
Please feel free to inquire and make an order.
Our portfolios:


logo designer in NZ|I will design a creative and distinctive logo for your business, $195 for JPG and Transparent . PNG , 7 Days Delivery
Natalia M wrote the post • 0 comments • 449 views • 2020-04-04 05:00
Why Should we work together?
1. I specialize in developing Brand Identities for new startups and companies.
2. I have an adaptive design style that helps me find solutions to for any personality or business genre.
Whether you are a new startup or an established brand that needs a fresh new look, I can help you gain that edge to stand out in your industry.
If you have any questions about my services, I invite you to contact me before ordering.
I look forward to doing business with you.
Regular office hours 9AM-5PM MST
view all
Why Should we work together?
1. I specialize in developing Brand Identities for new startups and companies.
2. I have an adaptive design style that helps me find solutions to for any personality or business genre.
Whether you are a new startup or an established brand that needs a fresh new look, I can help you gain that edge to stand out in your industry.
If you have any questions about my services, I invite you to contact me before ordering.
I look forward to doing business with you.
Regular office hours 9AM-5PM MST
Cheap and affordable custom logo design services company in New Zealand|$100 = 1 logo + 2 concepts of double sided business card
Natalia M wrote the post • 0 comments • 478 views • 2020-04-04 04:57
About This item
HI, Welcome to our Business card design Studio
First draft within 24 hours
UNLIMITED revisions
FREE mockup
PRINT READY files
24/7 Support
High Quality work
Packages:
Basic:
> 1 concept of Logo + 2 concept of Business card
> Unlimited Revisions
> Print Ready jpg files
Standard:
> 2 concept of Logo + 2 concept of Business card
> Unlimited Revisions
> Print Ready jpg files
> Source file
> High Quality Work
> FREE mockup
Premium:
> 3 concept of Logo + 3 concept of Business card
> Unlimited Revisions
> Print Ready jpg files
> Source file
> Vector file
> High Quality Work
> FREE mockup
> Letterhead
Specification:
Color mode: your desire RGB or CMYK (printable)
Resolution: 300dpi (best print quality)
Size: Standard 2 sizes are 90x50 and 85x55 (3.5 inch x 2 inch) but I can design any size you request. (100% Compatible with VistaPrint)
Layout : Horizontal or Vertical layout
File: PSD - editable, layered /PDF/JPG/PNG OR AI- editable, layered /EPS/TIFF/PDF/JPG/PNG
Design concepts means that same business name with different concepts NOT different companies or names.
design type:
view all
About This item
HI, Welcome to our Business card design Studio
First draft within 24 hours
UNLIMITED revisions
FREE mockup
PRINT READY files
24/7 Support
High Quality work
Packages:
Basic:
> 1 concept of Logo + 2 concept of Business card
> Unlimited Revisions
> Print Ready jpg files
Standard:
> 2 concept of Logo + 2 concept of Business card
> Unlimited Revisions
> Print Ready jpg files
> Source file
> High Quality Work
> FREE mockup
Premium:
> 3 concept of Logo + 3 concept of Business card
> Unlimited Revisions
> Print Ready jpg files
> Source file
> Vector file
> High Quality Work
> FREE mockup
> Letterhead
Specification:
Color mode: your desire RGB or CMYK (printable)
Resolution: 300dpi (best print quality)
Size: Standard 2 sizes are 90x50 and 85x55 (3.5 inch x 2 inch) but I can design any size you request. (100% Compatible with VistaPrint)
Layout : Horizontal or Vertical layout
File: PSD - editable, layered /PDF/JPG/PNG OR AI- editable, layered /EPS/TIFF/PDF/JPG/PNG
Design concepts means that same business name with different concepts NOT different companies or names.
design type:
multi-language translation agencies in New Zealand基督城中文翻译公司I will do translation service between english and mandarin,
annawilldo wrote the post • 0 comments • 449 views • 2020-04-04 03:12
I provide translation services between English and Chinese, I had used both languages for more than 20 years. =)
Normally 1 gig covers 400 English words or 400 Chinese words.
Multiple gigs are to be ordered if you would like to translate more than this amount of words.
I mastered simplified and traditional Chinese characters, you may choose if you want your translation copy in either simplified or traditional formats.
NOTE:Please attach the file (doc, pdf, xls etc.) or type the texts in the message box.
I don't accept tertiary academic/overly technical documents. Please drop me a message to confirm if I can help with your documents before placing the order.
For website translation, please export the texts on the website to Excel/Words file.
All documents and personal information absolutely confidential.
I reserve the right to reject objectionable content.
1-day delivery applies to translation less than 1000 words
About me:
I am a translator of a NZ translation company and a content writer of a Christchurch travel company specialising in SEO writing. I have a Bachelor degree in English Language and I am multilingual in Mandarin, Cantonese and English. Simply contact me for inquiry. Anna will do!
view all
I provide translation services between English and Chinese, I had used both languages for more than 20 years. =)
Normally 1 gig covers 400 English words or 400 Chinese words.
Multiple gigs are to be ordered if you would like to translate more than this amount of words.
I mastered simplified and traditional Chinese characters, you may choose if you want your translation copy in either simplified or traditional formats.
NOTE:Please attach the file (doc, pdf, xls etc.) or type the texts in the message box.
I don't accept tertiary academic/overly technical documents. Please drop me a message to confirm if I can help with your documents before placing the order.
For website translation, please export the texts on the website to Excel/Words file.
All documents and personal information absolutely confidential.
I reserve the right to reject objectionable content.
1-day delivery applies to translation less than 1000 words
About me:
I am a translator of a NZ translation company and a content writer of a Christchurch travel company specialising in SEO writing. I have a Bachelor degree in English Language and I am multilingual in Mandarin, Cantonese and English. Simply contact me for inquiry. Anna will do!
Chinese translator in Christchurch|I will provide Chinese translation, mandarin translation, english translation, Price start at USD 5 for every 200 words.
annawilldo wrote the post • 0 comments • 474 views • 2020-04-04 02:11
Welcome to "Ana will do" professional translation item!
Native Chinese and raised in New Zealand.
Completed more than 2500 orders and have over 1000 5-star reviews!
6 years in translation industry. Employed by a NZ translation company.
Price start at USD 5 for every 200 words.
2 to 3 days delivery depends on the gig package you order. Please contact me for a quote if the word count exceeds 2000.
Ultra fast service - 12 hours delivery - extra $40 for every 1000 words apart from basic charge.
Fast service - 24 hours delivery - extra $20 for every 1000 words apart from basic charge.
$5+ for image translation (depends on the number of images)
All translation is done by me manually.
Work experience: Cryptocurrency Whitepapers, Business Proposals in Financial/ E-Commerce/ Cosmetic / Automotive etc. sectors, Contracts, Websites, Menus, Flyers, Advertisements, Instruction Manual, Blog articles... (limited space to list all out)
I also provide Proofreading and editing English/Chinese 400 words for $5
Contact me for custom offer for any kind of orders. =)
Anna will do!
About me:
I am a translator of an NZ translation company and a content writer of a Christchurch travel company specializing in SEO writing. I have a Bachelor degree in English Language and I am multilingual in Mandarin, Cantonese and English. Simply contact me for inquiry. Anna will do it! view all
Welcome to "Ana will do" professional translation item!
Native Chinese and raised in New Zealand.
Completed more than 2500 orders and have over 1000 5-star reviews!
6 years in translation industry. Employed by a NZ translation company.
Price start at USD 5 for every 200 words.
2 to 3 days delivery depends on the gig package you order. Please contact me for a quote if the word count exceeds 2000.
Ultra fast service - 12 hours delivery - extra $40 for every 1000 words apart from basic charge.
Fast service - 24 hours delivery - extra $20 for every 1000 words apart from basic charge.
$5+ for image translation (depends on the number of images)
All translation is done by me manually.
Work experience: Cryptocurrency Whitepapers, Business Proposals in Financial/ E-Commerce/ Cosmetic / Automotive etc. sectors, Contracts, Websites, Menus, Flyers, Advertisements, Instruction Manual, Blog articles... (limited space to list all out)
I also provide Proofreading and editing English/Chinese 400 words for $5
Contact me for custom offer for any kind of orders. =)
Anna will do!
About me:
I am a translator of an NZ translation company and a content writer of a Christchurch travel company specializing in SEO writing. I have a Bachelor degree in English Language and I am multilingual in Mandarin, Cantonese and English. Simply contact me for inquiry. Anna will do it!