

ecommerce website design nz
website design in auckland|Our Studio front-end developer John share how to to use the preact-i18n library to add internationalization to your website. Let your website becomes multi-language site.
Marketplace • full stack developer Kevin wrote the post • 0 comments • 484 views • 2020-04-06 10:31
In this article, you are going to use the preact-i18n library to add internationalization to your Preact application.
Step 1: Setup Preact CLI & Create new project
Side Note: If you are already familiar with Preact, you may skip to the next step.
If you haven't installed the Preact CLI on your machine, use the following command to install the CLI. Make sure you have Node.js 6.x or above installed.$ npm install -g preact-cli
Once the Preact CLI is installed, let's create a new project using the default template, and call it my-project.$ preact create default my-project
Start the development server with the command below:$ cd my-project && npm run start
Now, open your browser and go to http://localhost:8080, and you should see something like this on your screen:
Step 2: Add preact-i18n library
Install the preact-i18n library to your project using the command below:
$ npm install --save preact-i18n
preact-i18n is very easy to use, and most importantly, it's extremely small, around 1.3kb after gzipped. You can learn more about the library here: https://github.com/synacor/preact-i18n
Step 3: Create a definition file
Once you have the library installed, you will need to create a definition file, which you will store all the translate strings in a JSON file.
In this case, you will need to save this file in src/i18n/zh-tw.json:{
"home": {
"title": "主頁",
"text": "這是個Home組件。"
}
}
Step 4: Import IntlProvider and definition file
Next, open the app.js file, which is located in the src/components folder. Then, import the IntlProvider and your definition file to the app.js file:import { IntlProvider } from 'preact-i18n';
import definition from '../i18n/zh-tw.json';
Step 5: Expose the definition via IntlProvider
After that, you will need to expose the definition file to the whole app via <IntlProvider>. By doing this, you will be able to read the definition file everywhere in the app.render() {
return(
<IntlProvider definition={definition}>
<div id="app" />
</IntlProvider>
);
}
At this moment, here's how your app.js file should looks like:import { h, Component } from 'preact';
import { Router } from 'preact-router';
import Header from './header';
import Home from '../routes/home';
import Profile from '../routes/profile';
// Import IntlProvider and the definition file.
import { IntlProvider } from 'preact-i18n';
import definition from '../i18n/zh-tw.json';
export default class App extends Component {
handleRoute = e => {
this.currentUrl = e.url;
};
render() {
return (
// Expose the definition to your whole app via <IntlProvider>
<IntlProvider definition={definition}>
<div id="app">
<Header />
<Router onChange={this.handleRoute}>
<Home path="/" />
<Profile path="/profile/" user="me" />
<Profile path="/profile/:user" />
</Router>
</div>
</IntlProvider>
);
}
}
Step 6: Use Text to translate string literals
You are almost done, now you just need to replace the text in the page with <Text>. In this case, you will need to update the content of the home page (src/routes/home/index.js) by adding the <Text> inside the <h1> and <p> tags.
import { Text } from 'preact-i18n';const Home = () => (
<div>
<h1>
<Text id="home.title">Home</Text>
</h1>
<p>
<Text id="home.text">This is the Home component.</Text>
</p>
</div>
);
export default Home;
Fallback Text
In order to prevent blank text being rendered in the page, you should set a fallback text to the <Text>. If you didn't include the definition for unknown.definition, the library will render any text contained within <Text>…</Text> as fallback text:
<Text id="unknown.definition">This is a fallback text.</Text>
// It will render this text: "This is a fallback text."
Localizer and MarkupText
If you want to translate the text of the HTML attribute's value (ie: placeholder="", title="", etc …), then you will need to use <Localizer> instead of <Text>.
However, if you want to include HTML markup in your rendered string, then you will need to use <MarkupText>. With this component, your text will be rendered in a <span> tag.
In the example below, you are going to add few more lines of code to your definition file. first_name and last_name will be used for the <Localizer>'s example, and link for the example for <MarkupText>.{
"first_name": "名",
"last_name": "姓",
"link": "這是個<a href='https://www.google.com'>連結</a>"
}
With this, you will able to use <Localizer> and <MarkupText> in the page. Please take note that you need to import Localizer and MarkupText to the src/routes/home/index.js file.import { Text, Localizer, MarkupText } from 'preact-i18n';
const Home = () => (
<div>
<Localizer>
<input placeholder={<Text id="first_name" />} />
</Localizer>
<Localizer>
<input placeholder={<Text id="last_name" />} />
</Localizer>
<MarkupText id="link">
This is a <a href="https://www.google.com">link</a>
</MarkupText>
</div>
);
export default Home;
Templating
If you want to inject a custom string or value into the definition, you could do it with the fields props.
First, you will need to update the definition file with the {{field}} placeholder. The placeholder will get replaced with the matched keys in an object you passed in the fields props.{
"page": "{{count}} / {{total}} 頁"
}
Next, you will need to add the fields attribute together with the value into the <Text />. As a result, your code should looks like this:import { Text } from 'preact-i18n';
const Home = () => (
<div>
<h2>
<Text id="page" fields={{ count: 5, total: 10 }}>
5 / 10 Pages
</Text>
</h2>
</div>
);
export default Home;
Pluralization
With preact-i18n, you have 3 ways to specific the pluralization values:"key": { "singular":"apple", "plural":"apples" }
"key": { "none":"no apples", "one":"apple", "many":"apples" }
"key": ["apples", "apple"]
For the next example, you will combine both pluralization and templating. First, you will need to update the definition file with the code below:
{
"apple": {
"singular": "Henry has {{count}} apple.",
"plural":"Henry has {{count}} apples."
}
}
Next, you will update the home page (src/routes/home/index.js) with the following code:import { Text } from 'preact-i18n';
const Home = () => (
<div>
<p>
<Text id="apple" plural={1} fields={{ count: 1 }} />
</p>
<p>
<Text id="apple" plural={100} fields={{ count: 100 }} />
</p>
</div>
);
export default Home;
With the method above, you will able to add pluralization and templating to your Preact application.
Dynamically import language definition file
In a real-world scenario, you would like to set the language site based on the user's choice, which is either based on the navigator.language or the user can change the site language on their own.
However, in order to prevent you from importing all the unnecessary definition files to the project, you can import the language definition file dynamically by using import(). By doing this, you can import the language definition file based on the user's choice.import { Component } from 'preact';
import { IntlProvider } from 'preact-i18n';
import defaultDefinition from '../i18n/zh-tw.json';
export default class App extends Component {
state = {
definition: defaultDefinition
}
changeLanguage = (lang) => {
// Call this function to change language
import(`../i18n/${lang}.json`)
.then(definition => this.setState({ definition }));
};
render({ }, { definition }) {
return (
<IntlProvider definition={definition}>
<div id="app" />
</IntlProvider>
);
}
}
In this case, you can call the this.changeLanguage('zh-TW') function to change the site language.
Who's using preact-i18n?
I am using preact-i18n for my side project: Remote for Slides.
Remote for Slides is a Progressive Web App + Chrome Extension that allows the user to control their Google Slides on any device, remotely, without the need of any extra hardware.
Remote for Slides Progressive Web App supports more than 8 languages, which includes: Català, English, Español, Euskera, Français, Polski, Traditional Chinese, and Simplified Chinese.
PS: if you looking for website design in Auckland, NZ. just leave a message to us.
In this side project, I am using the "dynamically import language definition file" method I mentioned earlier. This could prevent the web app from loading some unnecessary definition language files, thus this will improve the page performance.
view all
In this article, you are going to use the preact-i18n library to add internationalization to your Preact application.
Step 1: Setup Preact CLI & Create new project
Side Note: If you are already familiar with Preact, you may skip to the next step.
If you haven't installed the Preact CLI on your machine, use the following command to install the CLI. Make sure you have Node.js 6.x or above installed.
$ npm install -g preact-cli
Once the Preact CLI is installed, let's create a new project using the default template, and call it my-project.
$ preact create default my-project
Start the development server with the command below:
$ cd my-project && npm run start
Now, open your browser and go to http://localhost:8080, and you should see something like this on your screen:

Step 2: Add preact-i18n library
Install the preact-i18n library to your project using the command below:
$ npm install --save preact-i18n
preact-i18n is very easy to use, and most importantly, it's extremely small, around 1.3kb after gzipped. You can learn more about the library here: https://github.com/synacor/preact-i18n
Step 3: Create a definition file
Once you have the library installed, you will need to create a definition file, which you will store all the translate strings in a JSON file.
In this case, you will need to save this file in src/i18n/zh-tw.json:
{

  "home": {

    "title": "主頁",

    "text": "這是個Home組件。"

  }

}
Step 4: Import IntlProvider and definition file
Next, open the app.js file, which is located in the src/components folder. Then, import the IntlProvider and your definition file to the app.js file:
import { IntlProvider } from 'preact-i18n';

import definition from '../i18n/zh-tw.json';
Step 5: Expose the definition via IntlProvider
After that, you will need to expose the definition file to the whole app via <IntlProvider>. By doing this, you will be able to read the definition file everywhere in the app.
render() {

  return(

    <IntlProvider definition={definition}>

      <div id="app" />

    </IntlProvider>

  );

}
At this moment, here's how your app.js file should looks like:
import { h, Component } from 'preact';

import { Router } from 'preact-router';

import Header from './header';

import Home from '../routes/home';

import Profile from '../routes/profile';

// Import IntlProvider and the definition file.

import { IntlProvider } from 'preact-i18n';

import definition from '../i18n/zh-tw.json';

export default class App extends Component {


 handleRoute = e => {

  this.currentUrl = e.url;

 };

render() {

  return (

   // Expose the definition to your whole app via <IntlProvider>

   <IntlProvider definition={definition}>

    <div id="app">

     <Header />

     <Router onChange={this.handleRoute}>

      <Home path="/" />

      <Profile path="/profile/" user="me" />

      <Profile path="/profile/:user" />

     </Router>

    </div>

   </IntlProvider>

  );

 }

}
Step 6: Use Text to translate string literals
You are almost done, now you just need to replace the text in the page with <Text>. In this case, you will need to update the content of the home page (src/routes/home/index.js) by adding the <Text> inside the <h1> and <p> tags.
import { Text } from 'preact-i18n';
const Home = () => (

  <div>

    <h1>

      <Text id="home.title">Home</Text>

    </h1>

    <p>

      <Text id="home.text">This is the Home component.</Text>

    </p>

  </div>

);
export default Home;

Fallback Text
In order to prevent blank text being rendered in the page, you should set a fallback text to the <Text>. If you didn't include the definition for unknown.definition, the library will render any text contained within <Text>…</Text> as fallback text:
<Text id="unknown.definition">This is a fallback text.</Text>

// It will render this text: "This is a fallback text."
Localizer and MarkupText
If you want to translate the text of the HTML attribute's value (ie: placeholder="", title="", etc …), then you will need to use <Localizer> instead of <Text>.
However, if you want to include HTML markup in your rendered string, then you will need to use <MarkupText>. With this component, your text will be rendered in a <span> tag.
In the example below, you are going to add few more lines of code to your definition file. first_name and last_name will be used for the <Localizer>'s example, and link for the example for <MarkupText>.
{

  "first_name": "名",

  "last_name": "姓",

  "link": "這是個<a href='https://www.google.com'>連結</a>"

}
With this, you will able to use <Localizer> and <MarkupText> in the page. Please take note that you need to import Localizer and MarkupText to the src/routes/home/index.js file.
import { Text, Localizer, MarkupText } from 'preact-i18n';

const Home = () => (

  <div>

    <Localizer>

      <input placeholder={<Text id="first_name" />} />

    </Localizer>

    <Localizer>

      <input placeholder={<Text id="last_name" />} />

    </Localizer>

    <MarkupText id="link">

      This is a <a href="https://www.google.com">link</a>

    </MarkupText>

  </div>

);
export default Home;

Templating
If you want to inject a custom string or value into the definition, you could do it with the fields props.
First, you will need to update the definition file with the {{field}} placeholder. The placeholder will get replaced with the matched keys in an object you passed in the fields props.
{

  "page": "{{count}} / {{total}} 頁"

}
Next, you will need to add the fields attribute together with the value into the <Text />. As a result, your code should looks like this:
import { Text } from 'preact-i18n';

const Home = () => (

  <div>

    <h2>

      <Text id="page" fields={{ count: 5, total: 10 }}>

         5 / 10 Pages

      </Text>

    </h2>

  </div>

);
export default Home;

Pluralization
With preact-i18n, you have 3 ways to specific the pluralization values:
"key": { "singular":"apple", "plural":"apples" }

"key": { "none":"no apples", "one":"apple", "many":"apples" }

"key": ["apples", "apple"]

For the next example, you will combine both pluralization and templating. First, you will need to update the definition file with the code below:

{

  "apple": {

    "singular": "Henry has {{count}} apple.",

    "plural":"Henry has {{count}} apples."

  }

}
Next, you will update the home page (src/routes/home/index.js) with the following code:
import { Text } from 'preact-i18n';

const Home = () => (

  <div>

    <p>

      <Text id="apple" plural={1} fields={{ count: 1 }} />

    </p>

    <p>

      <Text id="apple" plural={100} fields={{ count: 100 }} />

    </p>

  </div>

);
export default Home;

With the method above, you will able to add pluralization and templating to your Preact application.
Dynamically import language definition file
In a real-world scenario, you would like to set the language site based on the user's choice, which is either based on the navigator.language or the user can change the site language on their own.
However, in order to prevent you from importing all the unnecessary definition files to the project, you can import the language definition file dynamically by using import(). By doing this, you can import the language definition file based on the user's choice.
import { Component } from 'preact';

import { IntlProvider } from 'preact-i18n';

import defaultDefinition from '../i18n/zh-tw.json';

export default class App extends Component {

  state = {

    definition: defaultDefinition

  }

  changeLanguage = (lang) => {

    // Call this function to change language

    import(`../i18n/${lang}.json`)

      .then(definition => this.setState({ definition }));

  };

  render({ }, { definition }) {

    return (

      <IntlProvider definition={definition}>

        <div id="app" />

      </IntlProvider>

    );

  }

}
In this case, you can call the this.changeLanguage('zh-TW') function to change the site language.
Who's using preact-i18n?
I am using preact-i18n for my side project: Remote for Slides.
Remote for Slides is a Progressive Web App + Chrome Extension that allows the user to control their Google Slides on any device, remotely, without the need of any extra hardware.
Remote for Slides Progressive Web App supports more than 8 languages, which includes: Català, English, Español, Euskera, Français, Polski, Traditional Chinese, and Simplified Chinese.
PS: if you looking for website design in Auckland, NZ. just leave a message to us.
In this side project, I am using the "dynamically import language definition file" method I mentioned earlier. This could prevent the web app from loading some unnecessary definition language files, thus this will improve the page performance.

ecommerce website design nz|I will design a smart ecommerce logo for website and online store,$20 = 3 Logo concepts +Free Source Vector file+Jpg+Png+3D mock up+Unlimited revisions
Marketplace • Michela F wrote the post • 0 comments • 886 views • 2020-04-06 02:46
Hello, Welcome to My this item!
I am Michela F. A Creative Graphic Designer with many years of working Experience, I Prefer High Quality Work.
Here i will Design a Smart ECOMMERCE and WEBSITE LOGO For Your BUSINESS. i will send you all standard files with Reasonable Price.
I will SEND You!
High Quality Logo concepts
Free Source file
Free Vector (Editable) file
Print resolution file
PNG (transparent)
Unlimited Revisions
100% Satisfaction
JPG
SVG
PSD
AI
EPS
I am Waiting for your order to star working with you!
Check out my portfolios:
view all
Hello, Welcome to My this item!
I am Michela F. A Creative Graphic Designer with many years of working Experience, I Prefer High Quality Work.
Here i will Design a Smart ECOMMERCE and WEBSITE LOGO For Your BUSINESS. i will send you all standard files with Reasonable Price.
I will SEND You!
High Quality Logo concepts
Free Source file
Free Vector (Editable) file
Print resolution file
PNG (transparent)
Unlimited Revisions
100% Satisfaction
JPG
SVG
PSD
AI
EPS
I am Waiting for your order to star working with you!
Check out my portfolios:


ecommerce website design nz| Install and Configure Magento on your hosting account, $260, Delivery in 3 days.
Marketplace • Michela F wrote the post • 0 comments • 459 views • 2020-04-06 02:42
What you get with this Item
Magento, the most flexible eCommerce platform to power your business
For this Hourlie I will...
1) Install Magento
2) General Magento configuration
3) Install your theme
4) Setup taxes
5) Setup Shipping rules
6) Setup Currency
7) Configure Attributes
8) Configure Attribute sets
9) Configuure store email
10) Configure store postal address
11) Configure payment gateway (Paypal etc)
12) Configure Shipping
13) Setup 5 CMS pages from your content
14) Setup 5 products
Not included in this offer:
Theme, content, images, text, product details and images, hosting
view all

What you get with this Item
Magento, the most flexible eCommerce platform to power your business
For this Hourlie I will...
1) Install Magento
2) General Magento configuration
3) Install your theme
4) Setup taxes
5) Setup Shipping rules
6) Setup Currency
7) Configure Attributes
8) Configure Attribute sets
9) Configuure store email
10) Configure store postal address
11) Configure payment gateway (Paypal etc)
12) Configure Shipping
13) Setup 5 CMS pages from your content
14) Setup 5 products
Not included in this offer:
Theme, content, images, text, product details and images, hosting
ecommerce website design nz|Design an outstanding eCommerce website for your business, Delivery in 5 days, $590
Marketplace • Michela F wrote the post • 0 comments • 437 views • 2020-04-06 01:50
What you get with this item
I am a Professional web developer with 13 years of experience. Here I am offering you an professional eCommerce website.This is your chance to have your very own online store designed and built.Expect your website to be completely responsive and to look great on all devices. I can design your site to your specification, which will include the latest technology along with the most up-to-date design. Once built, you have control of the content,Images,Color Theme!
What you will get with this hourlie
-----------------------------------------------
A set of standard options including:
Design and Development of your website
Home page image slider
wooCommerce integration
Payment Gateway integration
Product upload (upto 100)
News posts
Contact form
Social media links (linking to your Facebook, Twitter or Linkedin accounts)
Site search
Google location map
Google Analytics Code Integration
Yoast plugin setup
view all

What you get with this item
I am a Professional web developer with 13 years of experience. Here I am offering you an professional eCommerce website.This is your chance to have your very own online store designed and built.Expect your website to be completely responsive and to look great on all devices. I can design your site to your specification, which will include the latest technology along with the most up-to-date design. Once built, you have control of the content,Images,Color Theme!
What you will get with this hourlie
-----------------------------------------------
A set of standard options including:
Design and Development of your website
Home page image slider
wooCommerce integration
Payment Gateway integration
Product upload (upto 100)
News posts
Contact form
Social media links (linking to your Facebook, Twitter or Linkedin accounts)
Site search
Google location map
Google Analytics Code Integration
Yoast plugin setup
ecommerce website design nz|I will create ecommerce website with woocommerce, $25, I will install and setup woocommerce on your site . 3 Days Delivery
Marketplace • Michela F wrote the post • 0 comments • 468 views • 2020-04-06 01:45
About This Service:
Hi Everyone!
In this item, i am offering my services to create awesome ecommerce website.
I will build your online store in Wordpress. I can install and customize any Ecommece theme.
Specially I will :
Install Ecommerce theme
Install Woocommerce plugin
Setting up your basic ecommerce pages
Give 100% responsive layout
Setup different shipping options.
Setting up payment gateways as per requirements
Contact page with Google Map
and much more . .
Ecommerce site will have the following features
Open Source Documentation
Product Reviews
Payment gateway integration
Unlimited Products
Order tracking
Ratings Product Variations
Wish list System Social Media
SEO Plugins Installation
Sales Reports
Multiple Currency Options
Input Multiple Tax Rates
Related Products
Shipping Weight Calculation
Discount Coupon System
Unlimited Module Instance
High Security Integration
EBay, Amazon Affiliate system
Sales Reports
Error Logging
Unlimited Categories
If you want us to install premium theme or plugin in your site you have to provide it or you can pay us for this. Also product uploading is not included in my all 3 packages.
Note : Discuss your website plan before placing any customized order . Thank you!
view all

About This Service:
Hi Everyone!
In this item, i am offering my services to create awesome ecommerce website.
I will build your online store in Wordpress. I can install and customize any Ecommece theme.
Specially I will :
Install Ecommerce theme
Install Woocommerce plugin
Setting up your basic ecommerce pages
Give 100% responsive layout
Setup different shipping options.
Setting up payment gateways as per requirements
Contact page with Google Map
and much more . .
Ecommerce site will have the following features
Open Source Documentation
Product Reviews
Payment gateway integration
Unlimited Products
Order tracking
Ratings Product Variations
Wish list System Social Media
SEO Plugins Installation
Sales Reports
Multiple Currency Options
Input Multiple Tax Rates
Related Products
Shipping Weight Calculation
Discount Coupon System
Unlimited Module Instance
High Security Integration
EBay, Amazon Affiliate system
Sales Reports
Error Logging
Unlimited Categories
If you want us to install premium theme or plugin in your site you have to provide it or you can pay us for this. Also product uploading is not included in my all 3 packages.

Note : Discuss your website plan before placing any customized order . Thank you!
ecommerce website design nz|I will design Responsive Magento2 eCommerce website online shop/Store. only $790,Delivery in 5 days
Marketplace • full stack developer Kevin wrote the post • 0 comments • 471 views • 2020-04-06 00:51
Hello!
I'm David, a professional Back-End Developer , based Auckland, NZ.
If you are looking for a unique website for your business, in which you can manage all the content, I can design and develop a fully responsive and interactive E-Commerce online store for you, using the best technologies for fast, Google-friendly and SEO optimised websites.
I am certified Web developer having 12+ years of quality experience in designing, developing, debugging, updating and publishing attractive, efficient and easy to navigate Responsive E-commerce Websites.
My prime focus is to Guide people to Live their Dreams. I will help in "How to think and not what to think", I will be able to provide solutions for your Design or UI/UX related challenges.
Also I have experience in developing custom plugins as per the requirements and can also assist you in customisation tasks as well.
One of the key success factors in building a professional E-Commerce Website, is modern design combined with user friendly architecture that functions properly on any device. If these factors are not executed effectively, your customers won't trust you.
With more than 12 years of experience, i am ready to dig deep into your goals and needs and provide you with full development support at each step of the way.
Don't give your business and sales to just any developer!
What we need:
1-Logo
2- Website Name and URL
3- Categories, Sub categories name and some nice images to create banners
4- About us, Payment, Shipping, Returns, Contact us etc pages content
5- Cpanel Details (Website Hosting login details with SSH access)
The Process of development-
- Send your initial design and brief that your specific business requires so we can create the website to match your aims and aspirations.
- To provide the best user experience, we use initial mock ups and UX designs to produce an overview of how the website will look.
- To provide customer satisfaction, we allow unlimited revisions of the design
- Then our amazing team converts the approved designs into a functional website that provides all the services which are required to produce the most efficient business available
- Finally, an overall review that allows for revisions to make sure that the website matches your standards and is fully operational for customers.
- Then we provide a full summary on how to use the website and it we be all yours to operate and manage
Report this OfferReviews (92) view all

Hello!
I'm David, a professional Back-End Developer , based Auckland, NZ.
If you are looking for a unique website for your business, in which you can manage all the content, I can design and develop a fully responsive and interactive E-Commerce online store for you, using the best technologies for fast, Google-friendly and SEO optimised websites.
I am certified Web developer having 12+ years of quality experience in designing, developing, debugging, updating and publishing attractive, efficient and easy to navigate Responsive E-commerce Websites.
My prime focus is to Guide people to Live their Dreams. I will help in "How to think and not what to think", I will be able to provide solutions for your Design or UI/UX related challenges.
Also I have experience in developing custom plugins as per the requirements and can also assist you in customisation tasks as well.
One of the key success factors in building a professional E-Commerce Website, is modern design combined with user friendly architecture that functions properly on any device. If these factors are not executed effectively, your customers won't trust you.
With more than 12 years of experience, i am ready to dig deep into your goals and needs and provide you with full development support at each step of the way.
Don't give your business and sales to just any developer!
What we need:
1-Logo
2- Website Name and URL
3- Categories, Sub categories name and some nice images to create banners
4- About us, Payment, Shipping, Returns, Contact us etc pages content
5- Cpanel Details (Website Hosting login details with SSH access)
The Process of development-
- Send your initial design and brief that your specific business requires so we can create the website to match your aims and aspirations.
- To provide the best user experience, we use initial mock ups and UX designs to produce an overview of how the website will look.
- To provide customer satisfaction, we allow unlimited revisions of the design
- Then our amazing team converts the approved designs into a functional website that provides all the services which are required to produce the most efficient business available
- Finally, an overall review that allows for revisions to make sure that the website matches your standards and is fully operational for customers.
- Then we provide a full summary on how to use the website and it we be all yours to operate and manage
Report this OfferReviews (92)
ecommerce website design nz|our back-end developer David shared a method today, how to build a payments system with React and Stripe to your own company website.
Marketplace • full stack developer Kevin wrote the post • 0 comments • 584 views • 2020-04-06 00:05
Whether you’re implementing a subscription-based service, an e-commerce store, or a crowdfunding solution, Stripe offers the flexibility to get it done. We’re going to build a small proof-of-concept payments system to enable one-time purchases on a website.
By the end of this tutorial, you should be able to set up a backend and frontend for processing online payments in your React app.
Requirements to follow along
This tutorial requires that you have the following:
Node installed on your computer
A Stripe developer account
Basic knowledge of Express
Basic knowledge of React Hooks
If you do not have Node installed, you can get the latest version from the official website. All the code written in this tutorial can be accessed here.
Stripe setup
If you do not have a Stripe developer account, you can get started for free by signing up for an account here. After signing up, complete the following steps to get set up:
Select Developer integrations on the How do you want to get started? modal
Select Accept payments only on the next modal
Check the One-time payments option on the next modal
Finally, check Build a custom payment flow on the last modal
You should now have a base account set up. You can update the name of the account by clicking the Add a name link at the top left of the page.
You’ll need to copy your Publishable and Secret keys from the dashboard and store them somewhere, because we’ll need them very soon.
Building the payment server
Before we go ahead with building the React app, we’ll need to set up a server to handle payment requests.
We’ll need to set up a RESTful endpoint on an Express server, which will act as a middleman between our React code and the Stripe backend. If you’ve never built an API before, don’t worry, it’ll be pretty basic as we’re not implementing a production-ready backend here.
Let’s get started.
Create a new project folder and name it whatever you want (I’m going with react-stripe-payment)
Open your terminal in the folder and run npm init -y
Install the dependencies by running npm install express dotenv body-parser stripe
Create a folder src under the root folder by running mkdir src
server.js
Let’s create the server to listen for payment requests. Create a new file called server.js under the src folder and paste the following in it:const path = require('path')
const express = require('express')
const bodyParser = require('body-parser')
const postCharge = require('./stripe')
require('dotenv').config()
const app = express()
const router = express.Router()
const port = process.env.PORT || 7000
router.post('/stripe/charge', postCharge)
router.all('*', (_, res) =>
res.json({ message: 'please make a POST request to /stripe/charge' })
)
app.use((_, res, next) => {
res.header('Access-Control-Allow-Origin', '*')
res.header(
'Access-Control-Allow-Headers',
'Origin, X-Requested-With, Content-Type, Accept'
)
next()
})
app.use(bodyParser.json())
app.use('/api', router)
app.use(express.static(path.join(__dirname, '../build')))
app.get('*', (_, res) => {
res.sendFile(path.resolve(__dirname, '../build/index.html'))
})
app.listen(port, () => console.log(`server running on port ${port}`))
Let’s break down this file section by section.
const path = require('path')
const express = require('express')
const bodyParser = require('body-parser')
const postCharge = require('./stripe')
require('dotenv').config()
Here, we’re importing the required packages. You’ll notice that they are all third-party imports except for postCharge, which is being imported from a file called stripe. We’ll create that file later.
dotenv allows us to read sensitive information from the Node process so we don’t have to hardcode secret values in our code.const app = express()
const router = express.Router()
const port = process.env.PORT || 7000
We’re initializing a new Express instance into a variable called app. We then create a new Router instance and store it in a variable called router. This is what we’ll use to define the payment endpoint.
Finally, we initialize a new variable called port and assign it a value from the Node process (process.env.PORT), and if that is undefined, it is assigned 7000.router.post('/stripe/charge', postCharge)
router.all('*', (_, res) =>
res.json({ message: 'please make a POST request to /stripe/charge' })
)
app.use((_, res, next) => {
res.header('Access-Control-Allow-Origin', '*')
res.header(
'Access-Control-Allow-Headers',
'Origin, X-Requested-With, Content-Type, Accept'
)
next()
})
app.use(bodyParser.json())
app.use('/api', router)
app.use(express.static(path.join(__dirname, '../build')))
Remember the router we initialized earlier? On the first line, we set up an endpoint called /stripe/charge and assign postCharge to handle all POST requests to this route.
We then catch all other requests to the server and respond with a JSON object containing a message directing the user to the appropriate endpoint.
Next, we define a middleware on the app instance to enable CORS for all requests. On the next line, we attach another middleware that enables us to parse JSON objects from the request body.
Then we tell our app instance to use the router instance to handle all requests to the /api endpoint. Finally, we tell Express to serve up the /build folder. This folder will hold the transpiled code for the app’s frontend.app.get('*', (_, res) => {
res.sendFile(path.resolve(__dirname, '../build/index.html'))
})
app.listen(port, () => console.log(`server running on port ${port}`))
Here, we’re telling the app instance to handle all GET requests by serving the index.html file located in the /build folder. This is how we’ll serve the frontend in production.
Finally, we spin up the server on the port we defined earlier and log a message to the console on a successful startup.
stripe.js
We’ll then create the postCharge handler we required in server.js above. Under the src folder, create a new file, stripe.js, and paste the following in it:const stripe = require('stripe')(<your_secret_key>)
async function postCharge(req, res) {
try {
const { amount, source, receipt_email } = req.body
const charge = await stripe.charges.create({
amount,
currency: 'usd',
source,
receipt_email
})
if (!charge) throw new Error('charge unsuccessful')
res.status(200).json({
message: 'charge posted successfully',
charge
})
} catch (error) {
res.status(500).json({
message: error.message
})
}
}
module.exports = postCharge
Let’s break it down.const stripe = require('stripe')(<your_secret_key>)
Here, we initialize a new Stripe instance by requiring the stripe package and calling it with the secret key we copied earlier as a string. We save this instance in a variable called stripe.async function postCharge(req, res) {
try {
const { amount, source, receipt_email } = req.body
const charge = await stripe.charges.create({
amount,
currency: 'usd',
source,
receipt_email
})
We then create a new function called postCharge. This function is a request handler, so we have to take in two parameters: req and res.
We then open a try catch block inside this function. We destructure all the variables we’re expecting to be sent along with the request from the request object; in this case, those variables are amount, source, and receipt_email.
We then create a new variable called charge. This variable holds the result of an asynchronous call to the Stripe API to create a new charge (stripe.charges.create).if (!charge) throw new Error('charge unsuccessful')
If the result of the Stripe call is a falsy value — undefined, in this case — it means our payment request failed, and so we throw a new error with the message “charge unsuccessful.”
res.status(200).json({
message: 'charge posted successfully',
charge
})
Otherwise, we respond to the request with a 200 status code and a JSON object containing a message and the charge object.
} catch (error) {
res.status(500).json({
message: error.message
})
}
}
module.exports = postCharge
In the catch block, we intercept all other errors and send them to the client with a 500 status code and a message containing the error message.
At the end of the file, we export the postCharge function using module.exports.
That is all there is to the payment server. Of course, this isn’t production-ready and should not be used in a real application processing real payments, but it is enough for our current use case. Let’s move on to the frontend.
Building the frontend
Since we’re done building the payments server, it’s time to flesh out the frontend. It’s not going to be anything fancy since I’m trying to keep this tutorial bite-sized. Here are the different components of the app:
A router component
A products list component
A checkout form component
Let’s get started.
Run the following command to install the required packages:
npm install axios babel-polyfill history parcel parcel-bundler react react-dom react-router-dom react-stripe-elements
In the project root, run the following command:
mkdir public && touch public/index.html
This will create a folder called public and create an index.html file in this new folder. Open the index.html file and paste the following:<!DOCTYPE html>
<html lang="en">
<head>
<meta charset="utf-8" />
<meta name="viewport" content="width=device-width, initial-scale=1" />
<meta name="description" content="React + Stripe" />
<title>React and Stripe Payment</title>
</head>
<body>
<noscript>You need to enable JavaScript to run this app.</noscript>
<div id="root"></div>
<script src="https://js.stripe.com/v3/"></script>
<script src="../src/index.js"></script>
</body>
</html>
If you’re already familiar with React, this should be nothing new; this is simply the entry point of our app. Also notice that we import the Stripe SDK in the first <script> tag — the Stripe SDK import must come before our own code.
Inside the src folder, run the following command:
touch src/index.js && touch src/products.js
Open index.js and paste the following:import React from 'react'
import ReactDOM from 'react-dom'
import App from './components/App'
import 'babel-polyfill'
const rootNode = document.querySelector('#root')
ReactDOM.render(<App />, rootNode)
Now we need to get the list of products from somewhere. Usually, this would be from a database or some API, but for this simple use case, we can just hardcode two or three products in a JavaScript file. This is why we need products.js. Open it and paste the following:export const products = [
{
name: 'Rubber Duck',
desc: `Rubber ducks can lay as many eggs as the best chicken layers, and they
are fun to watch with their antics in your backyard, your barnyard, or
your pond.`,
price: 9.99,
img:
'https://encrypted-tbn0.gstatic.com/images?q=tbn%3AANd9GcSqkN8wkHiAuT2FQ14AsJFgihZDzKmS6OHQ6eMiC63rW8CRDcbK',
id: 100
},
{
name: 'Chilli Sauce',
desc: `This Chilli Sauce goes well with some nice roast rubber duck. Flavored with
the best spices and the hottest chillis, you can rest assured of a tasty Sunday
rubber roast.`,
price: 12.99,
img:
'https://encrypted-tbn0.gstatic.com/images?q=tbn%3AANd9GcRTREm1dEzdI__xc6O8eAz5-4s88SP-Gg9dWYMkBKltGMi84RW5',
id: 101
}
]
This is an array of products that are available for purchase. You can add as many as you like and then move on to creating the components.
Run the following command from the project root: mkdir src/components. This will create a new folder called components inside the src folder to hold our React components. Let’s go ahead and create the first component.
App.jsx
This is the root component and will be responsible for routing to the various pages we have in our app. Create a new file called App.jsx inside the components folder and paste in the following:import React, { useState } from 'react'
import { Router, Route, Switch } from 'react-router-dom'
import { createBrowserHistory } from 'history'
import Products from './Products'
import Checkout from './Checkout'
import { products } from '../products'
const history = createBrowserHistory()
const App = () => {
const [selectedProduct, setSelectedProduct] = useState(null)
return (
<Router history={history}>
<Switch>
<Route
exact
path="/"
render={() => (
<Products
products={products}
selectProduct={setSelectedProduct}
history={history}
/>
)}
/>
<Route
path="/checkout"
render={() => (
<Checkout
selectedProduct={selectedProduct}
history={history}
/>
)}
/>
</Switch>
</Router>
)
}
export default App
Let’s break it down.import React, { useState } from 'react'
import { Router, Route, Switch } from 'react-router-dom'
import { createBrowserHistory } from 'history'
import Products from './Products'
import Checkout from './Checkout'
import { products } from '../products'
const history = createBrowserHistory()
This first part is just a bunch of dependency imports. The first three imports are required for any single-page React application. The next two imports are custom components that we’ll write later on. The last import is the hardcoded products we created earlier. We’ll pass it down as a prop to the Products component.
Finally, we create a new history instance from the history package and save it in a variable aptly named history.const App = () => {
const [selectedProduct, setSelectedProduct] = useState(null)
return (
<Router history={history}>
<Switch>
<Route
exact
path="/"
render={() => (
<Products
products={products}
selectProduct={setSelectedProduct}
history={history}
/>
)}
/>
<Route
path="/checkout"
render={() => (
<Checkout
selectedProduct={selectedProduct}
history={history}
/>
)}
/>
</Switch>
</Router>
)
}
export default App
We then create a new functional component called App. App has a state variable called selectedProduct, which holds the product currently selected to be purchased.
We return a Router instance that defines all the routes and their respective components.
In the first route, /, we render the Products component and pass in three props: the list of hardcoded products, a function to set a product in the App state, and the history object to enable us to navigate to new pages without breaking the browser history.
In the second route, /checkout, we render the Checkout component and pass in a couple props: the currently selected product and the history object.
At the end of the file, we export the App component as the default export.
Products.jsx
This component is responsible for rendering the list of products to the DOM, and it’s fairly simple. Create a new file called Products.jsx in the components folder and paste in the following:import React from 'react'
import './Products.scss'
const Products = ({ products, selectProduct, history }) => {
const handlePurchase = prod => () => {
selectProduct(prod)
history.push('/checkout')
}
return products.map(prod => (
<div className="product" key={prod.id}>
<section>
<h2>{prod.name}</h2>
<p>{prod.desc}</p>
<h3>{'$' + prod.price}</h3>
<button type="button" onClick={handlePurchase(prod)}>
PURCHASE
</button>
</section>
<img src={prod.img} alt={prod.name} />
</div>
))
}
export default Products
Note: You can get the Products.scss contents from here.
Let’s break it down.const Products = ({ products, selectProduct, history }) => {
const handlePurchase = prod => () => {
selectProduct(prod)
history.push('/checkout')
}
We start off defining a functional component that takes in three props:
products
selectProduct
history
products is the array of products we hardcoded earlier. We’ll be mapping over this array later on to render the individual products to the DOM.
selectProduct is a function that takes in a single product object. It updates the App component’s state to hold this product so that the Checkout component can access it through its props.
history is the history object that will allow us to navigate to other routes safely.
Then we define the handlePurchase function, which will be called when a user wants to purchase a certain product. It takes in a single parameter, prod, and calls selectProduct with this parameter. After calling selectProduct, it then navigates to the /checkout route by calling history.push.return products.map(prod => (
<div className="product" key={prod.id}>
<section>
<h2>{prod.name}</h2>
<p>{prod.desc}</p>
<h3>{'$' + prod.price}</h3>
<button type="button" onClick={handlePurchase(prod)}>
PURCHASE
</button>
</section>
<img src={prod.img} alt={prod.name} />
</div>
))
}
export default Products
It’s time to render the products to the DOM. We map over the products array and, for each product in the array, return a bunch of JSX. The JSX should be pretty straightforward and will result in the following image being painted in the screen:
Checkout.jsx
Next, we want to create the checkout page where the user will be routed to when they click on the PURCHASE button on a product.
Create a Checkout.jsx file under the components folder and paste the following in it:import React, { useEffect } from 'react'
import { StripeProvider, Elements } from 'react-stripe-elements'
import CheckoutForm from './CheckoutForm'
const Checkout = ({ selectedProduct, history }) => {
useEffect(() => {
window.scrollTo(0, 0)
}, [])
return (
<StripeProvider apiKey="pk_test_UrBUzJWPNse3I03Bsaxh6WFX00r6rJ1YCq">
<Elements>
<CheckoutForm selectedProduct={selectedProduct} history={history} />
</Elements>
</StripeProvider>
)
}
export default Checkout
This is when we begin to bring Stripe into the mix. In the second line, we’re importing something called StripeProvider and another thing called Elements from the react-stripe-elements package we installed at the beginning of this section.
StripeProvider is required for our app to have access to the Stripe object, and any component that interacts with the Stripe object must be a child of StripeProvider.
Elements is a React component that wraps around the actual checkout form. It helps group the set of Stripe Elements (more on this in a bit) together and makes it easy to tokenize all the data from each Stripe Element.
The Checkout component itself is fairly simple. It takes in two props, selectedProduct and history, which it passes on to a CheckoutForm component we’ll create next.
There’s also a useEffect call that scrolls the document to the top when the page mounts for the first time. This is necessary because react-router-dom preserves the previous scroll state when you switch routes.
Also notice that we’re passing a prop, apiKey, to StripeProvider. This key is the publishable key you copied earlier when setting up Stripe. Note that this prop is required because it serves as a way to authenticate your application to the Stripe servers.
CheckoutForm.jsx
This is the last component we’ll be creating, and it’s also the most important. The CheckoutForm component will hold the inputs for getting the user’s card details as well as actually making a call to the backend to process the payment charge.
Create a new file called CheckoutForm.jsx inside the components directory. We’re going to go through the content of this file section by section.import React, { useState } from 'react'
import { Link } from 'react-router-dom'
import {
CardNumberElement,
CardExpiryElement,
CardCVCElement,
injectStripe
} from 'react-stripe-elements'
import axios from 'axios'
import './CheckoutForm.scss'
...to be continued below...
First, we import the required packages we’ll be working with into the file. Notice the imports from the react-stripe-elements package. This is a good time to talk more about Stripe Elements.
Stripe Elements are a set of prebuilt UI elements that allow you to collect your user’s card information without managing such sensitive information yourself.
The react-stripe-elements package is a wrapper for Stripe Elements that exposes these elements as React components you can just plug into your app — no need to create them from scratch.
We are importing some of these components into this file along with a HOC component, injectStripe.
injectStripe basically takes the Stripe object initialized in the StripeProvider component and “injects” the object into any component wrapped with it. This is how we’ll get access to the Stripe Object.
We then import a package called axios. Axios is just a promise-based HTTP client for the browser that we’re going to use to communicate with our payments server.
You can get the contents of CheckoutForm.scss from here.
...continued...const CheckoutForm = ({ selectedProduct, stripe, history }) => {
if (selectedProduct === null) history.push('/')
const [receiptUrl, setReceiptUrl] = useState('')
const handleSubmit = async event => {
event.preventDefault()
const { token } = await stripe.createToken()
const order = await axios.post('http://localhost:7000/api/stripe/charge', {
amount: selectedProduct.price.toString().replace('.', ''),
source: token.id,
receipt_email: '[email protected]'
})
setReceiptUrl(order.data.charge.receipt_url)
}
...to be continued...
Next up is the actual CheckoutForm component itself. It takes in three props:
selectedProduct
stripe
history
selectedProduct is the product the user clicked on to purchase. It’s coming from the root App component’s state and is being passed down as props.
stripe is the actual Stripe object that is being “injected” as a prop by the injectStripe HOC we imported. You already know what history does.
The first thing we do in the component is check whether selectedProduct actually exists. If it doesn’t, we route the user to the homepage. In a production-grade app, this would probably be handled by a route guard HOC.
We then define a new piece of state to hold the receipt URL for successful payments. It will initially be empty.
Next, we define a function called handleSubmit, which will be called when the checkout form is submitted (i.e., when the Pay button is clicked). Let’s go through this function.
Firstly, we prevent the default behavior of the form element so that the page doesn’t refresh.
Then we destructure a token value from the result of an async call to stripe.createToken. createToken tokenizes the card information from the form and sends it to the Stripe server. It then returns a token object, where you can get a token.id value as an alias for the actual card info. This ensures that you never actually send the user’s card details to your payment server.
Secondly, we make an HTTP POST request to localhost:7000/api/stripe/charge with a request body containing three things:
amount
source
receipt_email
amount is the price of the item being purchased. We have to convert it to a string and remove all special characters like “.” and “,”. This means that a cost of $9.99 will get sent to the payment server as 999.
source is where the payment will be charged. In our case, it will be the ID of the token we just generated.
receipt_email is where the receipt of the payment will be sent. It is usually the customer’s email address, but in our case, we’re just hardcoding it because, again, we’re not implementing authentication.
After the request is done, we grab the URL of the receipt from the response object and set it to state. This is assuming that there are no errors, so in a production-grade app, you would usually implement error handling.
...continued...if (receiptUrl) {
return (
<div className="success">
<h2>Payment Successful!</h2>
<a href={receiptUrl}>View Receipt</a>
<Link to="/">Home</Link>
</div>
)
}
...to be continued...
Immediately after the handleSubmit function, we have an if check to see if there’s a receiptUrl in the state. If there is, we want to render a div containing a success message and a link to view the receipt as well as a link back to the homepage.
...continued...
return (
<div className="checkout-form">
<p>Amount: ${selectedProduct.price}</p>
<form onSubmit={handleSubmit}>
<label>
Card details
<CardNumberElement />
</label>
<label>
Expiration date
<CardExpiryElement />
</label>
<label>
CVC
<CardCVCElement />
</label>
<button type="submit" className="order-button">
Pay
</button>
</form>
</div>
)
}
export default injectStripe(CheckoutForm)
Otherwise, we’re going to render the actual checkout form. We’re using the prebuilt Elements components instead of recreating them from scratch and having to manage sensitive information.
At the end of this file, we wrap the CheckoutForm component in the injectStripe HOC so that we have access to the Stripe object we use in the component.
Testing our app
Let’s go through what we’ve accomplished so far.
We’ve created a payments server that communicates with Stripe
We’ve created a homepage to list our products
We’ve created a checkout page to capture the user’s payment details
We’ve created a handleSubmit function to send a request to the server to process a payment charge
We just about have everything set up, so it’s time to actually run our app and see if we’re able to purchase a Rubber Duck. We have to add our scripts first, so open the package.json file and replace the “scripts” section with the following:"scripts": {
"build": "parcel build public/index.html --out-dir build --no-source-maps",
"dev": "node src/server.js & parcel public/index.html",
"start": "node src/server.js"
},
Open your terminal and run npm run dev. This should start the payments server and expose the frontend on port 1234. Open your browser, navigate to http://localhost:1234, and follow the steps below:
Click on the PURCHASE button on any product
In the checkout page, fill in 4242 4242 4242 4242 for the Card details field
Fill in any expiration date and choose a random CVC value
Click on Pay
If everything goes well, you should see a Payment Successful message with links to view your receipt and go back to the homepage.
To confirm payment, log in to your Stripe dashboard, click on Payments, and you should see your payment there.
If your company website using WooCommerce codes , you can use WooCommerce Stripe Payment Gateway Plugin
Woocommerce Stripe payment gateway enables you to accept payments from customers directly onsite. Customers can purchase their items, select stripe as their checkout option, and be able to pay quite easily with their credit cards.
Stripe takes care of processing the payment (for a little fee) and securing the customer’s financial details, thus giving customers both ease of use and security.
This guide will show you all the steps you need to integrate Stripe with WooCommerce using the WooCommerce Stripe Payment Gateway plugin. We assume you already have a Stripe account. If not, create one, and then go on to activate it.
Also, if you want to avoid all the work, we can help you setup and test Stripe in your WooCommerce store. Simply request our service and we will get to work on it.
Step 1. Installing the WooCommerce Stripe Payment Gateway plugin
To install the plugin, login to your WordPress Dashboard and go to “Plugins > Add New”
Add New Plugin - WooCommerce Stripe Payment Integration
Type in “WooCommerce Stripe Payment Gateway” in the search bar. When the plugin appears, click Install Now and wait for the installation to complete. Next click Activate.
Note: Ensure you install the WooCommerce Stripe plugin designed by WooCommerce.
Install and activate WooCommerce Stripe Payment Gateway
After activating the plugin, go to WooCommerce > Settings.
Go to Settings - WooCommerce Stripe Payment Integration
Next, switch to the “Checkout” tab. If you have correctly activated the WooCommerce Stripe plugin, “Stripe” should now appear among the options. Click on it.
Step 2. Setting Up Stripe Payment Options
In this step, we are going to set up the various options needed to activate and configure stripe for your website.
First click “Enable Stripe” to activate this payment option.
Next, setup your Title and Description. These would determine what users see during checkout. The default values may be good enough, or you can adjust as you see fit.
Set the description - WooCommerce Stripe Payment Integration
Since we want to try it out in test mode first, tick the “Enable Test Mode” option. Next, login to your stripe account and click API.
Switch to test mode with the toggle button, and copy the test “Publishable” and “Secret” keys into the corresponding fields in your stripe plugin.
Copy test API keys - WooCommerce Stripe Payment Integration
In the Statement Descriptor input, enter a description that will appear in the transaction statement. In the example below, this is “FixRunner Web Services”.
Next, tick the “Capture Charge Immediately” option to ensure charges are processed and billed as soon as the customer checks out.
Enter settings - WooCommerce Stripe Payment Integration
Enabling Stripe Checkout
When the “Enable Stripe Checkout” option is ticked, users get a popup form requesting their financial details when they select stripe as payment method and click Continue To Payment. Enabling this option also gives you the ability to accept payments via Bitcoin.
To use this feature, tick “Enable Stripe Checkout”. Next, select your preferred language, and tick “Enable Bitcoin Currency” if you want to accept payments with Bitcoin.
If you want a custom image of your brand to appear on top of the Stripe checkout popup, enter the url of that image in the “Stripe Checkout Image” input box.
Enable Stripe Checkout - WooCommerce Stripe Payment Integration
When users opt to pay through Stripe, the payment popup will appear like this:
Payment with Stripe Checkout - WooCommerce Stripe Payment Integration
Enabling Apple Pay
Apple pay offers your customers a very simple way to checkout from their iOS devices. If you want to use this option, tick “Enable Apple Pay”
Next, select your button style, and enter the 2 letter code for the language you want Apple pay to be displayed in. You may leave it set to “en” for English, or click the link under that option to see the codes for other languages.
Apple pay settings - WooCommerce Stripe Payment Integration
Now go back to your stripe account and click Payments. In the payments page, select Apple Pay, and accept Apples terms of service.
Accept Apple Pay terms - WooCommerce Stripe Payment Integration
Next, click Add New Domain, and type in your domain name. Your WooCommerce Stripe plugin would take care of steps 2 and 3. Go on to click Add.
Add domain for Apple Pay - WooCommerce Stripe Payment Integration
Note: If you get an error that the file could not be found in your domain, go back, download the file in step 2, and upload it to the specified location in step 3. And then click Add.
After completing this step and saving the setting in your Plugin, Apple Pay would be seen in product, checkout, and other pages, when your site is accessed with a compatible iOS device.
Saving Details for Future Payments
If you would like to store customer financial details so you can use these for billing them in the future, tick the “Enable Payments Via Saved Cards” option.
Saving financial details - WooCommerce Stripe Payment Integration
Note that the financial details are not stored on your servers, but on Stripe’s servers, where all security measures are in place to protect this sensitive data.
For debugging purposes, you may also enable the “Log Debug Messages” option. This can be useful in finding out what went wrong if there are errors.
And that concludes your setup process. Click Save Changes to use the settings you have specified.
Step 3. Trying WooCommerce Stripe in Test Mode
In the setup above, we enabled test mode and used the test API details obtained from Stripe. This is useful to check if Stripe payment works properly before making it available to your customers.
Stripe provides test credit card details you can use for this purpose. In this example, we would be using the following details, and you should be able to use them too. If not, you can obtain other test card details.
Card number: 4242424242424242
Expiry: Any date after today
CVV: 789
Now, go to any of your products page, add the product to cart, and click View Cart. In the cart page, click Proceed to checkout.
Fill out the form with your information. At the bottom of the page, select “Stripe” as your payment method and click Continue to payment.
Next, enter the test financial details and click Pay #Amount.
Test payment - WooCommerce Stripe Payment Integration
You would be taken to an order confirmation page like the one below:
Payment confirmation - WooCommerce Stripe Payment Integration
Congratulations! Your WooCommerce Stripe payment option works!
The final step is to make this payment method available to customers.
Step 4. Activating Live Mode to begin processing real payments
To enable this payment method for your customers, you need to activate live mode.
In your WordPress dashboard, go to WooCommerce > Settings. Next, switch to the “Checkout” tab and click Stripe.
Uncheck the enable test mode option. When you do, the key input boxes will change to accept the live keys.
Switch to live mode - WooCommerce Stripe Payment Integration
Now login go to your stripe dashboard and click API. You should currently be in test mode.
Switch API to live - WooCommerce Stripe Payment Integration
To switch to live mode, click the Live/Test toggle switch. Next, copy your live Publishable and Secret keys into their input boxes in your WooCommerce Stripe Plugin.
Enter live keys - WooCommerce Stripe Payment Integration
Lastly, scroll down and click Save Changes. Customers can now make payments with Stripe on your website.
Note: To be able to activate live mode, you must have ssl in your server (i.e. your domain should start with https), and you must have enabled the “Force secure checkout” option found in WooCommerce > Settings > Checkout.
If you do not have ssl, have your host add it for you, and then go on to enable secure checkout, and then live mode.
view all
Whether you’re implementing a subscription-based service, an e-commerce store, or a crowdfunding solution, Stripe offers the flexibility to get it done. We’re going to build a small proof-of-concept payments system to enable one-time purchases on a website.
By the end of this tutorial, you should be able to set up a backend and frontend for processing online payments in your React app.
Requirements to follow along
This tutorial requires that you have the following:
Node installed on your computer
A Stripe developer account
Basic knowledge of Express
Basic knowledge of React Hooks
If you do not have Node installed, you can get the latest version from the official website. All the code written in this tutorial can be accessed here.
Stripe setup
If you do not have a Stripe developer account, you can get started for free by signing up for an account here. After signing up, complete the following steps to get set up:
Select Developer integrations on the How do you want to get started? modal
Select Accept payments only on the next modal
Check the One-time payments option on the next modal
Finally, check Build a custom payment flow on the last modal
You should now have a base account set up. You can update the name of the account by clicking the Add a name link at the top left of the page.
You’ll need to copy your Publishable and Secret keys from the dashboard and store them somewhere, because we’ll need them very soon.

Building the payment server
Before we go ahead with building the React app, we’ll need to set up a server to handle payment requests.
We’ll need to set up a RESTful endpoint on an Express server, which will act as a middleman between our React code and the Stripe backend. If you’ve never built an API before, don’t worry, it’ll be pretty basic as we’re not implementing a production-ready backend here.
Let’s get started.
Create a new project folder and name it whatever you want (I’m going with react-stripe-payment)
Open your terminal in the folder and run npm init -y
Install the dependencies by running npm install express dotenv body-parser stripe
Create a folder src under the root folder by running mkdir src
server.js
Let’s create the server to listen for payment requests. Create a new file called server.js under the src folder and paste the following in it:
const path = require('path')

const express = require('express')

const bodyParser = require('body-parser')

const postCharge = require('./stripe')

require('dotenv').config()


const app = express()

const router = express.Router()

const port = process.env.PORT || 7000


router.post('/stripe/charge', postCharge)

router.all('*', (_, res) =>

  res.json({ message: 'please make a POST request to /stripe/charge' })

)

app.use((_, res, next) => {

  res.header('Access-Control-Allow-Origin', '*')

  res.header(

    'Access-Control-Allow-Headers',

    'Origin, X-Requested-With, Content-Type, Accept'

  )

  next()

})

app.use(bodyParser.json())

app.use('/api', router)

app.use(express.static(path.join(__dirname, '../build')))


app.get('*', (_, res) => {

  res.sendFile(path.resolve(__dirname, '../build/index.html'))

})


app.listen(port, () => console.log(`server running on port ${port}`))

Let’s break down this file section by section.


const path = require('path')

const express = require('express')

const bodyParser = require('body-parser')

const postCharge = require('./stripe')

require('dotenv').config()
Here, we’re importing the required packages. You’ll notice that they are all third-party imports except for postCharge, which is being imported from a file called stripe. We’ll create that file later.
dotenv allows us to read sensitive information from the Node process so we don’t have to hardcode secret values in our code.
const app = express()

const router = express.Router()

const port = process.env.PORT || 7000
We’re initializing a new Express instance into a variable called app. We then create a new Router instance and store it in a variable called router. This is what we’ll use to define the payment endpoint.
Finally, we initialize a new variable called port and assign it a value from the Node process (process.env.PORT), and if that is undefined, it is assigned 7000.
router.post('/stripe/charge', postCharge)

router.all('*', (_, res) =>

  res.json({ message: 'please make a POST request to /stripe/charge' })

)

app.use((_, res, next) => {

  res.header('Access-Control-Allow-Origin', '*')

  res.header(

    'Access-Control-Allow-Headers',

    'Origin, X-Requested-With, Content-Type, Accept'

  )

  next()

})

app.use(bodyParser.json())

app.use('/api', router)

app.use(express.static(path.join(__dirname, '../build')))
Remember the router we initialized earlier? On the first line, we set up an endpoint called /stripe/charge and assign postCharge to handle all POST requests to this route.
We then catch all other requests to the server and respond with a JSON object containing a message directing the user to the appropriate endpoint.
Next, we define a middleware on the app instance to enable CORS for all requests. On the next line, we attach another middleware that enables us to parse JSON objects from the request body.
Then we tell our app instance to use the router instance to handle all requests to the /api endpoint. Finally, we tell Express to serve up the /build folder. This folder will hold the transpiled code for the app’s frontend.
app.get('*', (_, res) => {

  res.sendFile(path.resolve(__dirname, '../build/index.html'))

})


app.listen(port, () => console.log(`server running on port ${port}`))
Here, we’re telling the app instance to handle all GET requests by serving the index.html file located in the /build folder. This is how we’ll serve the frontend in production.
Finally, we spin up the server on the port we defined earlier and log a message to the console on a successful startup.
stripe.js
We’ll then create the postCharge handler we required in server.js above. Under the src folder, create a new file, stripe.js, and paste the following in it:
const stripe = require('stripe')(<your_secret_key>)


async function postCharge(req, res) {

  try {

    const { amount, source, receipt_email } = req.body


    const charge = await stripe.charges.create({

      amount,

      currency: 'usd',

      source,

      receipt_email

    })


    if (!charge) throw new Error('charge unsuccessful')


    res.status(200).json({

      message: 'charge posted successfully',

      charge

    })

  } catch (error) {

    res.status(500).json({

      message: error.message

    })

  }

}
module.exports = postCharge
Let’s break it down.
const stripe = require('stripe')(<your_secret_key>)Here, we initialize a new Stripe instance by requiring the stripe package and calling it with the secret key we copied earlier as a string. We save this instance in a variable called stripe.
async function postCharge(req, res) {

  try {

    const { amount, source, receipt_email } = req.body


    const charge = await stripe.charges.create({

      amount,

      currency: 'usd',

      source,

      receipt_email

    })
We then create a new function called postCharge. This function is a request handler, so we have to take in two parameters: req and res.
We then open a try catch block inside this function. We destructure all the variables we’re expecting to be sent along with the request from the request object; in this case, those variables are amount, source, and receipt_email.
We then create a new variable called charge. This variable holds the result of an asynchronous call to the Stripe API to create a new charge (stripe.charges.create).
if (!charge) throw new Error('charge unsuccessful')

If the result of the Stripe call is a falsy value — undefined, in this case — it means our payment request failed, and so we throw a new error with the message “charge unsuccessful.”


res.status(200).json({

  message: 'charge posted successfully',

  charge

})

Otherwise, we respond to the request with a 200 status code and a JSON object containing a message and the charge object.


} catch (error) {

    res.status(500).json({

      message: error.message

    })

  }

}


module.exports = postCharge
In the catch block, we intercept all other errors and send them to the client with a 500 status code and a message containing the error message.
At the end of the file, we export the postCharge function using module.exports.
That is all there is to the payment server. Of course, this isn’t production-ready and should not be used in a real application processing real payments, but it is enough for our current use case. Let’s move on to the frontend.
Building the frontend
Since we’re done building the payments server, it’s time to flesh out the frontend. It’s not going to be anything fancy since I’m trying to keep this tutorial bite-sized. Here are the different components of the app:
A router component
A products list component
A checkout form component
Let’s get started.
Run the following command to install the required packages:
npm install axios babel-polyfill history parcel parcel-bundler react react-dom react-router-dom react-stripe-elements
In the project root, run the following command:
mkdir public && touch public/index.html
This will create a folder called public and create an index.html file in this new folder. Open the index.html file and paste the following:
<!DOCTYPE html>

<html lang="en">

  <head>

    <meta charset="utf-8" />

    <meta name="viewport" content="width=device-width, initial-scale=1" />

    <meta name="description" content="React + Stripe" />

    <title>React and Stripe Payment</title>

  </head>

  <body>

    <noscript>You need to enable JavaScript to run this app.</noscript>

    <div id="root"></div>

    <script src="https://js.stripe.com/v3/"></script>

    <script src="../src/index.js"></script>

  </body>

</html>
If you’re already familiar with React, this should be nothing new; this is simply the entry point of our app. Also notice that we import the Stripe SDK in the first <script> tag — the Stripe SDK import must come before our own code.
Inside the src folder, run the following command:
touch src/index.js && touch src/products.js
Open index.js and paste the following:
import React from 'react'

import ReactDOM from 'react-dom'

import App from './components/App'

import 'babel-polyfill'


const rootNode = document.querySelector('#root')

ReactDOM.render(<App />, rootNode)
Now we need to get the list of products from somewhere. Usually, this would be from a database or some API, but for this simple use case, we can just hardcode two or three products in a JavaScript file. This is why we need products.js. Open it and paste the following:
export const products = [

  {

    name: 'Rubber Duck',

    desc: `Rubber ducks can lay as many eggs as the best chicken layers, and they

  are fun to watch with their antics in your backyard, your barnyard, or

  your pond.`,

    price: 9.99,

    img:

      'https://encrypted-tbn0.gstatic.com/images?q=tbn%3AANd9GcSqkN8wkHiAuT2FQ14AsJFgihZDzKmS6OHQ6eMiC63rW8CRDcbK',

    id: 100

  },

  {

    name: 'Chilli Sauce',

    desc: `This Chilli Sauce goes well with some nice roast rubber duck. Flavored with

    the best spices and the hottest chillis, you can rest assured of a tasty Sunday

    rubber roast.`,

    price: 12.99,

    img:

      'https://encrypted-tbn0.gstatic.com/images?q=tbn%3AANd9GcRTREm1dEzdI__xc6O8eAz5-4s88SP-Gg9dWYMkBKltGMi84RW5',

    id: 101

  }

]
This is an array of products that are available for purchase. You can add as many as you like and then move on to creating the components.
Run the following command from the project root: mkdir src/components. This will create a new folder called components inside the src folder to hold our React components. Let’s go ahead and create the first component.
App.jsx
This is the root component and will be responsible for routing to the various pages we have in our app. Create a new file called App.jsx inside the components folder and paste in the following:
import React, { useState } from 'react'

import { Router, Route, Switch } from 'react-router-dom'

import { createBrowserHistory } from 'history'

import Products from './Products'

import Checkout from './Checkout'

import { products } from '../products'


const history = createBrowserHistory()


const App = () => {

  const [selectedProduct, setSelectedProduct] = useState(null)


  return (

    <Router history={history}>

      <Switch>

        <Route

          exact

          path="/"

          render={() => (

            <Products

              products={products}

              selectProduct={setSelectedProduct}

              history={history}

            />

          )}

        />

        <Route

          path="/checkout"

          render={() => (

            <Checkout

              selectedProduct={selectedProduct}

              history={history}

            />

          )}

        />

      </Switch>

    </Router>

  )

}
export default App
Let’s break it down.
import React, { useState } from 'react'

import { Router, Route, Switch } from 'react-router-dom'

import { createBrowserHistory } from 'history'

import Products from './Products'

import Checkout from './Checkout'

import { products } from '../products'


const history = createBrowserHistory()
This first part is just a bunch of dependency imports. The first three imports are required for any single-page React application. The next two imports are custom components that we’ll write later on. The last import is the hardcoded products we created earlier. We’ll pass it down as a prop to the Products component.
Finally, we create a new history instance from the history package and save it in a variable aptly named history.
const App = () => {

  const [selectedProduct, setSelectedProduct] = useState(null)


  return (

    <Router history={history}>

      <Switch>

        <Route

          exact

          path="/"

          render={() => (

            <Products

              products={products}

              selectProduct={setSelectedProduct}

              history={history}

            />

          )}

        />

        <Route

          path="/checkout"

          render={() => (

            <Checkout

              selectedProduct={selectedProduct}

              history={history}

            />

          )}

        />

      </Switch>

    </Router>

  )

}
export default App
We then create a new functional component called App. App has a state variable called selectedProduct, which holds the product currently selected to be purchased.
We return a Router instance that defines all the routes and their respective components.
In the first route, /, we render the Products component and pass in three props: the list of hardcoded products, a function to set a product in the App state, and the history object to enable us to navigate to new pages without breaking the browser history.
In the second route, /checkout, we render the Checkout component and pass in a couple props: the currently selected product and the history object.
At the end of the file, we export the App component as the default export.
Products.jsx
This component is responsible for rendering the list of products to the DOM, and it’s fairly simple. Create a new file called Products.jsx in the components folder and paste in the following:
import React from 'react'

import './Products.scss'


const Products = ({ products, selectProduct, history }) => {

  const handlePurchase = prod => () => {

    selectProduct(prod)

    history.push('/checkout')

  }


  return products.map(prod => (

    <div className="product" key={prod.id}>

      <section>

        <h2>{prod.name}</h2>

        <p>{prod.desc}</p>

        <h3>{'$' + prod.price}</h3>

        <button type="button" onClick={handlePurchase(prod)}>

          PURCHASE

        </button>

      </section>

      <img src={prod.img} alt={prod.name} />

    </div>

  ))

}
export default Products
Note: You can get the Products.scss contents from here.
Let’s break it down.
const Products = ({ products, selectProduct, history }) => {

  const handlePurchase = prod => () => {

    selectProduct(prod)

    history.push('/checkout')

  }
We start off defining a functional component that takes in three props:
products
selectProduct
history
products is the array of products we hardcoded earlier. We’ll be mapping over this array later on to render the individual products to the DOM.
selectProduct is a function that takes in a single product object. It updates the App component’s state to hold this product so that the Checkout component can access it through its props.
history is the history object that will allow us to navigate to other routes safely.
Then we define the handlePurchase function, which will be called when a user wants to purchase a certain product. It takes in a single parameter, prod, and calls selectProduct with this parameter. After calling selectProduct, it then navigates to the /checkout route by calling history.push.
return products.map(prod => (

    <div className="product" key={prod.id}>

      <section>

        <h2>{prod.name}</h2>

        <p>{prod.desc}</p>

        <h3>{'$' + prod.price}</h3>

        <button type="button" onClick={handlePurchase(prod)}>

          PURCHASE

        </button>

      </section>

      <img src={prod.img} alt={prod.name} />

    </div>

  ))

}
export default Products
It’s time to render the products to the DOM. We map over the products array and, for each product in the array, return a bunch of JSX. The JSX should be pretty straightforward and will result in the following image being painted in the screen:

Checkout.jsx
Next, we want to create the checkout page where the user will be routed to when they click on the PURCHASE button on a product.
Create a Checkout.jsx file under the components folder and paste the following in it:
import React, { useEffect } from 'react'

import { StripeProvider, Elements } from 'react-stripe-elements'

import CheckoutForm from './CheckoutForm'


const Checkout = ({ selectedProduct, history }) => {

  useEffect(() => {

    window.scrollTo(0, 0)

  }, [])


  return (

    <StripeProvider apiKey="pk_test_UrBUzJWPNse3I03Bsaxh6WFX00r6rJ1YCq">

      <Elements>

        <CheckoutForm selectedProduct={selectedProduct} history={history} />

      </Elements>

    </StripeProvider>

  )

}
export default Checkout
This is when we begin to bring Stripe into the mix. In the second line, we’re importing something called StripeProvider and another thing called Elements from the react-stripe-elements package we installed at the beginning of this section.
StripeProvider is required for our app to have access to the Stripe object, and any component that interacts with the Stripe object must be a child of StripeProvider.
Elements is a React component that wraps around the actual checkout form. It helps group the set of Stripe Elements (more on this in a bit) together and makes it easy to tokenize all the data from each Stripe Element.
The Checkout component itself is fairly simple. It takes in two props, selectedProduct and history, which it passes on to a CheckoutForm component we’ll create next.
There’s also a useEffect call that scrolls the document to the top when the page mounts for the first time. This is necessary because react-router-dom preserves the previous scroll state when you switch routes.
Also notice that we’re passing a prop, apiKey, to StripeProvider. This key is the publishable key you copied earlier when setting up Stripe. Note that this prop is required because it serves as a way to authenticate your application to the Stripe servers.
CheckoutForm.jsx
This is the last component we’ll be creating, and it’s also the most important. The CheckoutForm component will hold the inputs for getting the user’s card details as well as actually making a call to the backend to process the payment charge.
Create a new file called CheckoutForm.jsx inside the components directory. We’re going to go through the content of this file section by section.
import React, { useState } from 'react'

import { Link } from 'react-router-dom'

import {

  CardNumberElement,

  CardExpiryElement,

  CardCVCElement,

  injectStripe

} from 'react-stripe-elements'

import axios from 'axios'

import './CheckoutForm.scss'
...to be continued below...
First, we import the required packages we’ll be working with into the file. Notice the imports from the react-stripe-elements package. This is a good time to talk more about Stripe Elements.
Stripe Elements are a set of prebuilt UI elements that allow you to collect your user’s card information without managing such sensitive information yourself.
The react-stripe-elements package is a wrapper for Stripe Elements that exposes these elements as React components you can just plug into your app — no need to create them from scratch.
We are importing some of these components into this file along with a HOC component, injectStripe.
injectStripe basically takes the Stripe object initialized in the StripeProvider component and “injects” the object into any component wrapped with it. This is how we’ll get access to the Stripe Object.
We then import a package called axios. Axios is just a promise-based HTTP client for the browser that we’re going to use to communicate with our payments server.
You can get the contents of CheckoutForm.scss from here.
...continued...
const CheckoutForm = ({ selectedProduct, stripe, history }) => {

  if (selectedProduct === null) history.push('/')


  const [receiptUrl, setReceiptUrl] = useState('')


  const handleSubmit = async event => {

    event.preventDefault()


    const { token } = await stripe.createToken()


    const order = await axios.post('http://localhost:7000/api/stripe/charge', {

      amount: selectedProduct.price.toString().replace('.', ''),

      source: token.id,

      receipt_email: '[email protected]'

    })


    setReceiptUrl(order.data.charge.receipt_url)

  }
...to be continued...
Next up is the actual CheckoutForm component itself. It takes in three props:
selectedProduct
stripe
history
selectedProduct is the product the user clicked on to purchase. It’s coming from the root App component’s state and is being passed down as props.
stripe is the actual Stripe object that is being “injected” as a prop by the injectStripe HOC we imported. You already know what history does.
The first thing we do in the component is check whether selectedProduct actually exists. If it doesn’t, we route the user to the homepage. In a production-grade app, this would probably be handled by a route guard HOC.
We then define a new piece of state to hold the receipt URL for successful payments. It will initially be empty.
Next, we define a function called handleSubmit, which will be called when the checkout form is submitted (i.e., when the Pay button is clicked). Let’s go through this function.
Firstly, we prevent the default behavior of the form element so that the page doesn’t refresh.
Then we destructure a token value from the result of an async call to stripe.createToken. createToken tokenizes the card information from the form and sends it to the Stripe server. It then returns a token object, where you can get a token.id value as an alias for the actual card info. This ensures that you never actually send the user’s card details to your payment server.
Secondly, we make an HTTP POST request to localhost:7000/api/stripe/charge with a request body containing three things:
amount
source
receipt_email
amount is the price of the item being purchased. We have to convert it to a string and remove all special characters like “.” and “,”. This means that a cost of $9.99 will get sent to the payment server as 999.
source is where the payment will be charged. In our case, it will be the ID of the token we just generated.
receipt_email is where the receipt of the payment will be sent. It is usually the customer’s email address, but in our case, we’re just hardcoding it because, again, we’re not implementing authentication.
After the request is done, we grab the URL of the receipt from the response object and set it to state. This is assuming that there are no errors, so in a production-grade app, you would usually implement error handling.
...continued...
if (receiptUrl) {

    return (

      <div className="success">

        <h2>Payment Successful!</h2>

        <a href={receiptUrl}>View Receipt</a>

        <Link to="/">Home</Link>

      </div>

    )

  }
...to be continued...
Immediately after the handleSubmit function, we have an if check to see if there’s a receiptUrl in the state. If there is, we want to render a div containing a success message and a link to view the receipt as well as a link back to the homepage.
...continued...
return (

    <div className="checkout-form">

      <p>Amount: ${selectedProduct.price}</p>

      <form onSubmit={handleSubmit}>

        <label>

          Card details

          <CardNumberElement />

        </label>

        <label>

          Expiration date

          <CardExpiryElement />

        </label>

        <label>

          CVC

          <CardCVCElement />

        </label>

        <button type="submit" className="order-button">

          Pay

        </button>

      </form>

    </div>

  )

}
export default injectStripe(CheckoutForm)
Otherwise, we’re going to render the actual checkout form. We’re using the prebuilt Elements components instead of recreating them from scratch and having to manage sensitive information.
At the end of this file, we wrap the CheckoutForm component in the injectStripe HOC so that we have access to the Stripe object we use in the component.
Testing our app
Let’s go through what we’ve accomplished so far.
We’ve created a payments server that communicates with Stripe
We’ve created a homepage to list our products
We’ve created a checkout page to capture the user’s payment details
We’ve created a handleSubmit function to send a request to the server to process a payment charge
We just about have everything set up, so it’s time to actually run our app and see if we’re able to purchase a Rubber Duck. We have to add our scripts first, so open the package.json file and replace the “scripts” section with the following:
"scripts": {

    "build": "parcel build public/index.html --out-dir build --no-source-maps",

    "dev": "node src/server.js & parcel public/index.html",

    "start": "node src/server.js"

  },
Open your terminal and run npm run dev. This should start the payments server and expose the frontend on port 1234. Open your browser, navigate to http://localhost:1234, and follow the steps below:
Click on the PURCHASE button on any product
In the checkout page, fill in 4242 4242 4242 4242 for the Card details field
Fill in any expiration date and choose a random CVC value
Click on Pay
If everything goes well, you should see a Payment Successful message with links to view your receipt and go back to the homepage.
To confirm payment, log in to your Stripe dashboard, click on Payments, and you should see your payment there.

If your company website using WooCommerce codes , you can use WooCommerce Stripe Payment Gateway Plugin
Woocommerce Stripe payment gateway enables you to accept payments from customers directly onsite. Customers can purchase their items, select stripe as their checkout option, and be able to pay quite easily with their credit cards.
Stripe takes care of processing the payment (for a little fee) and securing the customer’s financial details, thus giving customers both ease of use and security.
This guide will show you all the steps you need to integrate Stripe with WooCommerce using the WooCommerce Stripe Payment Gateway plugin. We assume you already have a Stripe account. If not, create one, and then go on to activate it.
Also, if you want to avoid all the work, we can help you setup and test Stripe in your WooCommerce store. Simply request our service and we will get to work on it.

Step 1. Installing the WooCommerce Stripe Payment Gateway plugin
To install the plugin, login to your WordPress Dashboard and go to “Plugins > Add New”

Add New Plugin - WooCommerce Stripe Payment Integration
Type in “WooCommerce Stripe Payment Gateway” in the search bar. When the plugin appears, click Install Now and wait for the installation to complete. Next click Activate.
Note: Ensure you install the WooCommerce Stripe plugin designed by WooCommerce.
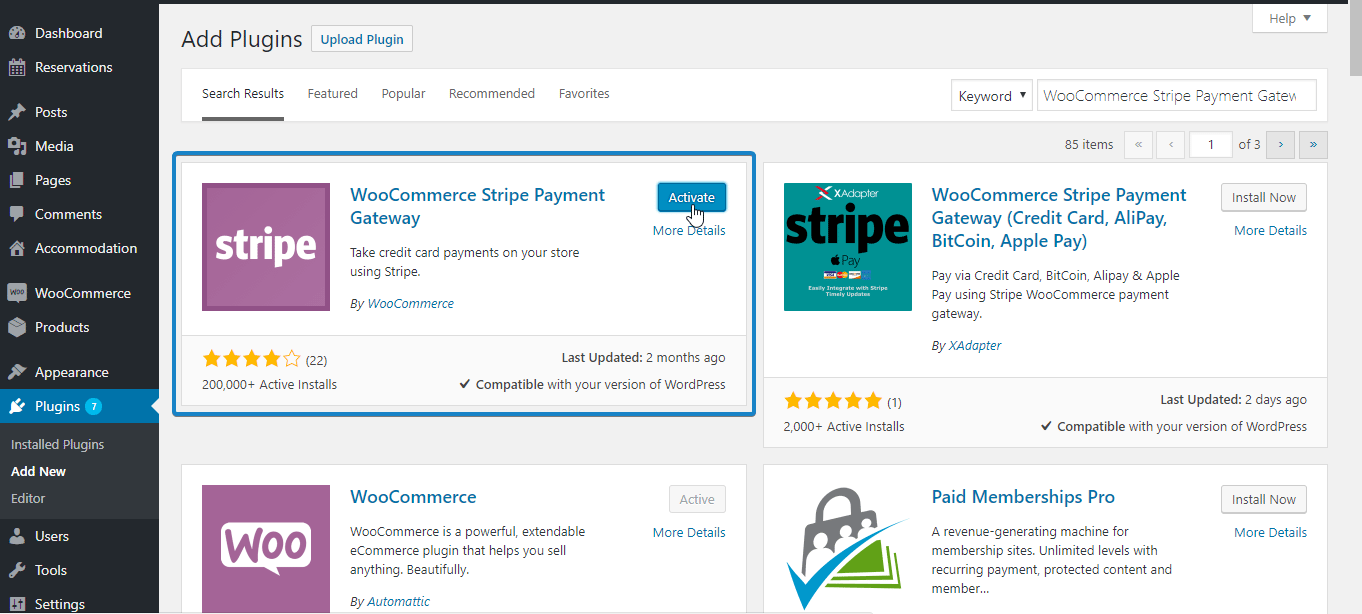
Install and activate WooCommerce Stripe Payment Gateway
After activating the plugin, go to WooCommerce > Settings.
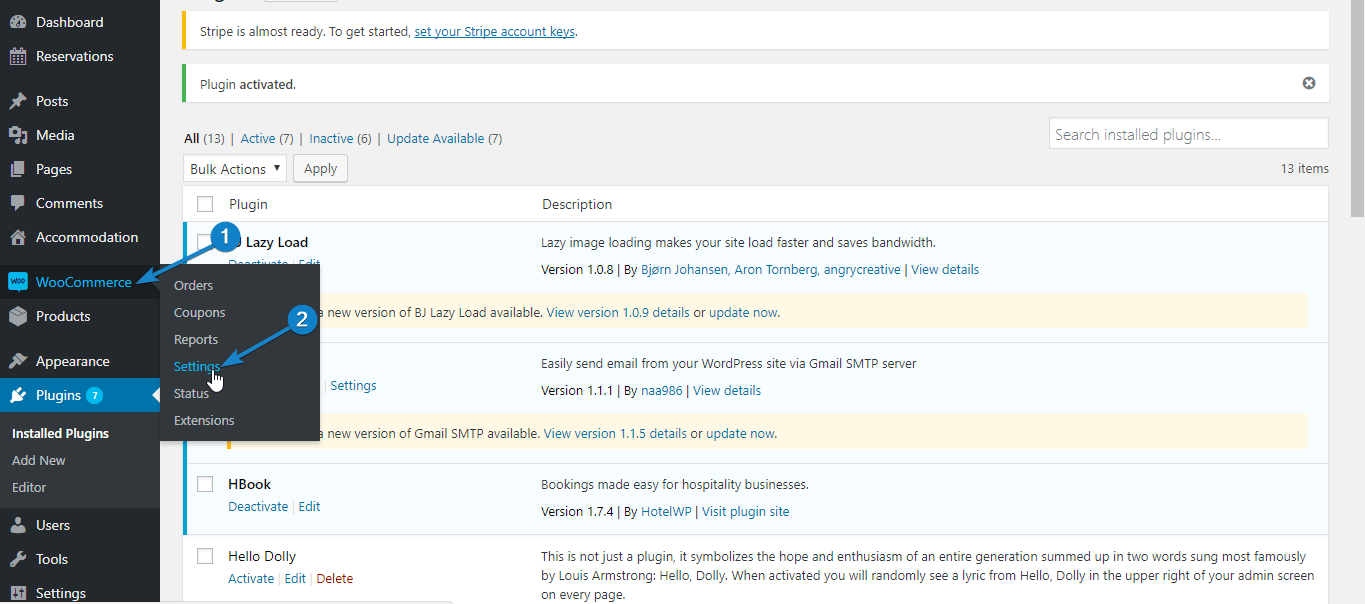
Go to Settings - WooCommerce Stripe Payment Integration
Next, switch to the “Checkout” tab. If you have correctly activated the WooCommerce Stripe plugin, “Stripe” should now appear among the options. Click on it.
Step 2. Setting Up Stripe Payment Options
In this step, we are going to set up the various options needed to activate and configure stripe for your website.
First click “Enable Stripe” to activate this payment option.
Next, setup your Title and Description. These would determine what users see during checkout. The default values may be good enough, or you can adjust as you see fit.
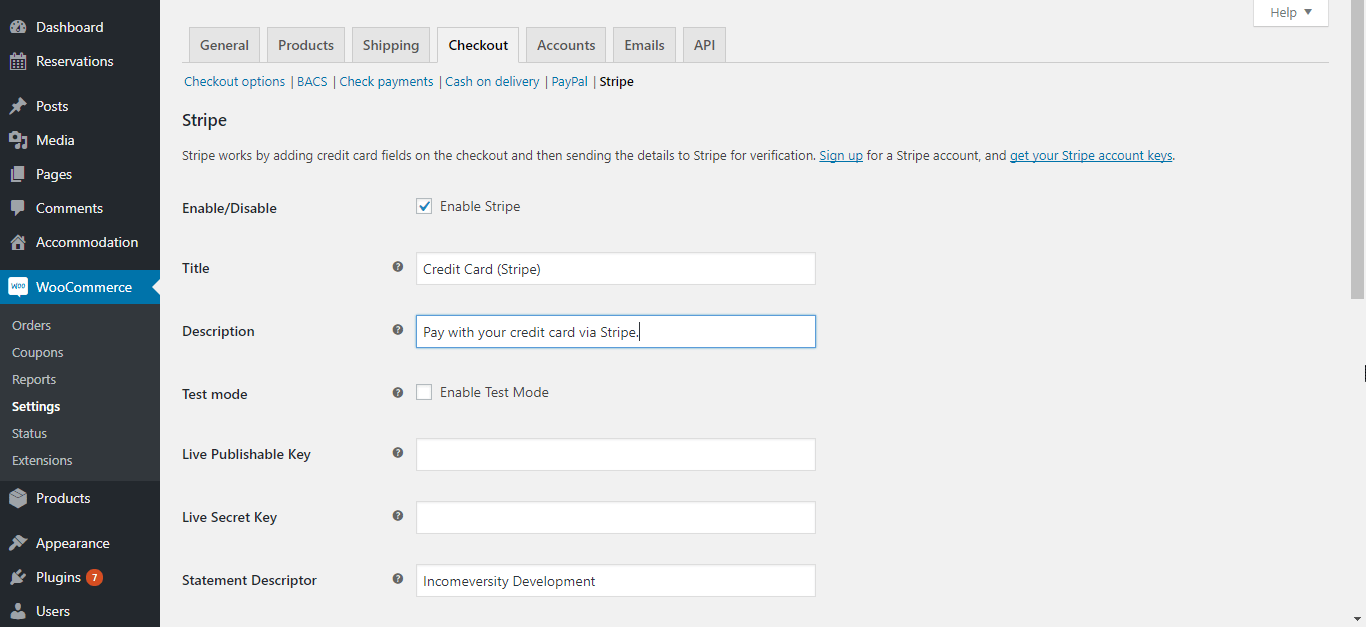
Set the description - WooCommerce Stripe Payment Integration
Since we want to try it out in test mode first, tick the “Enable Test Mode” option. Next, login to your stripe account and click API.
Switch to test mode with the toggle button, and copy the test “Publishable” and “Secret” keys into the corresponding fields in your stripe plugin.

Copy test API keys - WooCommerce Stripe Payment Integration
In the Statement Descriptor input, enter a description that will appear in the transaction statement. In the example below, this is “FixRunner Web Services”.
Next, tick the “Capture Charge Immediately” option to ensure charges are processed and billed as soon as the customer checks out.
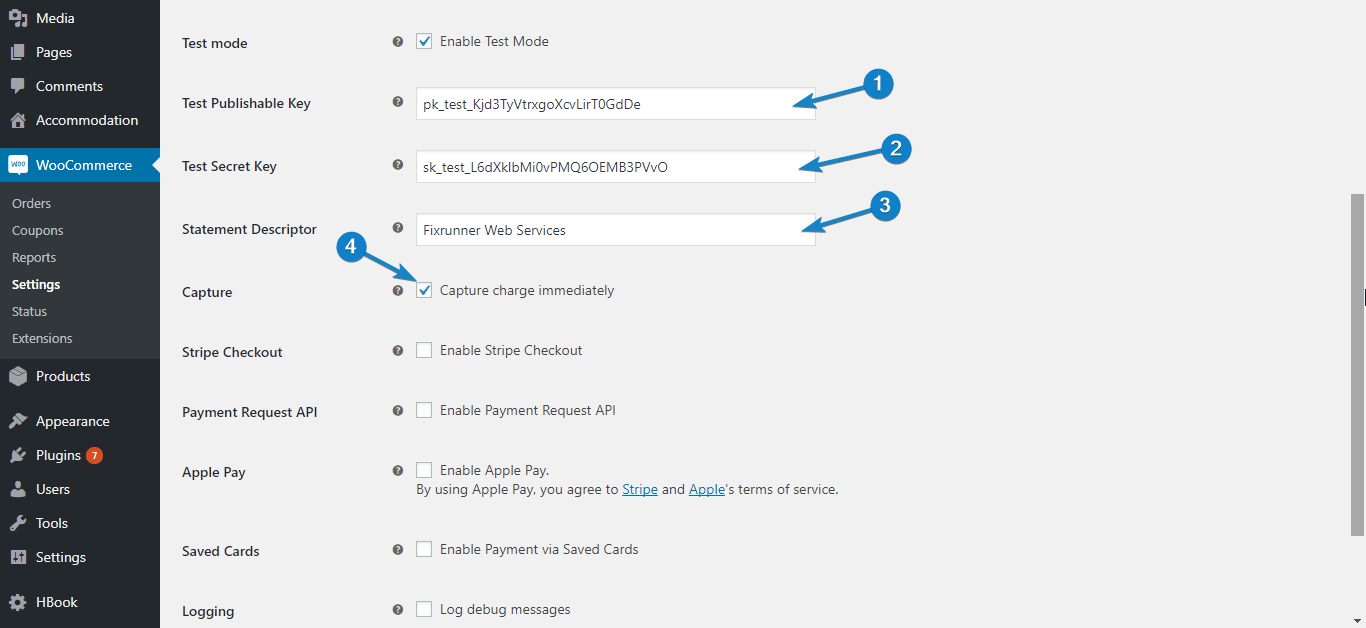
Enter settings - WooCommerce Stripe Payment Integration
Enabling Stripe Checkout
When the “Enable Stripe Checkout” option is ticked, users get a popup form requesting their financial details when they select stripe as payment method and click Continue To Payment. Enabling this option also gives you the ability to accept payments via Bitcoin.
To use this feature, tick “Enable Stripe Checkout”. Next, select your preferred language, and tick “Enable Bitcoin Currency” if you want to accept payments with Bitcoin.
If you want a custom image of your brand to appear on top of the Stripe checkout popup, enter the url of that image in the “Stripe Checkout Image” input box.
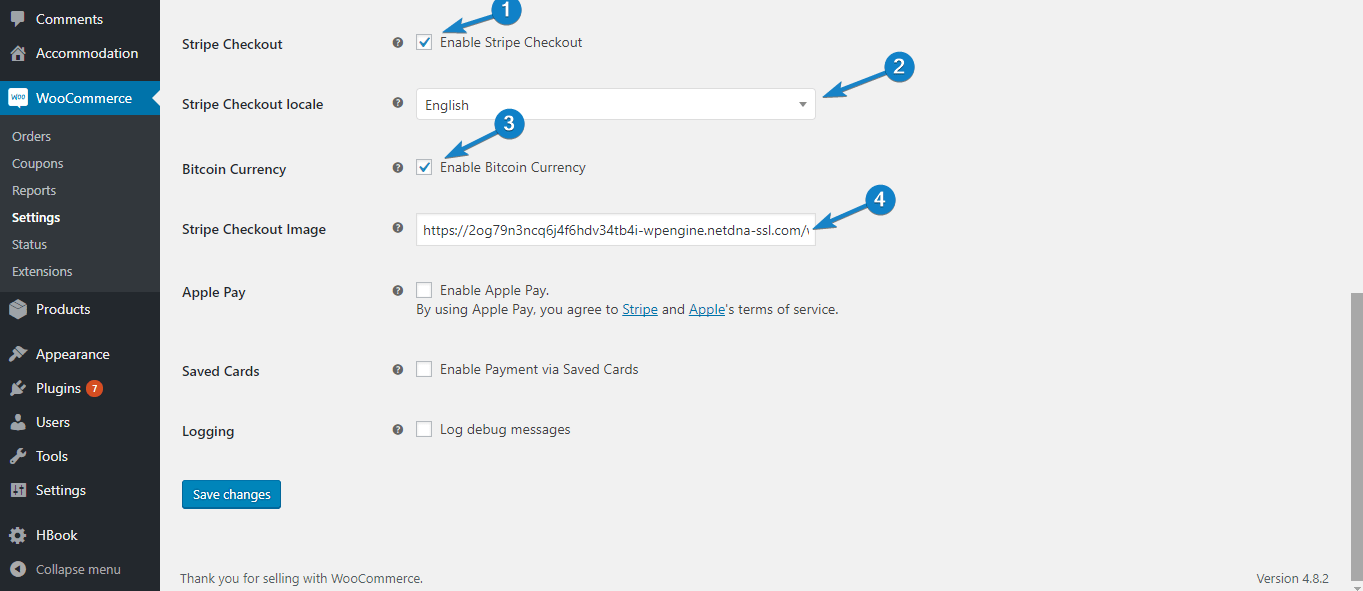
Enable Stripe Checkout - WooCommerce Stripe Payment Integration
When users opt to pay through Stripe, the payment popup will appear like this:
Payment with Stripe Checkout - WooCommerce Stripe Payment Integration
Enabling Apple Pay
Apple pay offers your customers a very simple way to checkout from their iOS devices. If you want to use this option, tick “Enable Apple Pay”
Next, select your button style, and enter the 2 letter code for the language you want Apple pay to be displayed in. You may leave it set to “en” for English, or click the link under that option to see the codes for other languages.
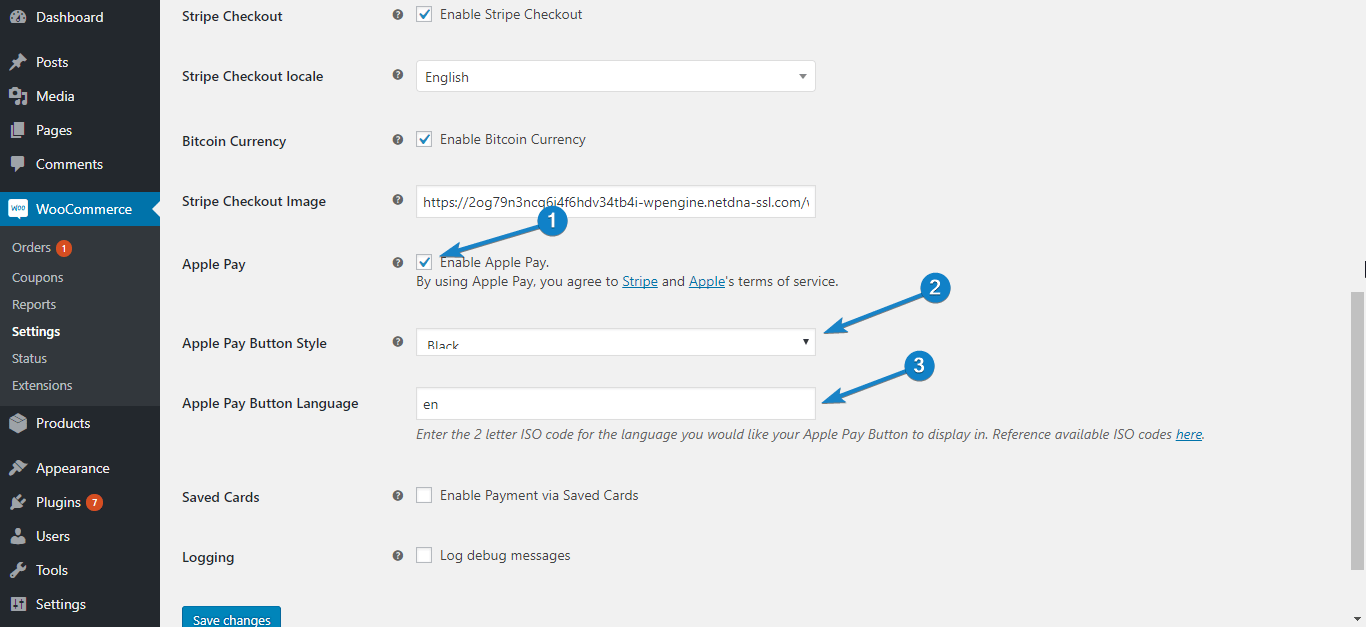
Apple pay settings - WooCommerce Stripe Payment Integration
Now go back to your stripe account and click Payments. In the payments page, select Apple Pay, and accept Apples terms of service.
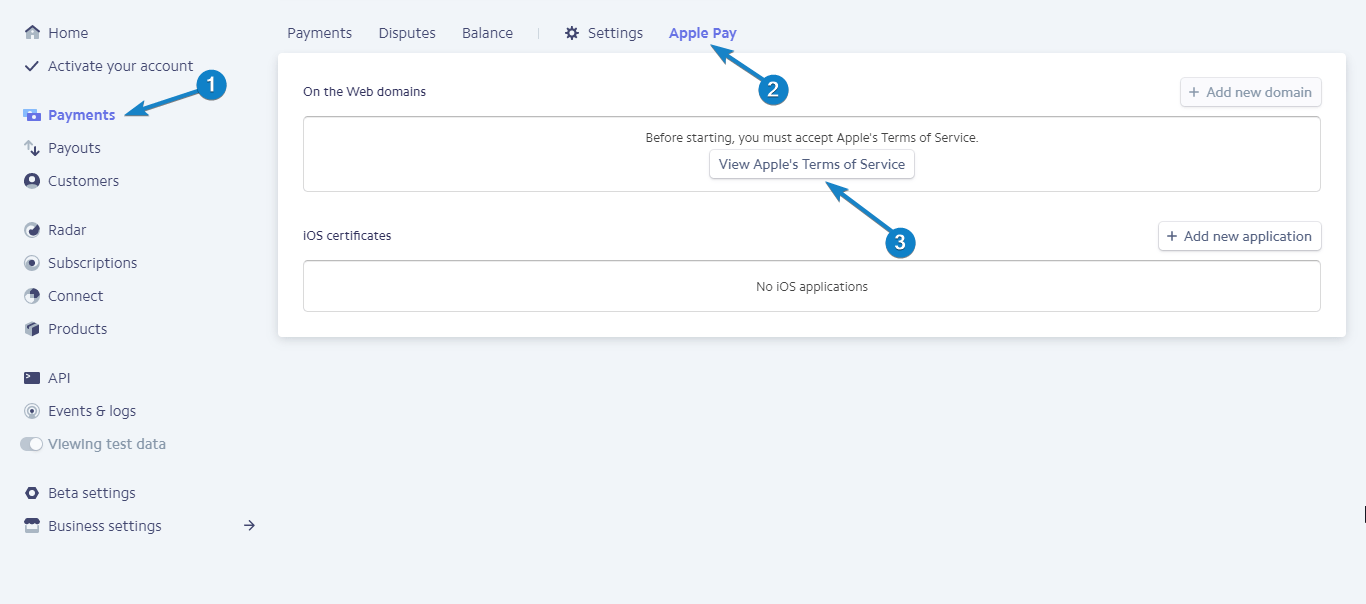
Accept Apple Pay terms - WooCommerce Stripe Payment Integration
Next, click Add New Domain, and type in your domain name. Your WooCommerce Stripe plugin would take care of steps 2 and 3. Go on to click Add.
Add domain for Apple Pay - WooCommerce Stripe Payment Integration
Note: If you get an error that the file could not be found in your domain, go back, download the file in step 2, and upload it to the specified location in step 3. And then click Add.
After completing this step and saving the setting in your Plugin, Apple Pay would be seen in product, checkout, and other pages, when your site is accessed with a compatible iOS device.
Saving Details for Future Payments
If you would like to store customer financial details so you can use these for billing them in the future, tick the “Enable Payments Via Saved Cards” option.
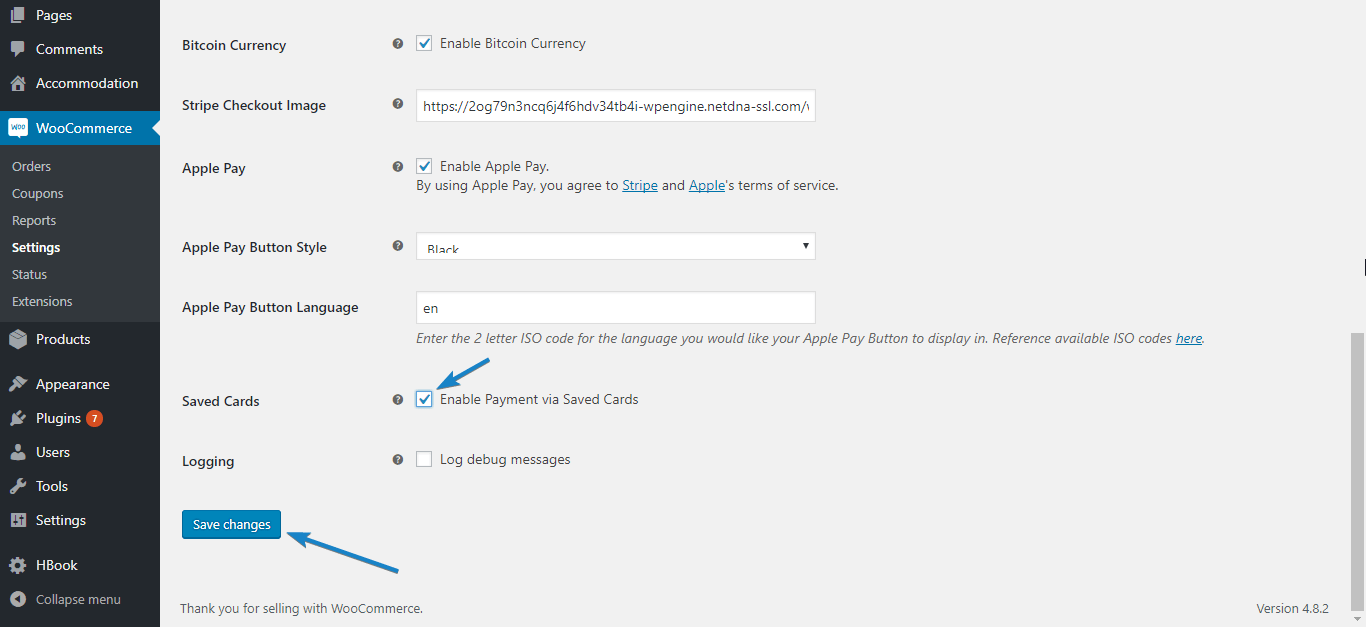
Saving financial details - WooCommerce Stripe Payment Integration
Note that the financial details are not stored on your servers, but on Stripe’s servers, where all security measures are in place to protect this sensitive data.
For debugging purposes, you may also enable the “Log Debug Messages” option. This can be useful in finding out what went wrong if there are errors.
And that concludes your setup process. Click Save Changes to use the settings you have specified.
Step 3. Trying WooCommerce Stripe in Test Mode
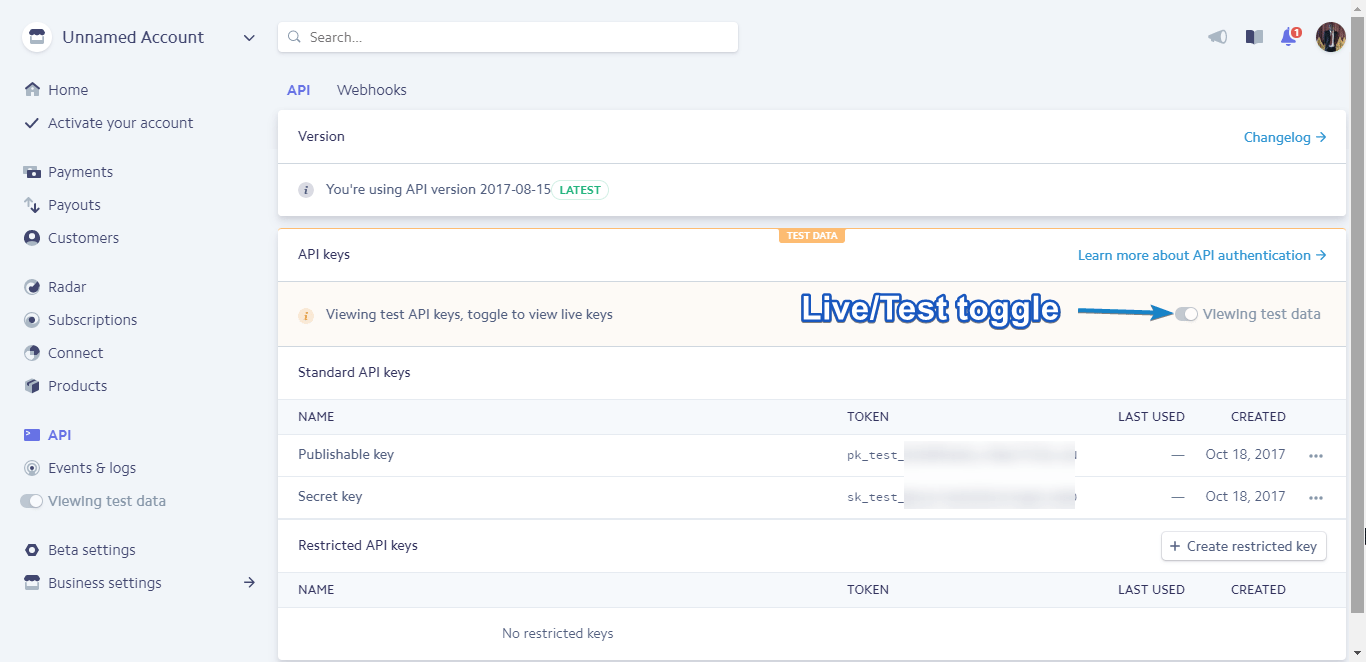
In the setup above, we enabled test mode and used the test API details obtained from Stripe. This is useful to check if Stripe payment works properly before making it available to your customers.
Stripe provides test credit card details you can use for this purpose. In this example, we would be using the following details, and you should be able to use them too. If not, you can obtain other test card details.
Card number: 4242424242424242
Expiry: Any date after today
CVV: 789
Now, go to any of your products page, add the product to cart, and click View Cart. In the cart page, click Proceed to checkout.
Fill out the form with your information. At the bottom of the page, select “Stripe” as your payment method and click Continue to payment.
Next, enter the test financial details and click Pay #Amount.
Test payment - WooCommerce Stripe Payment Integration
You would be taken to an order confirmation page like the one below:
Payment confirmation - WooCommerce Stripe Payment Integration
Congratulations! Your WooCommerce Stripe payment option works!
The final step is to make this payment method available to customers.
Step 4. Activating Live Mode to begin processing real payments
To enable this payment method for your customers, you need to activate live mode.
In your WordPress dashboard, go to WooCommerce > Settings. Next, switch to the “Checkout” tab and click Stripe.
Uncheck the enable test mode option. When you do, the key input boxes will change to accept the live keys.
Switch to live mode - WooCommerce Stripe Payment Integration
Now login go to your stripe dashboard and click API. You should currently be in test mode.
Switch API to live - WooCommerce Stripe Payment Integration
To switch to live mode, click the Live/Test toggle switch. Next, copy your live Publishable and Secret keys into their input boxes in your WooCommerce Stripe Plugin.
Enter live keys - WooCommerce Stripe Payment Integration
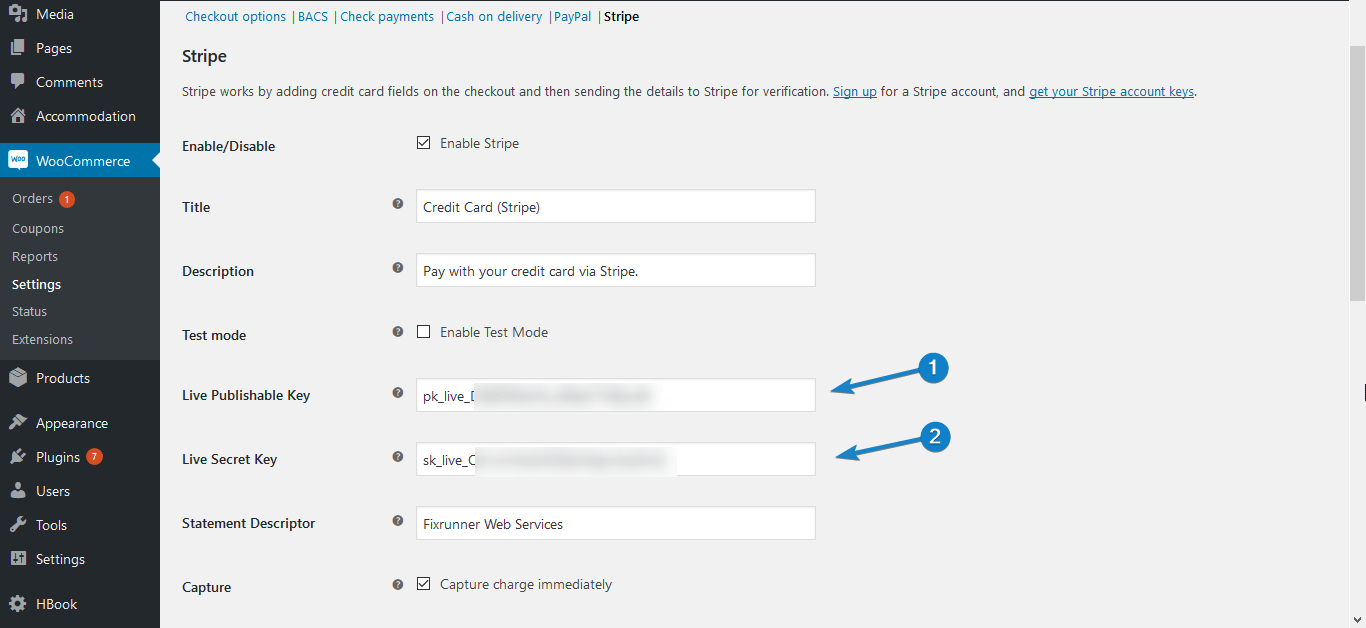
Lastly, scroll down and click Save Changes. Customers can now make payments with Stripe on your website.
Note: To be able to activate live mode, you must have ssl in your server (i.e. your domain should start with https), and you must have enabled the “Force secure checkout” option found in WooCommerce > Settings > Checkout.
If you do not have ssl, have your host add it for you, and then go on to enable secure checkout, and then live mode.
ecommerce website design nz|Our Studio will design a brand identity system with website and content, $1,500 Full website design + Unique Logo + SEO
Marketplace • Jenks Santiago wrote the post • 0 comments • 481 views • 2020-04-01 05:12
About This service:
If you plan on starting your business, company or product. YOU DEFINITELY NEED THIS GIG!
Our studio will handle everything from website design to full branding (Logos & Stationaries) and also Search Engine Optimization (SEO). we are a one stop solution to everything digital and tech!
What you will get in this service:
Unique and responsive web design
Website customizations
High-Speed Loading time
Ecommerce Functionality
Highly secure from bugs and malware
Keywords Research
Schema Code Implementation
Search Console Implementation and Index in Google
Sitemap XML creation
Unique logo and stationaries
All Projects are Delivered within an Estimated Date
Continued Follow-Up Support After Project is Finished
You will never get bored working with US!
Our Portfolios:
view all

About This service:
If you plan on starting your business, company or product. YOU DEFINITELY NEED THIS GIG!
Our studio will handle everything from website design to full branding (Logos & Stationaries) and also Search Engine Optimization (SEO). we are a one stop solution to everything digital and tech!
What you will get in this service:
Unique and responsive web design
Website customizations
High-Speed Loading time
Ecommerce Functionality
Highly secure from bugs and malware
Keywords Research
Schema Code Implementation
Search Console Implementation and Index in Google
Sitemap XML creation
Unique logo and stationaries
All Projects are Delivered within an Estimated Date
Continued Follow-Up Support After Project is Finished
You will never get bored working with US!
Our Portfolios:

website designer auckland|I will create beautiful interactive websites
Marketplace • Jenks Santiago wrote the post • 0 comments • 446 views • 2020-04-01 05:06
About This Item:
I will provide custom unique UI designs for your website or app and write the deployment-ready code you.
A typical page design being the home, about, contact and one extra-page for whatever information you find relevant.
view all

About This Item:
I will provide custom unique UI designs for your website or app and write the deployment-ready code you.
A typical page design being the home, about, contact and one extra-page for whatever information you find relevant.
website design in auckland|Our Studio front-end developer John share how to to use the preact-i18n library to add internationalization to your website. Let your website becomes multi-language site.
Marketplace • full stack developer Kevin wrote the post • 0 comments • 484 views • 2020-04-06 10:31
In this article, you are going to use the preact-i18n library to add internationalization to your Preact application.
Step 1: Setup Preact CLI & Create new project
Side Note: If you are already familiar with Preact, you may skip to the next step.
If you haven't installed the Preact CLI on your machine, use the following command to install the CLI. Make sure you have Node.js 6.x or above installed.$ npm install -g preact-cli
Once the Preact CLI is installed, let's create a new project using the default template, and call it my-project.$ preact create default my-project
Start the development server with the command below:$ cd my-project && npm run start
Now, open your browser and go to http://localhost:8080, and you should see something like this on your screen:
Step 2: Add preact-i18n library
Install the preact-i18n library to your project using the command below:
$ npm install --save preact-i18n
preact-i18n is very easy to use, and most importantly, it's extremely small, around 1.3kb after gzipped. You can learn more about the library here: https://github.com/synacor/preact-i18n
Step 3: Create a definition file
Once you have the library installed, you will need to create a definition file, which you will store all the translate strings in a JSON file.
In this case, you will need to save this file in src/i18n/zh-tw.json:{
"home": {
"title": "主頁",
"text": "這是個Home組件。"
}
}
Step 4: Import IntlProvider and definition file
Next, open the app.js file, which is located in the src/components folder. Then, import the IntlProvider and your definition file to the app.js file:import { IntlProvider } from 'preact-i18n';
import definition from '../i18n/zh-tw.json';
Step 5: Expose the definition via IntlProvider
After that, you will need to expose the definition file to the whole app via <IntlProvider>. By doing this, you will be able to read the definition file everywhere in the app.render() {
return(
<IntlProvider definition={definition}>
<div id="app" />
</IntlProvider>
);
}
At this moment, here's how your app.js file should looks like:import { h, Component } from 'preact';
import { Router } from 'preact-router';
import Header from './header';
import Home from '../routes/home';
import Profile from '../routes/profile';
// Import IntlProvider and the definition file.
import { IntlProvider } from 'preact-i18n';
import definition from '../i18n/zh-tw.json';
export default class App extends Component {
handleRoute = e => {
this.currentUrl = e.url;
};
render() {
return (
// Expose the definition to your whole app via <IntlProvider>
<IntlProvider definition={definition}>
<div id="app">
<Header />
<Router onChange={this.handleRoute}>
<Home path="/" />
<Profile path="/profile/" user="me" />
<Profile path="/profile/:user" />
</Router>
</div>
</IntlProvider>
);
}
}
Step 6: Use Text to translate string literals
You are almost done, now you just need to replace the text in the page with <Text>. In this case, you will need to update the content of the home page (src/routes/home/index.js) by adding the <Text> inside the <h1> and <p> tags.
import { Text } from 'preact-i18n';const Home = () => (
<div>
<h1>
<Text id="home.title">Home</Text>
</h1>
<p>
<Text id="home.text">This is the Home component.</Text>
</p>
</div>
);
export default Home;
Fallback Text
In order to prevent blank text being rendered in the page, you should set a fallback text to the <Text>. If you didn't include the definition for unknown.definition, the library will render any text contained within <Text>…</Text> as fallback text:
<Text id="unknown.definition">This is a fallback text.</Text>
// It will render this text: "This is a fallback text."
Localizer and MarkupText
If you want to translate the text of the HTML attribute's value (ie: placeholder="", title="", etc …), then you will need to use <Localizer> instead of <Text>.
However, if you want to include HTML markup in your rendered string, then you will need to use <MarkupText>. With this component, your text will be rendered in a <span> tag.
In the example below, you are going to add few more lines of code to your definition file. first_name and last_name will be used for the <Localizer>'s example, and link for the example for <MarkupText>.{
"first_name": "名",
"last_name": "姓",
"link": "這是個<a href='https://www.google.com'>連結</a>"
}
With this, you will able to use <Localizer> and <MarkupText> in the page. Please take note that you need to import Localizer and MarkupText to the src/routes/home/index.js file.import { Text, Localizer, MarkupText } from 'preact-i18n';
const Home = () => (
<div>
<Localizer>
<input placeholder={<Text id="first_name" />} />
</Localizer>
<Localizer>
<input placeholder={<Text id="last_name" />} />
</Localizer>
<MarkupText id="link">
This is a <a href="https://www.google.com">link</a>
</MarkupText>
</div>
);
export default Home;
Templating
If you want to inject a custom string or value into the definition, you could do it with the fields props.
First, you will need to update the definition file with the {{field}} placeholder. The placeholder will get replaced with the matched keys in an object you passed in the fields props.{
"page": "{{count}} / {{total}} 頁"
}
Next, you will need to add the fields attribute together with the value into the <Text />. As a result, your code should looks like this:import { Text } from 'preact-i18n';
const Home = () => (
<div>
<h2>
<Text id="page" fields={{ count: 5, total: 10 }}>
5 / 10 Pages
</Text>
</h2>
</div>
);
export default Home;
Pluralization
With preact-i18n, you have 3 ways to specific the pluralization values:"key": { "singular":"apple", "plural":"apples" }
"key": { "none":"no apples", "one":"apple", "many":"apples" }
"key": ["apples", "apple"]
For the next example, you will combine both pluralization and templating. First, you will need to update the definition file with the code below:
{
"apple": {
"singular": "Henry has {{count}} apple.",
"plural":"Henry has {{count}} apples."
}
}
Next, you will update the home page (src/routes/home/index.js) with the following code:import { Text } from 'preact-i18n';
const Home = () => (
<div>
<p>
<Text id="apple" plural={1} fields={{ count: 1 }} />
</p>
<p>
<Text id="apple" plural={100} fields={{ count: 100 }} />
</p>
</div>
);
export default Home;
With the method above, you will able to add pluralization and templating to your Preact application.
Dynamically import language definition file
In a real-world scenario, you would like to set the language site based on the user's choice, which is either based on the navigator.language or the user can change the site language on their own.
However, in order to prevent you from importing all the unnecessary definition files to the project, you can import the language definition file dynamically by using import(). By doing this, you can import the language definition file based on the user's choice.import { Component } from 'preact';
import { IntlProvider } from 'preact-i18n';
import defaultDefinition from '../i18n/zh-tw.json';
export default class App extends Component {
state = {
definition: defaultDefinition
}
changeLanguage = (lang) => {
// Call this function to change language
import(`../i18n/${lang}.json`)
.then(definition => this.setState({ definition }));
};
render({ }, { definition }) {
return (
<IntlProvider definition={definition}>
<div id="app" />
</IntlProvider>
);
}
}
In this case, you can call the this.changeLanguage('zh-TW') function to change the site language.
Who's using preact-i18n?
I am using preact-i18n for my side project: Remote for Slides.
Remote for Slides is a Progressive Web App + Chrome Extension that allows the user to control their Google Slides on any device, remotely, without the need of any extra hardware.
Remote for Slides Progressive Web App supports more than 8 languages, which includes: Català, English, Español, Euskera, Français, Polski, Traditional Chinese, and Simplified Chinese.
PS: if you looking for website design in Auckland, NZ. just leave a message to us.
In this side project, I am using the "dynamically import language definition file" method I mentioned earlier. This could prevent the web app from loading some unnecessary definition language files, thus this will improve the page performance.
view all
In this article, you are going to use the preact-i18n library to add internationalization to your Preact application.
Step 1: Setup Preact CLI & Create new project
Side Note: If you are already familiar with Preact, you may skip to the next step.
If you haven't installed the Preact CLI on your machine, use the following command to install the CLI. Make sure you have Node.js 6.x or above installed.
$ npm install -g preact-cli
Once the Preact CLI is installed, let's create a new project using the default template, and call it my-project.
$ preact create default my-project
Start the development server with the command below:
$ cd my-project && npm run start
Now, open your browser and go to http://localhost:8080, and you should see something like this on your screen:
Step 2: Add preact-i18n library
Install the preact-i18n library to your project using the command below:
$ npm install --save preact-i18n
preact-i18n is very easy to use, and most importantly, it's extremely small, around 1.3kb after gzipped. You can learn more about the library here: https://github.com/synacor/preact-i18n
Step 3: Create a definition file
Once you have the library installed, you will need to create a definition file, which you will store all the translate strings in a JSON file.
In this case, you will need to save this file in src/i18n/zh-tw.json:
{

  "home": {

    "title": "主頁",

    "text": "這是個Home組件。"

  }

}
Step 4: Import IntlProvider and definition file
Next, open the app.js file, which is located in the src/components folder. Then, import the IntlProvider and your definition file to the app.js file:
import { IntlProvider } from 'preact-i18n';

import definition from '../i18n/zh-tw.json';
Step 5: Expose the definition via IntlProvider
After that, you will need to expose the definition file to the whole app via <IntlProvider>. By doing this, you will be able to read the definition file everywhere in the app.
render() {

  return(

    <IntlProvider definition={definition}>

      <div id="app" />

    </IntlProvider>

  );

}
At this moment, here's how your app.js file should looks like:
import { h, Component } from 'preact';

import { Router } from 'preact-router';

import Header from './header';

import Home from '../routes/home';

import Profile from '../routes/profile';

// Import IntlProvider and the definition file.

import { IntlProvider } from 'preact-i18n';

import definition from '../i18n/zh-tw.json';

export default class App extends Component {


 handleRoute = e => {

  this.currentUrl = e.url;

 };

render() {

  return (

   // Expose the definition to your whole app via <IntlProvider>

   <IntlProvider definition={definition}>

    <div id="app">

     <Header />

     <Router onChange={this.handleRoute}>

      <Home path="/" />

      <Profile path="/profile/" user="me" />

      <Profile path="/profile/:user" />

     </Router>

    </div>

   </IntlProvider>

  );

 }

}
Step 6: Use Text to translate string literals
You are almost done, now you just need to replace the text in the page with <Text>. In this case, you will need to update the content of the home page (src/routes/home/index.js) by adding the <Text> inside the <h1> and <p> tags.
import { Text } from 'preact-i18n';
const Home = () => (

  <div>

    <h1>

      <Text id="home.title">Home</Text>

    </h1>

    <p>

      <Text id="home.text">This is the Home component.</Text>

    </p>

  </div>

);
export default Home;
Fallback Text
In order to prevent blank text being rendered in the page, you should set a fallback text to the <Text>. If you didn't include the definition for unknown.definition, the library will render any text contained within <Text>…</Text> as fallback text:
<Text id="unknown.definition">This is a fallback text.</Text>

// It will render this text: "This is a fallback text."
Localizer and MarkupText
If you want to translate the text of the HTML attribute's value (ie: placeholder="", title="", etc …), then you will need to use <Localizer> instead of <Text>.
However, if you want to include HTML markup in your rendered string, then you will need to use <MarkupText>. With this component, your text will be rendered in a <span> tag.
In the example below, you are going to add few more lines of code to your definition file. first_name and last_name will be used for the <Localizer>'s example, and link for the example for <MarkupText>.
{

  "first_name": "名",

  "last_name": "姓",

  "link": "這是個<a href='https://www.google.com'>連結</a>"

}
With this, you will able to use <Localizer> and <MarkupText> in the page. Please take note that you need to import Localizer and MarkupText to the src/routes/home/index.js file.
import { Text, Localizer, MarkupText } from 'preact-i18n';

const Home = () => (

  <div>

    <Localizer>

      <input placeholder={<Text id="first_name" />} />

    </Localizer>

    <Localizer>

      <input placeholder={<Text id="last_name" />} />

    </Localizer>

    <MarkupText id="link">

      This is a <a href="https://www.google.com">link</a>

    </MarkupText>

  </div>

);
export default Home;
Templating
If you want to inject a custom string or value into the definition, you could do it with the fields props.
First, you will need to update the definition file with the {{field}} placeholder. The placeholder will get replaced with the matched keys in an object you passed in the fields props.
{

  "page": "{{count}} / {{total}} 頁"

}
Next, you will need to add the fields attribute together with the value into the <Text />. As a result, your code should looks like this:
import { Text } from 'preact-i18n';

const Home = () => (

  <div>

    <h2>

      <Text id="page" fields={{ count: 5, total: 10 }}>

         5 / 10 Pages

      </Text>

    </h2>

  </div>

);
export default Home;
Pluralization
With preact-i18n, you have 3 ways to specific the pluralization values:
"key": { "singular":"apple", "plural":"apples" }

"key": { "none":"no apples", "one":"apple", "many":"apples" }

"key": ["apples", "apple"]

For the next example, you will combine both pluralization and templating. First, you will need to update the definition file with the code below:

{

  "apple": {

    "singular": "Henry has {{count}} apple.",

    "plural":"Henry has {{count}} apples."

  }

}
Next, you will update the home page (src/routes/home/index.js) with the following code:
import { Text } from 'preact-i18n';

const Home = () => (

  <div>

    <p>

      <Text id="apple" plural={1} fields={{ count: 1 }} />

    </p>

    <p>

      <Text id="apple" plural={100} fields={{ count: 100 }} />

    </p>

  </div>

);
export default Home;
With the method above, you will able to add pluralization and templating to your Preact application.
Dynamically import language definition file
In a real-world scenario, you would like to set the language site based on the user's choice, which is either based on the navigator.language or the user can change the site language on their own.
However, in order to prevent you from importing all the unnecessary definition files to the project, you can import the language definition file dynamically by using import(). By doing this, you can import the language definition file based on the user's choice.
import { Component } from 'preact';

import { IntlProvider } from 'preact-i18n';

import defaultDefinition from '../i18n/zh-tw.json';

export default class App extends Component {

  state = {

    definition: defaultDefinition

  }

  changeLanguage = (lang) => {

    // Call this function to change language

    import(`../i18n/${lang}.json`)

      .then(definition => this.setState({ definition }));

  };

  render({ }, { definition }) {

    return (

      <IntlProvider definition={definition}>

        <div id="app" />

      </IntlProvider>

    );

  }

}
In this case, you can call the this.changeLanguage('zh-TW') function to change the site language.
Who's using preact-i18n?
I am using preact-i18n for my side project: Remote for Slides.
Remote for Slides is a Progressive Web App + Chrome Extension that allows the user to control their Google Slides on any device, remotely, without the need of any extra hardware.
Remote for Slides Progressive Web App supports more than 8 languages, which includes: Català, English, Español, Euskera, Français, Polski, Traditional Chinese, and Simplified Chinese.
PS: if you looking for website design in Auckland, NZ. just leave a message to us.
In this side project, I am using the "dynamically import language definition file" method I mentioned earlier. This could prevent the web app from loading some unnecessary definition language files, thus this will improve the page performance.
ecommerce website design nz|I will design a smart ecommerce logo for website and online store,$20 = 3 Logo concepts +Free Source Vector file+Jpg+Png+3D mock up+Unlimited revisions
Marketplace • Michela F wrote the post • 0 comments • 886 views • 2020-04-06 02:46
Hello, Welcome to My this item!
I am Michela F. A Creative Graphic Designer with many years of working Experience, I Prefer High Quality Work.
Here i will Design a Smart ECOMMERCE and WEBSITE LOGO For Your BUSINESS. i will send you all standard files with Reasonable Price.
I will SEND You!
High Quality Logo concepts
Free Source file
Free Vector (Editable) file
Print resolution file
PNG (transparent)
Unlimited Revisions
100% Satisfaction
JPG
SVG
PSD
AI
EPS
I am Waiting for your order to star working with you!
Check out my portfolios:
view all
Hello, Welcome to My this item!
I am Michela F. A Creative Graphic Designer with many years of working Experience, I Prefer High Quality Work.
Here i will Design a Smart ECOMMERCE and WEBSITE LOGO For Your BUSINESS. i will send you all standard files with Reasonable Price.
I will SEND You!
High Quality Logo concepts
Free Source file
Free Vector (Editable) file
Print resolution file
PNG (transparent)
Unlimited Revisions
100% Satisfaction
JPG
SVG
PSD
AI
EPS
I am Waiting for your order to star working with you!
Check out my portfolios:
ecommerce website design nz| Install and Configure Magento on your hosting account, $260, Delivery in 3 days.
Marketplace • Michela F wrote the post • 0 comments • 459 views • 2020-04-06 02:42
What you get with this Item
Magento, the most flexible eCommerce platform to power your business
For this Hourlie I will...
1) Install Magento
2) General Magento configuration
3) Install your theme
4) Setup taxes
5) Setup Shipping rules
6) Setup Currency
7) Configure Attributes
8) Configure Attribute sets
9) Configuure store email
10) Configure store postal address
11) Configure payment gateway (Paypal etc)
12) Configure Shipping
13) Setup 5 CMS pages from your content
14) Setup 5 products
Not included in this offer:
Theme, content, images, text, product details and images, hosting
view all
What you get with this Item
Magento, the most flexible eCommerce platform to power your business
For this Hourlie I will...
1) Install Magento
2) General Magento configuration
3) Install your theme
4) Setup taxes
5) Setup Shipping rules
6) Setup Currency
7) Configure Attributes
8) Configure Attribute sets
9) Configuure store email
10) Configure store postal address
11) Configure payment gateway (Paypal etc)
12) Configure Shipping
13) Setup 5 CMS pages from your content
14) Setup 5 products
Not included in this offer:
Theme, content, images, text, product details and images, hosting
ecommerce website design nz|Design an outstanding eCommerce website for your business, Delivery in 5 days, $590
Marketplace • Michela F wrote the post • 0 comments • 437 views • 2020-04-06 01:50
What you get with this item
I am a Professional web developer with 13 years of experience. Here I am offering you an professional eCommerce website.This is your chance to have your very own online store designed and built.Expect your website to be completely responsive and to look great on all devices. I can design your site to your specification, which will include the latest technology along with the most up-to-date design. Once built, you have control of the content,Images,Color Theme!
What you will get with this hourlie
-----------------------------------------------
A set of standard options including:
Design and Development of your website
Home page image slider
wooCommerce integration
Payment Gateway integration
Product upload (upto 100)
News posts
Contact form
Social media links (linking to your Facebook, Twitter or Linkedin accounts)
Site search
Google location map
Google Analytics Code Integration
Yoast plugin setup
view all
What you get with this item
I am a Professional web developer with 13 years of experience. Here I am offering you an professional eCommerce website.This is your chance to have your very own online store designed and built.Expect your website to be completely responsive and to look great on all devices. I can design your site to your specification, which will include the latest technology along with the most up-to-date design. Once built, you have control of the content,Images,Color Theme!
What you will get with this hourlie
-----------------------------------------------
A set of standard options including:
Design and Development of your website
Home page image slider
wooCommerce integration
Payment Gateway integration
Product upload (upto 100)
News posts
Contact form
Social media links (linking to your Facebook, Twitter or Linkedin accounts)
Site search
Google location map
Google Analytics Code Integration
Yoast plugin setup
ecommerce website design nz|I will create ecommerce website with woocommerce, $25, I will install and setup woocommerce on your site . 3 Days Delivery
Marketplace • Michela F wrote the post • 0 comments • 468 views • 2020-04-06 01:45
About This Service:
Hi Everyone!
In this item, i am offering my services to create awesome ecommerce website.
I will build your online store in Wordpress. I can install and customize any Ecommece theme.
Specially I will :
Install Ecommerce theme
Install Woocommerce plugin
Setting up your basic ecommerce pages
Give 100% responsive layout
Setup different shipping options.
Setting up payment gateways as per requirements
Contact page with Google Map
and much more . .
Ecommerce site will have the following features
Open Source Documentation
Product Reviews
Payment gateway integration
Unlimited Products
Order tracking
Ratings Product Variations
Wish list System Social Media
SEO Plugins Installation
Sales Reports
Multiple Currency Options
Input Multiple Tax Rates
Related Products
Shipping Weight Calculation
Discount Coupon System
Unlimited Module Instance
High Security Integration
EBay, Amazon Affiliate system
Sales Reports
Error Logging
Unlimited Categories
If you want us to install premium theme or plugin in your site you have to provide it or you can pay us for this. Also product uploading is not included in my all 3 packages.
Note : Discuss your website plan before placing any customized order . Thank you!
view all
About This Service:
Hi Everyone!
In this item, i am offering my services to create awesome ecommerce website.
I will build your online store in Wordpress. I can install and customize any Ecommece theme.
Specially I will :
Install Ecommerce theme
Install Woocommerce plugin
Setting up your basic ecommerce pages
Give 100% responsive layout
Setup different shipping options.
Setting up payment gateways as per requirements
Contact page with Google Map
and much more . .
Ecommerce site will have the following features
Open Source Documentation
Product Reviews
Payment gateway integration
Unlimited Products
Order tracking
Ratings Product Variations
Wish list System Social Media
SEO Plugins Installation
Sales Reports
Multiple Currency Options
Input Multiple Tax Rates
Related Products
Shipping Weight Calculation
Discount Coupon System
Unlimited Module Instance
High Security Integration
EBay, Amazon Affiliate system
Sales Reports
Error Logging
Unlimited Categories
If you want us to install premium theme or plugin in your site you have to provide it or you can pay us for this. Also product uploading is not included in my all 3 packages.
Note : Discuss your website plan before placing any customized order . Thank you!
ecommerce website design nz|I will design Responsive Magento2 eCommerce website online shop/Store. only $790,Delivery in 5 days
Marketplace • full stack developer Kevin wrote the post • 0 comments • 471 views • 2020-04-06 00:51
Hello!
I'm David, a professional Back-End Developer , based Auckland, NZ.
If you are looking for a unique website for your business, in which you can manage all the content, I can design and develop a fully responsive and interactive E-Commerce online store for you, using the best technologies for fast, Google-friendly and SEO optimised websites.
I am certified Web developer having 12+ years of quality experience in designing, developing, debugging, updating and publishing attractive, efficient and easy to navigate Responsive E-commerce Websites.
My prime focus is to Guide people to Live their Dreams. I will help in "How to think and not what to think", I will be able to provide solutions for your Design or UI/UX related challenges.
Also I have experience in developing custom plugins as per the requirements and can also assist you in customisation tasks as well.
One of the key success factors in building a professional E-Commerce Website, is modern design combined with user friendly architecture that functions properly on any device. If these factors are not executed effectively, your customers won't trust you.
With more than 12 years of experience, i am ready to dig deep into your goals and needs and provide you with full development support at each step of the way.
Don't give your business and sales to just any developer!
What we need:
1-Logo
2- Website Name and URL
3- Categories, Sub categories name and some nice images to create banners
4- About us, Payment, Shipping, Returns, Contact us etc pages content
5- Cpanel Details (Website Hosting login details with SSH access)
The Process of development-
- Send your initial design and brief that your specific business requires so we can create the website to match your aims and aspirations.
- To provide the best user experience, we use initial mock ups and UX designs to produce an overview of how the website will look.
- To provide customer satisfaction, we allow unlimited revisions of the design
- Then our amazing team converts the approved designs into a functional website that provides all the services which are required to produce the most efficient business available
- Finally, an overall review that allows for revisions to make sure that the website matches your standards and is fully operational for customers.
- Then we provide a full summary on how to use the website and it we be all yours to operate and manage
Report this OfferReviews (92) view all
Hello!
I'm David, a professional Back-End Developer , based Auckland, NZ.
If you are looking for a unique website for your business, in which you can manage all the content, I can design and develop a fully responsive and interactive E-Commerce online store for you, using the best technologies for fast, Google-friendly and SEO optimised websites.
I am certified Web developer having 12+ years of quality experience in designing, developing, debugging, updating and publishing attractive, efficient and easy to navigate Responsive E-commerce Websites.
My prime focus is to Guide people to Live their Dreams. I will help in "How to think and not what to think", I will be able to provide solutions for your Design or UI/UX related challenges.
Also I have experience in developing custom plugins as per the requirements and can also assist you in customisation tasks as well.
One of the key success factors in building a professional E-Commerce Website, is modern design combined with user friendly architecture that functions properly on any device. If these factors are not executed effectively, your customers won't trust you.
With more than 12 years of experience, i am ready to dig deep into your goals and needs and provide you with full development support at each step of the way.
Don't give your business and sales to just any developer!
What we need:
1-Logo
2- Website Name and URL
3- Categories, Sub categories name and some nice images to create banners
4- About us, Payment, Shipping, Returns, Contact us etc pages content
5- Cpanel Details (Website Hosting login details with SSH access)
The Process of development-
- Send your initial design and brief that your specific business requires so we can create the website to match your aims and aspirations.
- To provide the best user experience, we use initial mock ups and UX designs to produce an overview of how the website will look.
- To provide customer satisfaction, we allow unlimited revisions of the design
- Then our amazing team converts the approved designs into a functional website that provides all the services which are required to produce the most efficient business available
- Finally, an overall review that allows for revisions to make sure that the website matches your standards and is fully operational for customers.
- Then we provide a full summary on how to use the website and it we be all yours to operate and manage
Report this OfferReviews (92)
ecommerce website design nz|our back-end developer David shared a method today, how to build a payments system with React and Stripe to your own company website.
Marketplace • full stack developer Kevin wrote the post • 0 comments • 584 views • 2020-04-06 00:05
Whether you’re implementing a subscription-based service, an e-commerce store, or a crowdfunding solution, Stripe offers the flexibility to get it done. We’re going to build a small proof-of-concept payments system to enable one-time purchases on a website.
By the end of this tutorial, you should be able to set up a backend and frontend for processing online payments in your React app.
Requirements to follow along
This tutorial requires that you have the following:
Node installed on your computer
A Stripe developer account
Basic knowledge of Express
Basic knowledge of React Hooks
If you do not have Node installed, you can get the latest version from the official website. All the code written in this tutorial can be accessed here.
Stripe setup
If you do not have a Stripe developer account, you can get started for free by signing up for an account here. After signing up, complete the following steps to get set up:
Select Developer integrations on the How do you want to get started? modal
Select Accept payments only on the next modal
Check the One-time payments option on the next modal
Finally, check Build a custom payment flow on the last modal
You should now have a base account set up. You can update the name of the account by clicking the Add a name link at the top left of the page.
You’ll need to copy your Publishable and Secret keys from the dashboard and store them somewhere, because we’ll need them very soon.
Building the payment server
Before we go ahead with building the React app, we’ll need to set up a server to handle payment requests.
We’ll need to set up a RESTful endpoint on an Express server, which will act as a middleman between our React code and the Stripe backend. If you’ve never built an API before, don’t worry, it’ll be pretty basic as we’re not implementing a production-ready backend here.
Let’s get started.
Create a new project folder and name it whatever you want (I’m going with react-stripe-payment)
Open your terminal in the folder and run npm init -y
Install the dependencies by running npm install express dotenv body-parser stripe
Create a folder src under the root folder by running mkdir src
server.js
Let’s create the server to listen for payment requests. Create a new file called server.js under the src folder and paste the following in it:const path = require('path')
const express = require('express')
const bodyParser = require('body-parser')
const postCharge = require('./stripe')
require('dotenv').config()
const app = express()
const router = express.Router()
const port = process.env.PORT || 7000
router.post('/stripe/charge', postCharge)
router.all('*', (_, res) =>
res.json({ message: 'please make a POST request to /stripe/charge' })
)
app.use((_, res, next) => {
res.header('Access-Control-Allow-Origin', '*')
res.header(
'Access-Control-Allow-Headers',
'Origin, X-Requested-With, Content-Type, Accept'
)
next()
})
app.use(bodyParser.json())
app.use('/api', router)
app.use(express.static(path.join(__dirname, '../build')))
app.get('*', (_, res) => {
res.sendFile(path.resolve(__dirname, '../build/index.html'))
})
app.listen(port, () => console.log(`server running on port ${port}`))
Let’s break down this file section by section.
const path = require('path')
const express = require('express')
const bodyParser = require('body-parser')
const postCharge = require('./stripe')
require('dotenv').config()
Here, we’re importing the required packages. You’ll notice that they are all third-party imports except for postCharge, which is being imported from a file called stripe. We’ll create that file later.
dotenv allows us to read sensitive information from the Node process so we don’t have to hardcode secret values in our code.const app = express()
const router = express.Router()
const port = process.env.PORT || 7000
We’re initializing a new Express instance into a variable called app. We then create a new Router instance and store it in a variable called router. This is what we’ll use to define the payment endpoint.
Finally, we initialize a new variable called port and assign it a value from the Node process (process.env.PORT), and if that is undefined, it is assigned 7000.router.post('/stripe/charge', postCharge)
router.all('*', (_, res) =>
res.json({ message: 'please make a POST request to /stripe/charge' })
)
app.use((_, res, next) => {
res.header('Access-Control-Allow-Origin', '*')
res.header(
'Access-Control-Allow-Headers',
'Origin, X-Requested-With, Content-Type, Accept'
)
next()
})
app.use(bodyParser.json())
app.use('/api', router)
app.use(express.static(path.join(__dirname, '../build')))
Remember the router we initialized earlier? On the first line, we set up an endpoint called /stripe/charge and assign postCharge to handle all POST requests to this route.
We then catch all other requests to the server and respond with a JSON object containing a message directing the user to the appropriate endpoint.
Next, we define a middleware on the app instance to enable CORS for all requests. On the next line, we attach another middleware that enables us to parse JSON objects from the request body.
Then we tell our app instance to use the router instance to handle all requests to the /api endpoint. Finally, we tell Express to serve up the /build folder. This folder will hold the transpiled code for the app’s frontend.app.get('*', (_, res) => {
res.sendFile(path.resolve(__dirname, '../build/index.html'))
})
app.listen(port, () => console.log(`server running on port ${port}`))
Here, we’re telling the app instance to handle all GET requests by serving the index.html file located in the /build folder. This is how we’ll serve the frontend in production.
Finally, we spin up the server on the port we defined earlier and log a message to the console on a successful startup.
stripe.js
We’ll then create the postCharge handler we required in server.js above. Under the src folder, create a new file, stripe.js, and paste the following in it:const stripe = require('stripe')(<your_secret_key>)
async function postCharge(req, res) {
try {
const { amount, source, receipt_email } = req.body
const charge = await stripe.charges.create({
amount,
currency: 'usd',
source,
receipt_email
})
if (!charge) throw new Error('charge unsuccessful')
res.status(200).json({
message: 'charge posted successfully',
charge
})
} catch (error) {
res.status(500).json({
message: error.message
})
}
}
module.exports = postCharge
Let’s break it down.const stripe = require('stripe')(<your_secret_key>)
Here, we initialize a new Stripe instance by requiring the stripe package and calling it with the secret key we copied earlier as a string. We save this instance in a variable called stripe.async function postCharge(req, res) {
try {
const { amount, source, receipt_email } = req.body
const charge = await stripe.charges.create({
amount,
currency: 'usd',
source,
receipt_email
})
We then create a new function called postCharge. This function is a request handler, so we have to take in two parameters: req and res.
We then open a try catch block inside this function. We destructure all the variables we’re expecting to be sent along with the request from the request object; in this case, those variables are amount, source, and receipt_email.
We then create a new variable called charge. This variable holds the result of an asynchronous call to the Stripe API to create a new charge (stripe.charges.create).if (!charge) throw new Error('charge unsuccessful')
If the result of the Stripe call is a falsy value — undefined, in this case — it means our payment request failed, and so we throw a new error with the message “charge unsuccessful.”
res.status(200).json({
message: 'charge posted successfully',
charge
})
Otherwise, we respond to the request with a 200 status code and a JSON object containing a message and the charge object.
} catch (error) {
res.status(500).json({
message: error.message
})
}
}
module.exports = postCharge
In the catch block, we intercept all other errors and send them to the client with a 500 status code and a message containing the error message.
At the end of the file, we export the postCharge function using module.exports.
That is all there is to the payment server. Of course, this isn’t production-ready and should not be used in a real application processing real payments, but it is enough for our current use case. Let’s move on to the frontend.
Building the frontend
Since we’re done building the payments server, it’s time to flesh out the frontend. It’s not going to be anything fancy since I’m trying to keep this tutorial bite-sized. Here are the different components of the app:
A router component
A products list component
A checkout form component
Let’s get started.
Run the following command to install the required packages:
npm install axios babel-polyfill history parcel parcel-bundler react react-dom react-router-dom react-stripe-elements
In the project root, run the following command:
mkdir public && touch public/index.html
This will create a folder called public and create an index.html file in this new folder. Open the index.html file and paste the following:<!DOCTYPE html>
<html lang="en">
<head>
<meta charset="utf-8" />
<meta name="viewport" content="width=device-width, initial-scale=1" />
<meta name="description" content="React + Stripe" />
<title>React and Stripe Payment</title>
</head>
<body>
<noscript>You need to enable JavaScript to run this app.</noscript>
<div id="root"></div>
<script src="https://js.stripe.com/v3/"></script>
<script src="../src/index.js"></script>
</body>
</html>
If you’re already familiar with React, this should be nothing new; this is simply the entry point of our app. Also notice that we import the Stripe SDK in the first <script> tag — the Stripe SDK import must come before our own code.
Inside the src folder, run the following command:
touch src/index.js && touch src/products.js
Open index.js and paste the following:import React from 'react'
import ReactDOM from 'react-dom'
import App from './components/App'
import 'babel-polyfill'
const rootNode = document.querySelector('#root')
ReactDOM.render(<App />, rootNode)
Now we need to get the list of products from somewhere. Usually, this would be from a database or some API, but for this simple use case, we can just hardcode two or three products in a JavaScript file. This is why we need products.js. Open it and paste the following:export const products = [
{
name: 'Rubber Duck',
desc: `Rubber ducks can lay as many eggs as the best chicken layers, and they
are fun to watch with their antics in your backyard, your barnyard, or
your pond.`,
price: 9.99,
img:
'https://encrypted-tbn0.gstatic.com/images?q=tbn%3AANd9GcSqkN8wkHiAuT2FQ14AsJFgihZDzKmS6OHQ6eMiC63rW8CRDcbK',
id: 100
},
{
name: 'Chilli Sauce',
desc: `This Chilli Sauce goes well with some nice roast rubber duck. Flavored with
the best spices and the hottest chillis, you can rest assured of a tasty Sunday
rubber roast.`,
price: 12.99,
img:
'https://encrypted-tbn0.gstatic.com/images?q=tbn%3AANd9GcRTREm1dEzdI__xc6O8eAz5-4s88SP-Gg9dWYMkBKltGMi84RW5',
id: 101
}
]
This is an array of products that are available for purchase. You can add as many as you like and then move on to creating the components.
Run the following command from the project root: mkdir src/components. This will create a new folder called components inside the src folder to hold our React components. Let’s go ahead and create the first component.
App.jsx
This is the root component and will be responsible for routing to the various pages we have in our app. Create a new file called App.jsx inside the components folder and paste in the following:import React, { useState } from 'react'
import { Router, Route, Switch } from 'react-router-dom'
import { createBrowserHistory } from 'history'
import Products from './Products'
import Checkout from './Checkout'
import { products } from '../products'
const history = createBrowserHistory()
const App = () => {
const [selectedProduct, setSelectedProduct] = useState(null)
return (
<Router history={history}>
<Switch>
<Route
exact
path="/"
render={() => (
<Products
products={products}
selectProduct={setSelectedProduct}
history={history}
/>
)}
/>
<Route
path="/checkout"
render={() => (
<Checkout
selectedProduct={selectedProduct}
history={history}
/>
)}
/>
</Switch>
</Router>
)
}
export default App
Let’s break it down.import React, { useState } from 'react'
import { Router, Route, Switch } from 'react-router-dom'
import { createBrowserHistory } from 'history'
import Products from './Products'
import Checkout from './Checkout'
import { products } from '../products'
const history = createBrowserHistory()
This first part is just a bunch of dependency imports. The first three imports are required for any single-page React application. The next two imports are custom components that we’ll write later on. The last import is the hardcoded products we created earlier. We’ll pass it down as a prop to the Products component.
Finally, we create a new history instance from the history package and save it in a variable aptly named history.const App = () => {
const [selectedProduct, setSelectedProduct] = useState(null)
return (
<Router history={history}>
<Switch>
<Route
exact
path="/"
render={() => (
<Products
products={products}
selectProduct={setSelectedProduct}
history={history}
/>
)}
/>
<Route
path="/checkout"
render={() => (
<Checkout
selectedProduct={selectedProduct}
history={history}
/>
)}
/>
</Switch>
</Router>
)
}
export default App
We then create a new functional component called App. App has a state variable called selectedProduct, which holds the product currently selected to be purchased.
We return a Router instance that defines all the routes and their respective components.
In the first route, /, we render the Products component and pass in three props: the list of hardcoded products, a function to set a product in the App state, and the history object to enable us to navigate to new pages without breaking the browser history.
In the second route, /checkout, we render the Checkout component and pass in a couple props: the currently selected product and the history object.
At the end of the file, we export the App component as the default export.
Products.jsx
This component is responsible for rendering the list of products to the DOM, and it’s fairly simple. Create a new file called Products.jsx in the components folder and paste in the following:import React from 'react'
import './Products.scss'
const Products = ({ products, selectProduct, history }) => {
const handlePurchase = prod => () => {
selectProduct(prod)
history.push('/checkout')
}
return products.map(prod => (
<div className="product" key={prod.id}>
<section>
<h2>{prod.name}</h2>
<p>{prod.desc}</p>
<h3>{'$' + prod.price}</h3>
<button type="button" onClick={handlePurchase(prod)}>
PURCHASE
</button>
</section>
<img src={prod.img} alt={prod.name} />
</div>
))
}
export default Products
Note: You can get the Products.scss contents from here.
Let’s break it down.const Products = ({ products, selectProduct, history }) => {
const handlePurchase = prod => () => {
selectProduct(prod)
history.push('/checkout')
}
We start off defining a functional component that takes in three props:
products
selectProduct
history
products is the array of products we hardcoded earlier. We’ll be mapping over this array later on to render the individual products to the DOM.
selectProduct is a function that takes in a single product object. It updates the App component’s state to hold this product so that the Checkout component can access it through its props.
history is the history object that will allow us to navigate to other routes safely.
Then we define the handlePurchase function, which will be called when a user wants to purchase a certain product. It takes in a single parameter, prod, and calls selectProduct with this parameter. After calling selectProduct, it then navigates to the /checkout route by calling history.push.return products.map(prod => (
<div className="product" key={prod.id}>
<section>
<h2>{prod.name}</h2>
<p>{prod.desc}</p>
<h3>{'$' + prod.price}</h3>
<button type="button" onClick={handlePurchase(prod)}>
PURCHASE
</button>
</section>
<img src={prod.img} alt={prod.name} />
</div>
))
}
export default Products
It’s time to render the products to the DOM. We map over the products array and, for each product in the array, return a bunch of JSX. The JSX should be pretty straightforward and will result in the following image being painted in the screen:
Checkout.jsx
Next, we want to create the checkout page where the user will be routed to when they click on the PURCHASE button on a product.
Create a Checkout.jsx file under the components folder and paste the following in it:import React, { useEffect } from 'react'
import { StripeProvider, Elements } from 'react-stripe-elements'
import CheckoutForm from './CheckoutForm'
const Checkout = ({ selectedProduct, history }) => {
useEffect(() => {
window.scrollTo(0, 0)
}, [])
return (
<StripeProvider apiKey="pk_test_UrBUzJWPNse3I03Bsaxh6WFX00r6rJ1YCq">
<Elements>
<CheckoutForm selectedProduct={selectedProduct} history={history} />
</Elements>
</StripeProvider>
)
}
export default Checkout
This is when we begin to bring Stripe into the mix. In the second line, we’re importing something called StripeProvider and another thing called Elements from the react-stripe-elements package we installed at the beginning of this section.
StripeProvider is required for our app to have access to the Stripe object, and any component that interacts with the Stripe object must be a child of StripeProvider.
Elements is a React component that wraps around the actual checkout form. It helps group the set of Stripe Elements (more on this in a bit) together and makes it easy to tokenize all the data from each Stripe Element.
The Checkout component itself is fairly simple. It takes in two props, selectedProduct and history, which it passes on to a CheckoutForm component we’ll create next.
There’s also a useEffect call that scrolls the document to the top when the page mounts for the first time. This is necessary because react-router-dom preserves the previous scroll state when you switch routes.
Also notice that we’re passing a prop, apiKey, to StripeProvider. This key is the publishable key you copied earlier when setting up Stripe. Note that this prop is required because it serves as a way to authenticate your application to the Stripe servers.
CheckoutForm.jsx
This is the last component we’ll be creating, and it’s also the most important. The CheckoutForm component will hold the inputs for getting the user’s card details as well as actually making a call to the backend to process the payment charge.
Create a new file called CheckoutForm.jsx inside the components directory. We’re going to go through the content of this file section by section.import React, { useState } from 'react'
import { Link } from 'react-router-dom'
import {
CardNumberElement,
CardExpiryElement,
CardCVCElement,
injectStripe
} from 'react-stripe-elements'
import axios from 'axios'
import './CheckoutForm.scss'
...to be continued below...
First, we import the required packages we’ll be working with into the file. Notice the imports from the react-stripe-elements package. This is a good time to talk more about Stripe Elements.
Stripe Elements are a set of prebuilt UI elements that allow you to collect your user’s card information without managing such sensitive information yourself.
The react-stripe-elements package is a wrapper for Stripe Elements that exposes these elements as React components you can just plug into your app — no need to create them from scratch.
We are importing some of these components into this file along with a HOC component, injectStripe.
injectStripe basically takes the Stripe object initialized in the StripeProvider component and “injects” the object into any component wrapped with it. This is how we’ll get access to the Stripe Object.
We then import a package called axios. Axios is just a promise-based HTTP client for the browser that we’re going to use to communicate with our payments server.
You can get the contents of CheckoutForm.scss from here.
...continued...const CheckoutForm = ({ selectedProduct, stripe, history }) => {
if (selectedProduct === null) history.push('/')
const [receiptUrl, setReceiptUrl] = useState('')
const handleSubmit = async event => {
event.preventDefault()
const { token } = await stripe.createToken()
const order = await axios.post('http://localhost:7000/api/stripe/charge', {
amount: selectedProduct.price.toString().replace('.', ''),
source: token.id,
receipt_email: '[email protected]'
})
setReceiptUrl(order.data.charge.receipt_url)
}
...to be continued...
Next up is the actual CheckoutForm component itself. It takes in three props:
selectedProduct
stripe
history
selectedProduct is the product the user clicked on to purchase. It’s coming from the root App component’s state and is being passed down as props.
stripe is the actual Stripe object that is being “injected” as a prop by the injectStripe HOC we imported. You already know what history does.
The first thing we do in the component is check whether selectedProduct actually exists. If it doesn’t, we route the user to the homepage. In a production-grade app, this would probably be handled by a route guard HOC.
We then define a new piece of state to hold the receipt URL for successful payments. It will initially be empty.
Next, we define a function called handleSubmit, which will be called when the checkout form is submitted (i.e., when the Pay button is clicked). Let’s go through this function.
Firstly, we prevent the default behavior of the form element so that the page doesn’t refresh.
Then we destructure a token value from the result of an async call to stripe.createToken. createToken tokenizes the card information from the form and sends it to the Stripe server. It then returns a token object, where you can get a token.id value as an alias for the actual card info. This ensures that you never actually send the user’s card details to your payment server.
Secondly, we make an HTTP POST request to localhost:7000/api/stripe/charge with a request body containing three things:
amount
source
receipt_email
amount is the price of the item being purchased. We have to convert it to a string and remove all special characters like “.” and “,”. This means that a cost of $9.99 will get sent to the payment server as 999.
source is where the payment will be charged. In our case, it will be the ID of the token we just generated.
receipt_email is where the receipt of the payment will be sent. It is usually the customer’s email address, but in our case, we’re just hardcoding it because, again, we’re not implementing authentication.
After the request is done, we grab the URL of the receipt from the response object and set it to state. This is assuming that there are no errors, so in a production-grade app, you would usually implement error handling.
...continued...if (receiptUrl) {
return (
<div className="success">
<h2>Payment Successful!</h2>
<a href={receiptUrl}>View Receipt</a>
<Link to="/">Home</Link>
</div>
)
}
...to be continued...
Immediately after the handleSubmit function, we have an if check to see if there’s a receiptUrl in the state. If there is, we want to render a div containing a success message and a link to view the receipt as well as a link back to the homepage.
...continued...
return (
<div className="checkout-form">
<p>Amount: ${selectedProduct.price}</p>
<form onSubmit={handleSubmit}>
<label>
Card details
<CardNumberElement />
</label>
<label>
Expiration date
<CardExpiryElement />
</label>
<label>
CVC
<CardCVCElement />
</label>
<button type="submit" className="order-button">
Pay
</button>
</form>
</div>
)
}
export default injectStripe(CheckoutForm)
Otherwise, we’re going to render the actual checkout form. We’re using the prebuilt Elements components instead of recreating them from scratch and having to manage sensitive information.
At the end of this file, we wrap the CheckoutForm component in the injectStripe HOC so that we have access to the Stripe object we use in the component.
Testing our app
Let’s go through what we’ve accomplished so far.
We’ve created a payments server that communicates with Stripe
We’ve created a homepage to list our products
We’ve created a checkout page to capture the user’s payment details
We’ve created a handleSubmit function to send a request to the server to process a payment charge
We just about have everything set up, so it’s time to actually run our app and see if we’re able to purchase a Rubber Duck. We have to add our scripts first, so open the package.json file and replace the “scripts” section with the following:"scripts": {
"build": "parcel build public/index.html --out-dir build --no-source-maps",
"dev": "node src/server.js & parcel public/index.html",
"start": "node src/server.js"
},
Open your terminal and run npm run dev. This should start the payments server and expose the frontend on port 1234. Open your browser, navigate to http://localhost:1234, and follow the steps below:
Click on the PURCHASE button on any product
In the checkout page, fill in 4242 4242 4242 4242 for the Card details field
Fill in any expiration date and choose a random CVC value
Click on Pay
If everything goes well, you should see a Payment Successful message with links to view your receipt and go back to the homepage.
To confirm payment, log in to your Stripe dashboard, click on Payments, and you should see your payment there.
If your company website using WooCommerce codes , you can use WooCommerce Stripe Payment Gateway Plugin
Woocommerce Stripe payment gateway enables you to accept payments from customers directly onsite. Customers can purchase their items, select stripe as their checkout option, and be able to pay quite easily with their credit cards.
Stripe takes care of processing the payment (for a little fee) and securing the customer’s financial details, thus giving customers both ease of use and security.
This guide will show you all the steps you need to integrate Stripe with WooCommerce using the WooCommerce Stripe Payment Gateway plugin. We assume you already have a Stripe account. If not, create one, and then go on to activate it.
Also, if you want to avoid all the work, we can help you setup and test Stripe in your WooCommerce store. Simply request our service and we will get to work on it.
Step 1. Installing the WooCommerce Stripe Payment Gateway plugin
To install the plugin, login to your WordPress Dashboard and go to “Plugins > Add New”
Add New Plugin - WooCommerce Stripe Payment Integration
Type in “WooCommerce Stripe Payment Gateway” in the search bar. When the plugin appears, click Install Now and wait for the installation to complete. Next click Activate.
Note: Ensure you install the WooCommerce Stripe plugin designed by WooCommerce.
Install and activate WooCommerce Stripe Payment Gateway
After activating the plugin, go to WooCommerce > Settings.
Go to Settings - WooCommerce Stripe Payment Integration
Next, switch to the “Checkout” tab. If you have correctly activated the WooCommerce Stripe plugin, “Stripe” should now appear among the options. Click on it.
Step 2. Setting Up Stripe Payment Options
In this step, we are going to set up the various options needed to activate and configure stripe for your website.
First click “Enable Stripe” to activate this payment option.
Next, setup your Title and Description. These would determine what users see during checkout. The default values may be good enough, or you can adjust as you see fit.
Set the description - WooCommerce Stripe Payment Integration
Since we want to try it out in test mode first, tick the “Enable Test Mode” option. Next, login to your stripe account and click API.
Switch to test mode with the toggle button, and copy the test “Publishable” and “Secret” keys into the corresponding fields in your stripe plugin.
Copy test API keys - WooCommerce Stripe Payment Integration
In the Statement Descriptor input, enter a description that will appear in the transaction statement. In the example below, this is “FixRunner Web Services”.
Next, tick the “Capture Charge Immediately” option to ensure charges are processed and billed as soon as the customer checks out.
Enter settings - WooCommerce Stripe Payment Integration
Enabling Stripe Checkout
When the “Enable Stripe Checkout” option is ticked, users get a popup form requesting their financial details when they select stripe as payment method and click Continue To Payment. Enabling this option also gives you the ability to accept payments via Bitcoin.
To use this feature, tick “Enable Stripe Checkout”. Next, select your preferred language, and tick “Enable Bitcoin Currency” if you want to accept payments with Bitcoin.
If you want a custom image of your brand to appear on top of the Stripe checkout popup, enter the url of that image in the “Stripe Checkout Image” input box.
Enable Stripe Checkout - WooCommerce Stripe Payment Integration
When users opt to pay through Stripe, the payment popup will appear like this:
Payment with Stripe Checkout - WooCommerce Stripe Payment Integration
Enabling Apple Pay
Apple pay offers your customers a very simple way to checkout from their iOS devices. If you want to use this option, tick “Enable Apple Pay”
Next, select your button style, and enter the 2 letter code for the language you want Apple pay to be displayed in. You may leave it set to “en” for English, or click the link under that option to see the codes for other languages.
Apple pay settings - WooCommerce Stripe Payment Integration
Now go back to your stripe account and click Payments. In the payments page, select Apple Pay, and accept Apples terms of service.
Accept Apple Pay terms - WooCommerce Stripe Payment Integration
Next, click Add New Domain, and type in your domain name. Your WooCommerce Stripe plugin would take care of steps 2 and 3. Go on to click Add.
Add domain for Apple Pay - WooCommerce Stripe Payment Integration
Note: If you get an error that the file could not be found in your domain, go back, download the file in step 2, and upload it to the specified location in step 3. And then click Add.
After completing this step and saving the setting in your Plugin, Apple Pay would be seen in product, checkout, and other pages, when your site is accessed with a compatible iOS device.
Saving Details for Future Payments
If you would like to store customer financial details so you can use these for billing them in the future, tick the “Enable Payments Via Saved Cards” option.
Saving financial details - WooCommerce Stripe Payment Integration
Note that the financial details are not stored on your servers, but on Stripe’s servers, where all security measures are in place to protect this sensitive data.
For debugging purposes, you may also enable the “Log Debug Messages” option. This can be useful in finding out what went wrong if there are errors.
And that concludes your setup process. Click Save Changes to use the settings you have specified.
Step 3. Trying WooCommerce Stripe in Test Mode
In the setup above, we enabled test mode and used the test API details obtained from Stripe. This is useful to check if Stripe payment works properly before making it available to your customers.
Stripe provides test credit card details you can use for this purpose. In this example, we would be using the following details, and you should be able to use them too. If not, you can obtain other test card details.
Card number: 4242424242424242
Expiry: Any date after today
CVV: 789
Now, go to any of your products page, add the product to cart, and click View Cart. In the cart page, click Proceed to checkout.
Fill out the form with your information. At the bottom of the page, select “Stripe” as your payment method and click Continue to payment.
Next, enter the test financial details and click Pay #Amount.
Test payment - WooCommerce Stripe Payment Integration
You would be taken to an order confirmation page like the one below:
Payment confirmation - WooCommerce Stripe Payment Integration
Congratulations! Your WooCommerce Stripe payment option works!
The final step is to make this payment method available to customers.
Step 4. Activating Live Mode to begin processing real payments
To enable this payment method for your customers, you need to activate live mode.
In your WordPress dashboard, go to WooCommerce > Settings. Next, switch to the “Checkout” tab and click Stripe.
Uncheck the enable test mode option. When you do, the key input boxes will change to accept the live keys.
Switch to live mode - WooCommerce Stripe Payment Integration
Now login go to your stripe dashboard and click API. You should currently be in test mode.
Switch API to live - WooCommerce Stripe Payment Integration
To switch to live mode, click the Live/Test toggle switch. Next, copy your live Publishable and Secret keys into their input boxes in your WooCommerce Stripe Plugin.
Enter live keys - WooCommerce Stripe Payment Integration
Lastly, scroll down and click Save Changes. Customers can now make payments with Stripe on your website.
Note: To be able to activate live mode, you must have ssl in your server (i.e. your domain should start with https), and you must have enabled the “Force secure checkout” option found in WooCommerce > Settings > Checkout.
If you do not have ssl, have your host add it for you, and then go on to enable secure checkout, and then live mode.
view all
Whether you’re implementing a subscription-based service, an e-commerce store, or a crowdfunding solution, Stripe offers the flexibility to get it done. We’re going to build a small proof-of-concept payments system to enable one-time purchases on a website.
By the end of this tutorial, you should be able to set up a backend and frontend for processing online payments in your React app.
Requirements to follow along
This tutorial requires that you have the following:
Node installed on your computer
A Stripe developer account
Basic knowledge of Express
Basic knowledge of React Hooks
If you do not have Node installed, you can get the latest version from the official website. All the code written in this tutorial can be accessed here.
Stripe setup
If you do not have a Stripe developer account, you can get started for free by signing up for an account here. After signing up, complete the following steps to get set up:
Select Developer integrations on the How do you want to get started? modal
Select Accept payments only on the next modal
Check the One-time payments option on the next modal
Finally, check Build a custom payment flow on the last modal
You should now have a base account set up. You can update the name of the account by clicking the Add a name link at the top left of the page.
You’ll need to copy your Publishable and Secret keys from the dashboard and store them somewhere, because we’ll need them very soon.
Building the payment server
Before we go ahead with building the React app, we’ll need to set up a server to handle payment requests.
We’ll need to set up a RESTful endpoint on an Express server, which will act as a middleman between our React code and the Stripe backend. If you’ve never built an API before, don’t worry, it’ll be pretty basic as we’re not implementing a production-ready backend here.
Let’s get started.
Create a new project folder and name it whatever you want (I’m going with react-stripe-payment)
Open your terminal in the folder and run npm init -y
Install the dependencies by running npm install express dotenv body-parser stripe
Create a folder src under the root folder by running mkdir src
server.js
Let’s create the server to listen for payment requests. Create a new file called server.js under the src folder and paste the following in it:
const path = require('path')

const express = require('express')

const bodyParser = require('body-parser')

const postCharge = require('./stripe')

require('dotenv').config()


const app = express()

const router = express.Router()

const port = process.env.PORT || 7000


router.post('/stripe/charge', postCharge)

router.all('*', (_, res) =>

  res.json({ message: 'please make a POST request to /stripe/charge' })

)

app.use((_, res, next) => {

  res.header('Access-Control-Allow-Origin', '*')

  res.header(

    'Access-Control-Allow-Headers',

    'Origin, X-Requested-With, Content-Type, Accept'

  )

  next()

})

app.use(bodyParser.json())

app.use('/api', router)

app.use(express.static(path.join(__dirname, '../build')))


app.get('*', (_, res) => {

  res.sendFile(path.resolve(__dirname, '../build/index.html'))

})


app.listen(port, () => console.log(`server running on port ${port}`))

Let’s break down this file section by section.


const path = require('path')

const express = require('express')

const bodyParser = require('body-parser')

const postCharge = require('./stripe')

require('dotenv').config()
Here, we’re importing the required packages. You’ll notice that they are all third-party imports except for postCharge, which is being imported from a file called stripe. We’ll create that file later.
dotenv allows us to read sensitive information from the Node process so we don’t have to hardcode secret values in our code.
const app = express()

const router = express.Router()

const port = process.env.PORT || 7000
We’re initializing a new Express instance into a variable called app. We then create a new Router instance and store it in a variable called router. This is what we’ll use to define the payment endpoint.
Finally, we initialize a new variable called port and assign it a value from the Node process (process.env.PORT), and if that is undefined, it is assigned 7000.
router.post('/stripe/charge', postCharge)

router.all('*', (_, res) =>

  res.json({ message: 'please make a POST request to /stripe/charge' })

)

app.use((_, res, next) => {

  res.header('Access-Control-Allow-Origin', '*')

  res.header(

    'Access-Control-Allow-Headers',

    'Origin, X-Requested-With, Content-Type, Accept'

  )

  next()

})

app.use(bodyParser.json())

app.use('/api', router)

app.use(express.static(path.join(__dirname, '../build')))
Remember the router we initialized earlier? On the first line, we set up an endpoint called /stripe/charge and assign postCharge to handle all POST requests to this route.
We then catch all other requests to the server and respond with a JSON object containing a message directing the user to the appropriate endpoint.
Next, we define a middleware on the app instance to enable CORS for all requests. On the next line, we attach another middleware that enables us to parse JSON objects from the request body.
Then we tell our app instance to use the router instance to handle all requests to the /api endpoint. Finally, we tell Express to serve up the /build folder. This folder will hold the transpiled code for the app’s frontend.
app.get('*', (_, res) => {

  res.sendFile(path.resolve(__dirname, '../build/index.html'))

})


app.listen(port, () => console.log(`server running on port ${port}`))
Here, we’re telling the app instance to handle all GET requests by serving the index.html file located in the /build folder. This is how we’ll serve the frontend in production.
Finally, we spin up the server on the port we defined earlier and log a message to the console on a successful startup.
stripe.js
We’ll then create the postCharge handler we required in server.js above. Under the src folder, create a new file, stripe.js, and paste the following in it:
const stripe = require('stripe')(<your_secret_key>)


async function postCharge(req, res) {

  try {

    const { amount, source, receipt_email } = req.body


    const charge = await stripe.charges.create({

      amount,

      currency: 'usd',

      source,

      receipt_email

    })


    if (!charge) throw new Error('charge unsuccessful')


    res.status(200).json({

      message: 'charge posted successfully',

      charge

    })

  } catch (error) {

    res.status(500).json({

      message: error.message

    })

  }

}
module.exports = postCharge
Let’s break it down.
const stripe = require('stripe')(<your_secret_key>)Here, we initialize a new Stripe instance by requiring the stripe package and calling it with the secret key we copied earlier as a string. We save this instance in a variable called stripe.
async function postCharge(req, res) {

  try {

    const { amount, source, receipt_email } = req.body


    const charge = await stripe.charges.create({

      amount,

      currency: 'usd',

      source,

      receipt_email

    })
We then create a new function called postCharge. This function is a request handler, so we have to take in two parameters: req and res.
We then open a try catch block inside this function. We destructure all the variables we’re expecting to be sent along with the request from the request object; in this case, those variables are amount, source, and receipt_email.
We then create a new variable called charge. This variable holds the result of an asynchronous call to the Stripe API to create a new charge (stripe.charges.create).
if (!charge) throw new Error('charge unsuccessful')

If the result of the Stripe call is a falsy value — undefined, in this case — it means our payment request failed, and so we throw a new error with the message “charge unsuccessful.”


res.status(200).json({

  message: 'charge posted successfully',

  charge

})

Otherwise, we respond to the request with a 200 status code and a JSON object containing a message and the charge object.


} catch (error) {

    res.status(500).json({

      message: error.message

    })

  }

}


module.exports = postCharge
In the catch block, we intercept all other errors and send them to the client with a 500 status code and a message containing the error message.
At the end of the file, we export the postCharge function using module.exports.
That is all there is to the payment server. Of course, this isn’t production-ready and should not be used in a real application processing real payments, but it is enough for our current use case. Let’s move on to the frontend.
Building the frontend
Since we’re done building the payments server, it’s time to flesh out the frontend. It’s not going to be anything fancy since I’m trying to keep this tutorial bite-sized. Here are the different components of the app:
A router component
A products list component
A checkout form component
Let’s get started.
Run the following command to install the required packages:
npm install axios babel-polyfill history parcel parcel-bundler react react-dom react-router-dom react-stripe-elements
In the project root, run the following command:
mkdir public && touch public/index.html
This will create a folder called public and create an index.html file in this new folder. Open the index.html file and paste the following:
<!DOCTYPE html>

<html lang="en">

  <head>

    <meta charset="utf-8" />

    <meta name="viewport" content="width=device-width, initial-scale=1" />

    <meta name="description" content="React + Stripe" />

    <title>React and Stripe Payment</title>

  </head>

  <body>

    <noscript>You need to enable JavaScript to run this app.</noscript>

    <div id="root"></div>

    <script src="https://js.stripe.com/v3/"></script>

    <script src="../src/index.js"></script>

  </body>

</html>
If you’re already familiar with React, this should be nothing new; this is simply the entry point of our app. Also notice that we import the Stripe SDK in the first <script> tag — the Stripe SDK import must come before our own code.
Inside the src folder, run the following command:
touch src/index.js && touch src/products.js
Open index.js and paste the following:
import React from 'react'

import ReactDOM from 'react-dom'

import App from './components/App'

import 'babel-polyfill'


const rootNode = document.querySelector('#root')

ReactDOM.render(<App />, rootNode)
Now we need to get the list of products from somewhere. Usually, this would be from a database or some API, but for this simple use case, we can just hardcode two or three products in a JavaScript file. This is why we need products.js. Open it and paste the following:
export const products = [

  {

    name: 'Rubber Duck',

    desc: `Rubber ducks can lay as many eggs as the best chicken layers, and they

  are fun to watch with their antics in your backyard, your barnyard, or

  your pond.`,

    price: 9.99,

    img:

      'https://encrypted-tbn0.gstatic.com/images?q=tbn%3AANd9GcSqkN8wkHiAuT2FQ14AsJFgihZDzKmS6OHQ6eMiC63rW8CRDcbK',

    id: 100

  },

  {

    name: 'Chilli Sauce',

    desc: `This Chilli Sauce goes well with some nice roast rubber duck. Flavored with

    the best spices and the hottest chillis, you can rest assured of a tasty Sunday

    rubber roast.`,

    price: 12.99,

    img:

      'https://encrypted-tbn0.gstatic.com/images?q=tbn%3AANd9GcRTREm1dEzdI__xc6O8eAz5-4s88SP-Gg9dWYMkBKltGMi84RW5',

    id: 101

  }

]
This is an array of products that are available for purchase. You can add as many as you like and then move on to creating the components.
Run the following command from the project root: mkdir src/components. This will create a new folder called components inside the src folder to hold our React components. Let’s go ahead and create the first component.
App.jsx
This is the root component and will be responsible for routing to the various pages we have in our app. Create a new file called App.jsx inside the components folder and paste in the following:
import React, { useState } from 'react'

import { Router, Route, Switch } from 'react-router-dom'

import { createBrowserHistory } from 'history'

import Products from './Products'

import Checkout from './Checkout'

import { products } from '../products'


const history = createBrowserHistory()


const App = () => {

  const [selectedProduct, setSelectedProduct] = useState(null)


  return (

    <Router history={history}>

      <Switch>

        <Route

          exact

          path="/"

          render={() => (

            <Products

              products={products}

              selectProduct={setSelectedProduct}

              history={history}

            />

          )}

        />

        <Route

          path="/checkout"

          render={() => (

            <Checkout

              selectedProduct={selectedProduct}

              history={history}

            />

          )}

        />

      </Switch>

    </Router>

  )

}
export default App
Let’s break it down.
import React, { useState } from 'react'

import { Router, Route, Switch } from 'react-router-dom'

import { createBrowserHistory } from 'history'

import Products from './Products'

import Checkout from './Checkout'

import { products } from '../products'


const history = createBrowserHistory()
This first part is just a bunch of dependency imports. The first three imports are required for any single-page React application. The next two imports are custom components that we’ll write later on. The last import is the hardcoded products we created earlier. We’ll pass it down as a prop to the Products component.
Finally, we create a new history instance from the history package and save it in a variable aptly named history.
const App = () => {

  const [selectedProduct, setSelectedProduct] = useState(null)


  return (

    <Router history={history}>

      <Switch>

        <Route

          exact

          path="/"

          render={() => (

            <Products

              products={products}

              selectProduct={setSelectedProduct}

              history={history}

            />

          )}

        />

        <Route

          path="/checkout"

          render={() => (

            <Checkout

              selectedProduct={selectedProduct}

              history={history}

            />

          )}

        />

      </Switch>

    </Router>

  )

}
export default App
We then create a new functional component called App. App has a state variable called selectedProduct, which holds the product currently selected to be purchased.
We return a Router instance that defines all the routes and their respective components.
In the first route, /, we render the Products component and pass in three props: the list of hardcoded products, a function to set a product in the App state, and the history object to enable us to navigate to new pages without breaking the browser history.
In the second route, /checkout, we render the Checkout component and pass in a couple props: the currently selected product and the history object.
At the end of the file, we export the App component as the default export.
Products.jsx
This component is responsible for rendering the list of products to the DOM, and it’s fairly simple. Create a new file called Products.jsx in the components folder and paste in the following:
import React from 'react'

import './Products.scss'


const Products = ({ products, selectProduct, history }) => {

  const handlePurchase = prod => () => {

    selectProduct(prod)

    history.push('/checkout')

  }


  return products.map(prod => (

    <div className="product" key={prod.id}>

      <section>

        <h2>{prod.name}</h2>

        <p>{prod.desc}</p>

        <h3>{'$' + prod.price}</h3>

        <button type="button" onClick={handlePurchase(prod)}>

          PURCHASE

        </button>

      </section>

      <img src={prod.img} alt={prod.name} />

    </div>

  ))

}
export default Products
Note: You can get the Products.scss contents from here.
Let’s break it down.
const Products = ({ products, selectProduct, history }) => {

  const handlePurchase = prod => () => {

    selectProduct(prod)

    history.push('/checkout')

  }
We start off defining a functional component that takes in three props:
products
selectProduct
history
products is the array of products we hardcoded earlier. We’ll be mapping over this array later on to render the individual products to the DOM.
selectProduct is a function that takes in a single product object. It updates the App component’s state to hold this product so that the Checkout component can access it through its props.
history is the history object that will allow us to navigate to other routes safely.
Then we define the handlePurchase function, which will be called when a user wants to purchase a certain product. It takes in a single parameter, prod, and calls selectProduct with this parameter. After calling selectProduct, it then navigates to the /checkout route by calling history.push.
return products.map(prod => (

    <div className="product" key={prod.id}>

      <section>

        <h2>{prod.name}</h2>

        <p>{prod.desc}</p>

        <h3>{'$' + prod.price}</h3>

        <button type="button" onClick={handlePurchase(prod)}>

          PURCHASE

        </button>

      </section>

      <img src={prod.img} alt={prod.name} />

    </div>

  ))

}
export default Products
It’s time to render the products to the DOM. We map over the products array and, for each product in the array, return a bunch of JSX. The JSX should be pretty straightforward and will result in the following image being painted in the screen:
Checkout.jsx
Next, we want to create the checkout page where the user will be routed to when they click on the PURCHASE button on a product.
Create a Checkout.jsx file under the components folder and paste the following in it:
import React, { useEffect } from 'react'

import { StripeProvider, Elements } from 'react-stripe-elements'

import CheckoutForm from './CheckoutForm'


const Checkout = ({ selectedProduct, history }) => {

  useEffect(() => {

    window.scrollTo(0, 0)

  }, [])


  return (

    <StripeProvider apiKey="pk_test_UrBUzJWPNse3I03Bsaxh6WFX00r6rJ1YCq">

      <Elements>

        <CheckoutForm selectedProduct={selectedProduct} history={history} />

      </Elements>

    </StripeProvider>

  )

}
export default Checkout
This is when we begin to bring Stripe into the mix. In the second line, we’re importing something called StripeProvider and another thing called Elements from the react-stripe-elements package we installed at the beginning of this section.
StripeProvider is required for our app to have access to the Stripe object, and any component that interacts with the Stripe object must be a child of StripeProvider.
Elements is a React component that wraps around the actual checkout form. It helps group the set of Stripe Elements (more on this in a bit) together and makes it easy to tokenize all the data from each Stripe Element.
The Checkout component itself is fairly simple. It takes in two props, selectedProduct and history, which it passes on to a CheckoutForm component we’ll create next.
There’s also a useEffect call that scrolls the document to the top when the page mounts for the first time. This is necessary because react-router-dom preserves the previous scroll state when you switch routes.
Also notice that we’re passing a prop, apiKey, to StripeProvider. This key is the publishable key you copied earlier when setting up Stripe. Note that this prop is required because it serves as a way to authenticate your application to the Stripe servers.
CheckoutForm.jsx
This is the last component we’ll be creating, and it’s also the most important. The CheckoutForm component will hold the inputs for getting the user’s card details as well as actually making a call to the backend to process the payment charge.
Create a new file called CheckoutForm.jsx inside the components directory. We’re going to go through the content of this file section by section.
import React, { useState } from 'react'

import { Link } from 'react-router-dom'

import {

  CardNumberElement,

  CardExpiryElement,

  CardCVCElement,

  injectStripe

} from 'react-stripe-elements'

import axios from 'axios'

import './CheckoutForm.scss'
...to be continued below...
First, we import the required packages we’ll be working with into the file. Notice the imports from the react-stripe-elements package. This is a good time to talk more about Stripe Elements.
Stripe Elements are a set of prebuilt UI elements that allow you to collect your user’s card information without managing such sensitive information yourself.
The react-stripe-elements package is a wrapper for Stripe Elements that exposes these elements as React components you can just plug into your app — no need to create them from scratch.
We are importing some of these components into this file along with a HOC component, injectStripe.
injectStripe basically takes the Stripe object initialized in the StripeProvider component and “injects” the object into any component wrapped with it. This is how we’ll get access to the Stripe Object.
We then import a package called axios. Axios is just a promise-based HTTP client for the browser that we’re going to use to communicate with our payments server.
You can get the contents of CheckoutForm.scss from here.
...continued...
const CheckoutForm = ({ selectedProduct, stripe, history }) => {

  if (selectedProduct === null) history.push('/')


  const [receiptUrl, setReceiptUrl] = useState('')


  const handleSubmit = async event => {

    event.preventDefault()


    const { token } = await stripe.createToken()


    const order = await axios.post('http://localhost:7000/api/stripe/charge', {

      amount: selectedProduct.price.toString().replace('.', ''),

      source: token.id,

      receipt_email: '[email protected]'

    })


    setReceiptUrl(order.data.charge.receipt_url)

  }
...to be continued...
Next up is the actual CheckoutForm component itself. It takes in three props:
selectedProduct
stripe
history
selectedProduct is the product the user clicked on to purchase. It’s coming from the root App component’s state and is being passed down as props.
stripe is the actual Stripe object that is being “injected” as a prop by the injectStripe HOC we imported. You already know what history does.
The first thing we do in the component is check whether selectedProduct actually exists. If it doesn’t, we route the user to the homepage. In a production-grade app, this would probably be handled by a route guard HOC.
We then define a new piece of state to hold the receipt URL for successful payments. It will initially be empty.
Next, we define a function called handleSubmit, which will be called when the checkout form is submitted (i.e., when the Pay button is clicked). Let’s go through this function.
Firstly, we prevent the default behavior of the form element so that the page doesn’t refresh.
Then we destructure a token value from the result of an async call to stripe.createToken. createToken tokenizes the card information from the form and sends it to the Stripe server. It then returns a token object, where you can get a token.id value as an alias for the actual card info. This ensures that you never actually send the user’s card details to your payment server.
Secondly, we make an HTTP POST request to localhost:7000/api/stripe/charge with a request body containing three things:
amount
source
receipt_email
amount is the price of the item being purchased. We have to convert it to a string and remove all special characters like “.” and “,”. This means that a cost of $9.99 will get sent to the payment server as 999.
source is where the payment will be charged. In our case, it will be the ID of the token we just generated.
receipt_email is where the receipt of the payment will be sent. It is usually the customer’s email address, but in our case, we’re just hardcoding it because, again, we’re not implementing authentication.
After the request is done, we grab the URL of the receipt from the response object and set it to state. This is assuming that there are no errors, so in a production-grade app, you would usually implement error handling.
...continued...
if (receiptUrl) {

    return (

      <div className="success">

        <h2>Payment Successful!</h2>

        <a href={receiptUrl}>View Receipt</a>

        <Link to="/">Home</Link>

      </div>

    )

  }
...to be continued...
Immediately after the handleSubmit function, we have an if check to see if there’s a receiptUrl in the state. If there is, we want to render a div containing a success message and a link to view the receipt as well as a link back to the homepage.
...continued...
return (

    <div className="checkout-form">

      <p>Amount: ${selectedProduct.price}</p>

      <form onSubmit={handleSubmit}>

        <label>

          Card details

          <CardNumberElement />

        </label>

        <label>

          Expiration date

          <CardExpiryElement />

        </label>

        <label>

          CVC

          <CardCVCElement />

        </label>

        <button type="submit" className="order-button">

          Pay

        </button>

      </form>

    </div>

  )

}
export default injectStripe(CheckoutForm)
Otherwise, we’re going to render the actual checkout form. We’re using the prebuilt Elements components instead of recreating them from scratch and having to manage sensitive information.
At the end of this file, we wrap the CheckoutForm component in the injectStripe HOC so that we have access to the Stripe object we use in the component.
Testing our app
Let’s go through what we’ve accomplished so far.
We’ve created a payments server that communicates with Stripe
We’ve created a homepage to list our products
We’ve created a checkout page to capture the user’s payment details
We’ve created a handleSubmit function to send a request to the server to process a payment charge
We just about have everything set up, so it’s time to actually run our app and see if we’re able to purchase a Rubber Duck. We have to add our scripts first, so open the package.json file and replace the “scripts” section with the following:
"scripts": {

    "build": "parcel build public/index.html --out-dir build --no-source-maps",

    "dev": "node src/server.js & parcel public/index.html",

    "start": "node src/server.js"

  },
Open your terminal and run npm run dev. This should start the payments server and expose the frontend on port 1234. Open your browser, navigate to http://localhost:1234, and follow the steps below:
Click on the PURCHASE button on any product
In the checkout page, fill in 4242 4242 4242 4242 for the Card details field
Fill in any expiration date and choose a random CVC value
Click on Pay
If everything goes well, you should see a Payment Successful message with links to view your receipt and go back to the homepage.
To confirm payment, log in to your Stripe dashboard, click on Payments, and you should see your payment there.
If your company website using WooCommerce codes , you can use WooCommerce Stripe Payment Gateway Plugin
Woocommerce Stripe payment gateway enables you to accept payments from customers directly onsite. Customers can purchase their items, select stripe as their checkout option, and be able to pay quite easily with their credit cards.
Stripe takes care of processing the payment (for a little fee) and securing the customer’s financial details, thus giving customers both ease of use and security.
This guide will show you all the steps you need to integrate Stripe with WooCommerce using the WooCommerce Stripe Payment Gateway plugin. We assume you already have a Stripe account. If not, create one, and then go on to activate it.
Also, if you want to avoid all the work, we can help you setup and test Stripe in your WooCommerce store. Simply request our service and we will get to work on it.
Step 1. Installing the WooCommerce Stripe Payment Gateway plugin
To install the plugin, login to your WordPress Dashboard and go to “Plugins > Add New”
Add New Plugin - WooCommerce Stripe Payment Integration
Type in “WooCommerce Stripe Payment Gateway” in the search bar. When the plugin appears, click Install Now and wait for the installation to complete. Next click Activate.
Note: Ensure you install the WooCommerce Stripe plugin designed by WooCommerce.
Install and activate WooCommerce Stripe Payment Gateway
After activating the plugin, go to WooCommerce > Settings.
Go to Settings - WooCommerce Stripe Payment Integration
Next, switch to the “Checkout” tab. If you have correctly activated the WooCommerce Stripe plugin, “Stripe” should now appear among the options. Click on it.
Step 2. Setting Up Stripe Payment Options
In this step, we are going to set up the various options needed to activate and configure stripe for your website.
First click “Enable Stripe” to activate this payment option.
Next, setup your Title and Description. These would determine what users see during checkout. The default values may be good enough, or you can adjust as you see fit.
Set the description - WooCommerce Stripe Payment Integration
Since we want to try it out in test mode first, tick the “Enable Test Mode” option. Next, login to your stripe account and click API.
Switch to test mode with the toggle button, and copy the test “Publishable” and “Secret” keys into the corresponding fields in your stripe plugin.
Copy test API keys - WooCommerce Stripe Payment Integration
In the Statement Descriptor input, enter a description that will appear in the transaction statement. In the example below, this is “FixRunner Web Services”.
Next, tick the “Capture Charge Immediately” option to ensure charges are processed and billed as soon as the customer checks out.
Enter settings - WooCommerce Stripe Payment Integration
Enabling Stripe Checkout
When the “Enable Stripe Checkout” option is ticked, users get a popup form requesting their financial details when they select stripe as payment method and click Continue To Payment. Enabling this option also gives you the ability to accept payments via Bitcoin.
To use this feature, tick “Enable Stripe Checkout”. Next, select your preferred language, and tick “Enable Bitcoin Currency” if you want to accept payments with Bitcoin.
If you want a custom image of your brand to appear on top of the Stripe checkout popup, enter the url of that image in the “Stripe Checkout Image” input box.
Enable Stripe Checkout - WooCommerce Stripe Payment Integration
When users opt to pay through Stripe, the payment popup will appear like this:
Payment with Stripe Checkout - WooCommerce Stripe Payment Integration
Enabling Apple Pay
Apple pay offers your customers a very simple way to checkout from their iOS devices. If you want to use this option, tick “Enable Apple Pay”
Next, select your button style, and enter the 2 letter code for the language you want Apple pay to be displayed in. You may leave it set to “en” for English, or click the link under that option to see the codes for other languages.
Apple pay settings - WooCommerce Stripe Payment Integration
Now go back to your stripe account and click Payments. In the payments page, select Apple Pay, and accept Apples terms of service.
Accept Apple Pay terms - WooCommerce Stripe Payment Integration
Next, click Add New Domain, and type in your domain name. Your WooCommerce Stripe plugin would take care of steps 2 and 3. Go on to click Add.
Add domain for Apple Pay - WooCommerce Stripe Payment Integration
Note: If you get an error that the file could not be found in your domain, go back, download the file in step 2, and upload it to the specified location in step 3. And then click Add.
After completing this step and saving the setting in your Plugin, Apple Pay would be seen in product, checkout, and other pages, when your site is accessed with a compatible iOS device.
Saving Details for Future Payments
If you would like to store customer financial details so you can use these for billing them in the future, tick the “Enable Payments Via Saved Cards” option.
Saving financial details - WooCommerce Stripe Payment Integration
Note that the financial details are not stored on your servers, but on Stripe’s servers, where all security measures are in place to protect this sensitive data.
For debugging purposes, you may also enable the “Log Debug Messages” option. This can be useful in finding out what went wrong if there are errors.
And that concludes your setup process. Click Save Changes to use the settings you have specified.
Step 3. Trying WooCommerce Stripe in Test Mode
In the setup above, we enabled test mode and used the test API details obtained from Stripe. This is useful to check if Stripe payment works properly before making it available to your customers.
Stripe provides test credit card details you can use for this purpose. In this example, we would be using the following details, and you should be able to use them too. If not, you can obtain other test card details.
Card number: 4242424242424242
Expiry: Any date after today
CVV: 789
Now, go to any of your products page, add the product to cart, and click View Cart. In the cart page, click Proceed to checkout.
Fill out the form with your information. At the bottom of the page, select “Stripe” as your payment method and click Continue to payment.
Next, enter the test financial details and click Pay #Amount.
Test payment - WooCommerce Stripe Payment Integration
You would be taken to an order confirmation page like the one below:
Payment confirmation - WooCommerce Stripe Payment Integration
Congratulations! Your WooCommerce Stripe payment option works!
The final step is to make this payment method available to customers.
Step 4. Activating Live Mode to begin processing real payments
To enable this payment method for your customers, you need to activate live mode.
In your WordPress dashboard, go to WooCommerce > Settings. Next, switch to the “Checkout” tab and click Stripe.
Uncheck the enable test mode option. When you do, the key input boxes will change to accept the live keys.
Switch to live mode - WooCommerce Stripe Payment Integration
Now login go to your stripe dashboard and click API. You should currently be in test mode.
Switch API to live - WooCommerce Stripe Payment Integration
To switch to live mode, click the Live/Test toggle switch. Next, copy your live Publishable and Secret keys into their input boxes in your WooCommerce Stripe Plugin.
Enter live keys - WooCommerce Stripe Payment Integration
Lastly, scroll down and click Save Changes. Customers can now make payments with Stripe on your website.
Note: To be able to activate live mode, you must have ssl in your server (i.e. your domain should start with https), and you must have enabled the “Force secure checkout” option found in WooCommerce > Settings > Checkout.
If you do not have ssl, have your host add it for you, and then go on to enable secure checkout, and then live mode.
ecommerce website design nz|Our Studio will design a brand identity system with website and content, $1,500 Full website design + Unique Logo + SEO
Marketplace • Jenks Santiago wrote the post • 0 comments • 481 views • 2020-04-01 05:12
About This service:
If you plan on starting your business, company or product. YOU DEFINITELY NEED THIS GIG!
Our studio will handle everything from website design to full branding (Logos & Stationaries) and also Search Engine Optimization (SEO). we are a one stop solution to everything digital and tech!
What you will get in this service:
Unique and responsive web design
Website customizations
High-Speed Loading time
Ecommerce Functionality
Highly secure from bugs and malware
Keywords Research
Schema Code Implementation
Search Console Implementation and Index in Google
Sitemap XML creation
Unique logo and stationaries
All Projects are Delivered within an Estimated Date
Continued Follow-Up Support After Project is Finished
You will never get bored working with US!
Our Portfolios:
view all
About This service:
If you plan on starting your business, company or product. YOU DEFINITELY NEED THIS GIG!
Our studio will handle everything from website design to full branding (Logos & Stationaries) and also Search Engine Optimization (SEO). we are a one stop solution to everything digital and tech!
What you will get in this service:
Unique and responsive web design
Website customizations
High-Speed Loading time
Ecommerce Functionality
Highly secure from bugs and malware
Keywords Research
Schema Code Implementation
Search Console Implementation and Index in Google
Sitemap XML creation
Unique logo and stationaries
All Projects are Delivered within an Estimated Date
Continued Follow-Up Support After Project is Finished
You will never get bored working with US!
Our Portfolios:
website designer auckland|I will create beautiful interactive websites
Marketplace • Jenks Santiago wrote the post • 0 comments • 446 views • 2020-04-01 05:06
About This Item:
I will provide custom unique UI designs for your website or app and write the deployment-ready code you.
A typical page design being the home, about, contact and one extra-page for whatever information you find relevant.
view all
About This Item:
I will provide custom unique UI designs for your website or app and write the deployment-ready code you.
A typical page design being the home, about, contact and one extra-page for whatever information you find relevant.